Diverter Valve Installed Backwards

The friendliest place on the web for anyone with an RV or an interest in RVing!
If you have answers, please help by responding to the unanswered posts.

youracman

Well-known member
Joined
Nov 17, 2015
Posts
332
Location
Denver, CO
Just a tip that may help others-

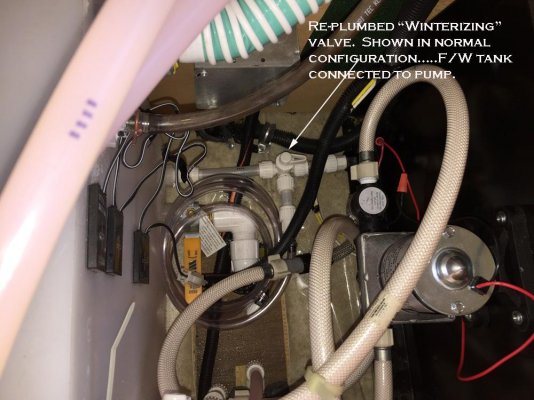
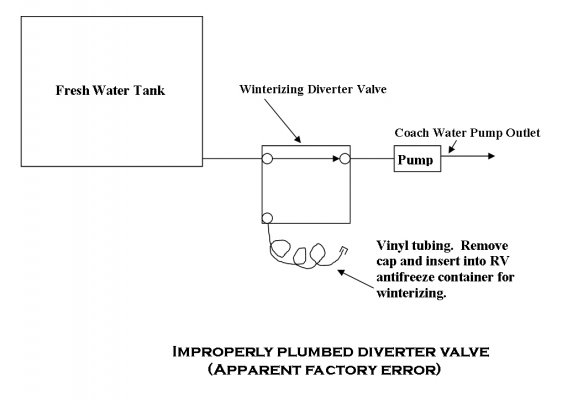
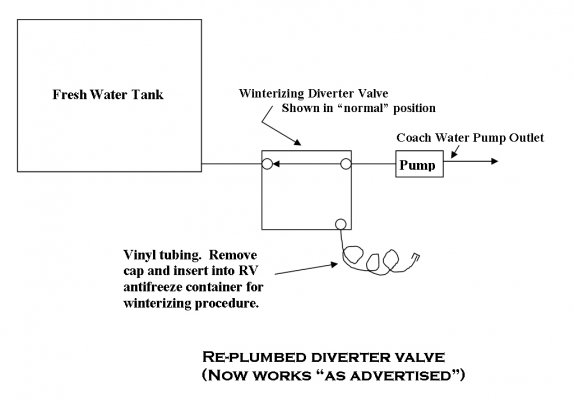
My new-to-me rig has lived all its former life in So California and had never been winterized.  We expect 20 degrees here in Denver Fri night so I proceeded do a cursory blow out of the lines then fill with the pink stuff via the pump diverter valve and hose.  I found that the valve was apparently installed backwards with the common port connected to the FW tank instead of the pump......so even when I pumped anti freeze into that special vinyl hose (using new a garden sprayer) it just got routed to the FW tank, not to the motor home pump.  No time to tear into that plumbing now (it's a bit "tight" in there) so I just added extra anti freeze to the FW tank and then let the motor home pump fill my lines lines from the FW tank (this one time) and that all worked fine.

SOooo if your pump won't pick up antifreeze via the special hose installed for that purpose, your diverter valve just may  be installed backwards too.  The valve is very symmetrical and all the connections are the same size so it would be easy to install backwards.  I don't believe there is any labeling on it either.  Obviously, this "diverter" function is not checked out at the WGO factory..........or by the dealer (why am I not surprised?)

Safe travels............... Ed S
 
This makes no sense to me. If the valve were installed backwards the pump would be unable to draw from the anti freeze container. Are you trying to force feed the system with the garden sprayer?
 
Yup, that's what happened, Roy.  The pump wouldn't draw from the anti freeze jug so I thought the (new) pump I installed this summer evidently was just a type of transfer pump with  no lift/suction capability (shoulda known better).....so I tried to give it some positive head using a new garden sprayer with anti freeze in it.............still no pink stuff coming out of any faucet even though the anti freeze was flowing out of the sprayer into that special tygon tubing line.  I FINALLY got a strong enough flashlight that I could see  anti freeze in the bottom of the (translucent) FW  tank ............. it got there by my force feeding technique; i.e., trying to feed the pump inlet, but no dice.....just went to the FW tank!  It just never dawned on me that the valve (installed backwards) could be the problem.....who would ever install one backwards?  lol

I'll get at it and re-plumb things when the weather abates a bit, but I know I am gonna find that the valve's common port is connected to the FW tank (s/b to the pump inlet) so the tank is connected to (a) the pump inlet or (b) the special anti freeze tygon/vinyl tubing line.

I'll take some pics at that time.

 
If it is backwards, can't you just turn the handle the opposite way?  The winterizing inlet and the tank inlet both feed the pump and the "diverter" just selects which one is active.
 
[quote author=Gary RV Roamer]
If it is backwards, can't you just turn the handle the opposite way?  [/quote]
Not if it's made like mine.  My pump has to be attached to the center leg of the "T" shaped diverter valve, else it acts just as the OP stated.
 
Gary RV Roamer said:
If it is backwards, can't you just turn the handle the opposite way?  The winterizing inlet and the tank inlet both feed the pump and the "diverter" just selects which one is active.

This one has positive handle stops at 90 degrees, Gary.  The way it is installed, normal operation is fine; i.e., the FW tank is connected to the pump inlet and the anti freeze hose is isolated.  When you turn it 90 degrees to draw in anti freeze as shown in the manual directions/photos, the FW tank and the anti freeze hose are connected...........and the pump inlet is isolated. 

More later, when I get the "surgery" (and my camera) in process.

I think mine was a "Monday Build"  :-[    Well shucks ........ not really, the rest of the rig is just great.  Everything works ....... knock on wood.
 
youracman said:
This one has positive handle stops at 90 degrees, Gary.  The way it is installed, normal operation is fine; i.e., the FW tank is connected to the pump inlet and the anti freeze hose is isolated.  When you turn it 90 degrees to draw in anti freeze as shown in the manual directions/photos, the FW tank and the anti freeze hose are connected...........and the pump inlet is isolated. 

More later, when I get the "surgery" (and my camera) in process.

I think mine was a "Monday Build"  :-[    Well shucks ........ not really, the rest of the rig is just great.  Everything works ....... knock on wood.
Yours sounds like a CAMCO winterizing kit.  That's the way theirs works.  The end of the valve marked with a "C" must attach to the pump input.

I also suspect the "kit" was installed by a previous owner, and not the factory.
 
Just bumping this thread back up to "close the loop" on my inoperative siphon tube (which is supposed to draw RV antifreeze into the water pump as an aid to winterizing.)

On a recent warmer day, I got down to the RV storage lot; removed the suspect winterizing valve and sure enough, it was plumbed wrong.  It has a "common" port, and it is absolutely directional; so the common port MUST be plumbed to the water pump.  Oddly, the valve has no marking whatsoever indicating which is the common port...........so it could be easily installed "backwards" (and it was).  I re-plumbed that installation and it now all works as it should.  I will attempt to attach a few pics/sketches.  Hopefully if you click on them they will enlarge enough to read the annotations.

My rig may be the only one ever plumbed at the factory with this valve switched "end for end" .... but I doubt it.  It is a well made little plastic (teflon?) valve ..... just says "THC" and "Made In Chile".  It really should have the "Com" port identified though IMHO.

The 2 PO's never realized anything was amiss, cuz the coach has lived in So Cal all its (previous) life and has never been winterized ............. until I brought it to Colorado.  All's well that ends well, in any event.

Best.............  ed s
 

Attachments

  • Winterize Valve.jpg
    Winterize Valve.jpg
    101.1 KB · Views: 22
  • Replumed Valve.jpg
    Replumed Valve.jpg
    104.5 KB · Views: 21
  • Winterize-Final.jpg
    Winterize-Final.jpg
    149.6 KB · Views: 19
  • Winterize-2 Final.jpg
    Winterize-2 Final.jpg
    156.5 KB · Views: 17
On edit:

If this article is of interest to you, you may have to work with the pics a bit.

When I opened my post above, I found that if I clicked on one of the attached pics, the image was MUCH too large and overfilled my screen.  Once that happened, I just held the "Ctl" button down while I tapped the (-) sign a couple of times to just fill the screen.  (Not a MAC)  If you overdo it, just hold "Ctl" down as you tap the (+) sign to enlarge. 

I will eventually figure out the best image size for posting in the future so that it will all come out right, perhaps, with a single click of an attached image.  I have been using a width of 1000 pixels.....needs to be smaller, methinks.  For us 85-yr-olds this is a bit challenging, ya know?  ;D  Suggestions welcome, of course.

Safe travels................  ed s
 

Latest posts

Forum statistics

Threads
131,981
Posts
1,388,584
Members
137,726
Latest member
CampMike2270
Back
Top Bottom