Norcold to residential fridge project

The friendliest place on the web for anyone with an RV or an interest in RVing!
If you have answers, please help by responding to the unanswered posts.
Mine sticks out 4" at the bottom,  closer to 2+at the top ...not a noticeable difference. I extend the floor of the compartment 1 inch out from the edge of the opening in order to support the front feet. At the handles,  it is 7 inches.
 
BinaryBob said:
...Here is a picture of charring at the top. I've seen pics here of worse, but it's still alarming.
As far as I'm concerned, any absorbed gas fridge (Nocold/Dometic) is a ticking fire bomb.  I should have gotten rid of mine years earlier.
 
Some progress. Slow, as I'm not retired yet.
Got the plumbing done.
Pic 6 is the existing waste line from the sink to the grey tank. Too tall for the future refrigerator base.
Since it's such tight quarters, a hacksaw cut seemed too irregular so I used my PVC cutters. The amount of reduction was too slight to risk damaging the existing pipe, so I replaced all the elbows. (pic 7)
Pic 8 is the finished job. Glory be! No leaks.....
Tomorrow is the new electrical outlet.
Wish I had more time to spend on this!
 

Attachments

  • IMG_06.JPG
    IMG_06.JPG
    108.3 KB · Views: 65
  • IMG_07.JPG
    IMG_07.JPG
    101 KB · Views: 54
  • IMG_08.JPG
    IMG_08.JPG
    111.3 KB · Views: 61
BinaryBob said:
..Since it's such tight quarters, a hacksaw cut seemed too irregular so I used my PVC cutters. ..
One of man's great inventions. I bought a pair of Klein PVC cutters years ago and have used them a bunch, I never use a hacksaw anymore if it will fit in the Kleins.
 
Lou Schneider said:
Don't forget to seal up the roof vent. 

You'll want to leave the rear access door as a way to get to the AC plug and water connection, just add some foam insulation to seal it up.

For top... Fiberglass batts, or foam board; outside remove vent cover and use spray foam if desired.

For side... Metallic tape used inside the door to seal all the openings completely. Gray pipe insulation, trimmed, between the ridges, etc. Makes a neat job.

Also think how you are going to latch the doors for travel. if interested I will explain mine. My latches are completely hidden, no straps nailed to the wall, etc.
 
NoMoreAZ said:
For top... Fiberglass batts, or foam board; outside remove vent cover and use spray foam if desired.

For side... Metallic tape used inside the door to seal all the openings completely. Gray pipe insulation, trimmed, between the ridges, etc. Makes a neat job.

Also think how you are going to latch the doors for travel. if interested I will explain mine. My latches are completely hidden, no straps nailed to the wall, etc.

Yes, please. I would be very interested.
 
I filled the vent panel with expanding foam. Since my fridge was on a slide, I permanently closed off the upper vent. For a door latch, I was able to make a simple twist dog. Page four of my fridge write-up near the bottom are details.
 
BinaryBob said:
I bought a can of Loctite Tite Foam.
Supposed to be a lot denser.
We'll see how it works this weekend.
I want to be able to open the side vent panel for the ice maker connection when we winterize.
That foam should work fine for you. Since my fridge (Frigidaire) doesn't have a fully closed in back like our home Samsung, I pull the vent cover off once or twice a year and vacuum the dust off the condenser coil. There's actually good access to the compressor and other goodies back there.
 
Alfa38User said:
The dude is correct!!! 8)

While the dude is correct, it does not hurt to put just a slight amount on the BACK side of the flare or threads to reduce friction, it just helps tighten them up a hair more. The sealing surface gets nothing.
 
Too late...
I wrenched it in, turned the gas on and stuck the end in a glass of water to make sure.
There's about 2 feet of line sticking out from the floor. Gonna strap the line down so it's not bouncing.
 
Going to need some trim pieces. Anyone match up Winnie's "washed maple" woodgrain? I assume poplar would be the best choice to match with some type of minwax.
 
Poplar is a good secondary wood but it's difficult to find a clear board with no green areas. I used it as temporary trim around my fridge until I could replace it with cherry wood.

You might be able to do some kind of wash to get it to sorta kinda look like maple but it will take a bit of experimenting. Having said that, I only use poplar where it doesn't show, it's just too difficult to stain it to match a hardwood.

About Minwax - avoid the combo stain varnish, I have never had good luck with a coating like that. The problem is you might need to apply several applications of a stain (or mix a custom stain) to get the look you want. With the combo stain-varnish you basically get the stain color shown on the can (depending on what wood you use.)

I would use genuine maple for your trim. If you don't have a local hardwood source, there are suppliers that can ship.

Just thought of another idea, you could use a veneer over the poplar, that would be a bit of work but it would be less expensive than real maple.
 
BinaryBob said:
Yes, please. I would be very interested.
As promised...

The instructions are listed in numbered sequence. If I do this it this way is easier for me to follow. Considering your UID on the forum, the numbers at the start of each step have been adjusted accordingly.


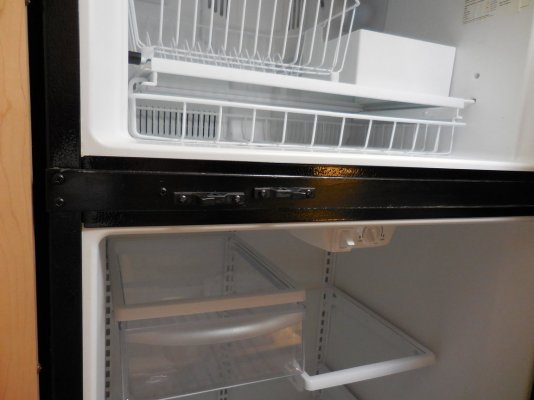
This travel latch installation was installed on a Frigidaire LGHT1837N F, top freezer model.

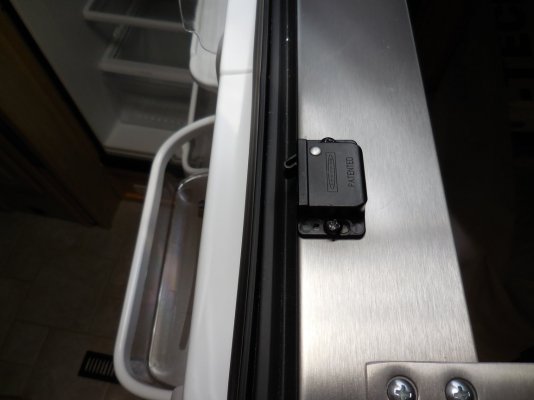
0000) Obtain 2 ea. drawer/cabinet latching assemblies, (AKA push latch, drawer catch assy). Latches used here are ?beefier? than the ones normally found in cabinet drawers, at least in our case. The adjustable portion of the latch in our cabinets is 2.125? long. For the refrigerator it is 2.8125 ? long and thicker. This helps bridge the gap between the refrigerator door(s) and the added strip. The latches are a generic item.

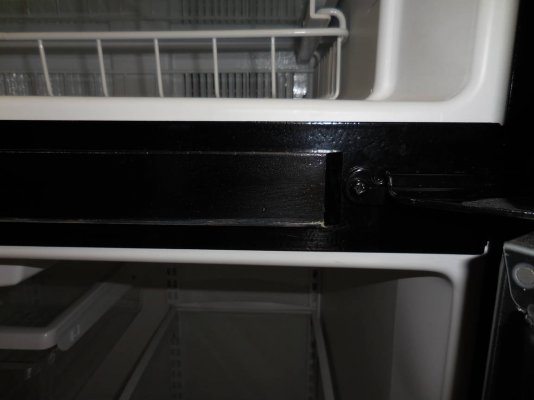
0001) Obtain a piece of hard wood, a good choice would be cabinet moulding. Cut to fit to 1.4375? H, 15.5? W, and 0.375 Thick. Height is critical so the doors do not rub on the strip. Note the angled cut on the right side of the wood strip.

0010) Drill three (3) thru holes in the wood, matching the three (3) left most (assuming hinges of refrigerator on right) screws that exist in the cabinet between the refrigerator and freezer doors.

0011) Obtain three (3) new screws, same diameter, and longer length to account for added wood strip.

0100) Paint all 6 sides of the wood to match the area where the wood strip is to be installed. Paint back side of wood because of temperature and moisture in area when opening and closing doors.

0101) Attach wood strip with the three (3) new screws. If you determine that the right portion of the strip is too loose or may move after time, a small amount of appropriate adhesive may be used. Consider the porosity of the two materials when choosing the adhesive.

0110) Mount latches as shown. Adjustable portion on wood strip, non-adjustable portion on doors.

0111) Perform necessary adjustments.


We have not had any problems with this latching method. Fine tuned the adjustments, twice I think, in the 4.5 years the unit has been in the coach.

I did not make any new holes in the refrigerator cabinet. This is good because one does always know what a manufacturer puts where! Only new holes are in the doors. Since there is no water lines, ice cube chutes, 4 port routers with Wi-Fi, cameras, TVs, horoscope predictors, etc. in the doors of this model the new holes should not be a problem.

Hope this works for you.
 

Attachments

  • rsz_3dscn0156.jpg
    rsz_3dscn0156.jpg
    175.1 KB · Views: 47
  • rsz_dscn0157.jpg
    rsz_dscn0157.jpg
    117.5 KB · Views: 39
  • rsz_dscn0158.jpg
    rsz_dscn0158.jpg
    189.9 KB · Views: 38
  • rsz_dscn0159.jpg
    rsz_dscn0159.jpg
    158.9 KB · Views: 39
That looks like the Cadillac of latching systems.
Not sure how the board thickness doesn't interfere with closing, but I'll have a better idea once the fridge is delivered.
Thanks for the detailed instructions.
 
John Canfield said:
Poplar is a good secondary wood but it's difficult to find a clear board with no green areas. I used it as temporary trim around my fridge until I could replace it with cherry wood.

You might be able to do some kind of wash to get it to sorta kinda look like maple but it will take a bit of experimenting. Having said that, I only use poplar where it doesn't show, it's just too difficult to stain it to match a hardwood.

About Minwax - avoid the combo stain varnish, I have never had good luck with a coating like that. The problem is you might need to apply several applications of a stain (or mix a custom stain) to get the look you want. With the combo stain-varnish you basically get the stain color shown on the can (depending on what wood you use.)

I would use genuine maple for your trim. If you don't have a local hardwood source, there are suppliers that can ship.

Just thought of another idea, you could use a veneer over the poplar, that would be a bit of work but it would be less expensive than real maple.

I'm not much of a wood worker. I read somewhere that poplar is a popular stain matching wood since it's so light.
From your advice, I picked up some maple at a local Rockler store. Good move.
After considerable experimenting, I found a match for the Winnie/Itasca "washed maple" finish:

Two coats of minwax #209 (Natural), applied liberally and let soak in for 15 minutes before removing excess.
 
BinaryBob said:
...From your advice, I picked up some maple at a local Rockler store. Good move.  After considerable experimenting, I found a match for the Winnie/Itasca "washed maple" finish:
Most excellent! You just saved yourself a bunch of time and trouble by using maple instead of poplar. Birch is a great wood for staining, I used some 1/8" birch plywood for some interior projects and stained to match our cherry.
 
How are you allowing for the waste heat from the refrigerator condenser to escape? When I changed out the defunct Dometic in a 2001 Rexhall I too sealed the vent behind the fridge but left the rooftop vent open so there could be a natural path for the heat off the condenser. By leaving the vent open I felt that less heat was being introduced into the RV and we mostly use the rig in the summer.
I can feel heat rising from the back of our house fridge as it goes up the back and under the overhead cupboard. Same idea.

I will be interested in responses as I am thinking of dumping the Dometic RM7732 in our current coach.
 
The replacement fridge will have specifications for free space required around it for adequate ventilation, I have at least three inches all around the fridge box. My compressor and condenser coil are lower rear of the fridge and it draws probably most ventilation from the bottom. At any rate, I think we installed our residential fridge about five years ago and it works just fine.
 

Latest posts

Forum statistics

Threads
131,929
Posts
1,387,698
Members
137,678
Latest member
David W.
Back
Top Bottom