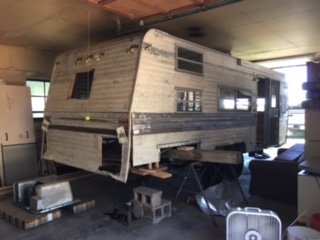
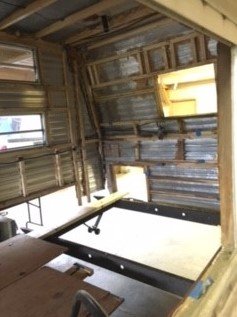
As seems to be the case with most of these old guys, our "remodel" project of our 1980 Jayco Songbird "Jbird" quickly became a gut rehab. Started by taking out the floor in the back, and before we knew it, we were down to wood studs and sheet metal throughout. My kindergarten teacher taught me early that, "A job worth doing is worth doing right," so we figured if we've got it down to the bones, we may as well put it back together the best way possible.
Which brings us to the floor. Part of the back was rotted, and after a few more decision points, we decided to rip the whole thing out, front to back.
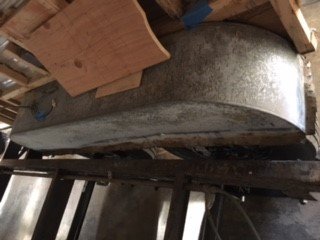
So, we now have a trailer frame supported by jacks, hovering above the steel frame.
We've checked a few things off our list since then: new wheels, tires, axles. Now, the ball is back in our court, and I'd like to run our game plan for the floor past some more experienced folks:
1. We're down to the frame, so we decided we may as well sand off the surface rust and prime the thing. Some 150 grit paper using hand sanders and orbital sanders, angle grinder when necessary, plus some good ol' Rust-Oleum should do the trick. Probably the 2X Ultra Cover rattle can spray.
2. After that, time to cut our aluminum sheets. The camper is 20' long inside and 8' wide (except for the section where the wheel wells are). We picked up six 0.32" 4'x8' sheets of aluminum, to allow space for overlap. We will overlap front to back, so the "opening" will be towards the back, and water won't blast up and in easily as we travel forward. That's just one water precaution. Not to fear - there are plenty more, as sealing this sucker from the bottom up is our #1 priority. (We're working on it in a barn, so it's covered now. We'll tackle the roof and corners last.)
3. To connect and seal the aluminum sheets, we plan to first attach them to each other with 3M VHB 5952 tape across, which should secure + act as water barrier. Second, we will attach the sheets to the frame using 1/4" rivets. Third, we will seal each end where an overlap occurs (top and bottom) with Seal-Tite 2" Corner Tape. (I know it's meant for corner molding, and we will also be using it for that down the line, but this tape looked like one of the better flexible, durable, waterproof tapes on the market.) Last, we will seal over that tape with either Pro Flex Super Flexible Elastomeric Sealant or Dicor 501LSW-1 Self-Leveling Lap Sealant.
Note: we would normally be concerned about the reaction of aluminum to steel, but we live in Colorado and have been advised from many people that we don't need to worry about galvanic corrosion if the beast is going to spend its life with us out in this dry climate. So, we stopped worrying about using spacers or anything like that before attaching sheets to the frame.
4. Repeat the tape + sealant process from #3 to secure sheets to the surrounding aluminum (the folds down from the exterior siding) and to the wheel wells.
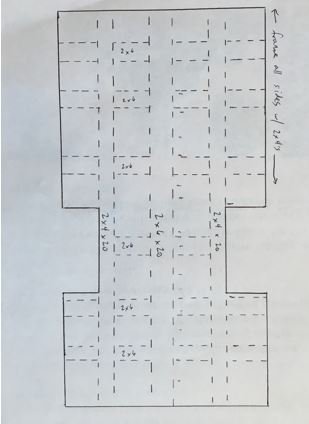
5. Lay new wood. Our frame has two sections that run the full 20' length front to back, and eight sections that run the width. We plan to lay a 20' 2x6 down the middle (front to back), and a 20' 2x4 along each side (front to back). Then, we plan to lay 2x6's horizontally above each of the horizontal cross sections of frame (side to side). We'll have to measure and cut these to fill in between the front-to-back 2x4's and 2'6. I have uploaded a diagram of this plan. It's a lot of framing for the floor, and we are trying to think of any reason why that would not be a good idea. Might be overkill, but I don't know if there's any reason to NOT do this approach. Would appreciate any input from this group.
6. Secure wood to aluminum with some kind of glue. Any tips for a good aluminum-to-metal adhesive? JB Weld seems like it's probably more heavy-duty than we need for this job. Trying to find one that adheres to both wood and metal and would last in various temperatures. Well, I guess it has to adhere to a metal surface that has been painted with Rust-Oleum + a wood surface (our lumber is white fir).
7. Re-frame exterior of trailer. Used to be two 2x2's stacked. We plan to use 2x4's for the bottom layer and 2x2's for the top layer around the exterior, to connect back to the vertical studs. Same glue aluminum-to-wood process as in #6. We plan to attach the wood to each other with a combination of pocket holes, corner braces, wood screws, etc., depending on the instance.
8. Bolt in places where there's a bolt hole in frame.
9. Fill in spaces between wood frame with foamboard insulation.
10. Finally, cut plywood. We got 3/4" 4x8 sheets to cut and lay. Attach plywood to framing with wood screws.
Does this sound like an effective plan to you all? Anything else we should consider?
Thanks in advance!
Which brings us to the floor. Part of the back was rotted, and after a few more decision points, we decided to rip the whole thing out, front to back.
So, we now have a trailer frame supported by jacks, hovering above the steel frame.
We've checked a few things off our list since then: new wheels, tires, axles. Now, the ball is back in our court, and I'd like to run our game plan for the floor past some more experienced folks:
1. We're down to the frame, so we decided we may as well sand off the surface rust and prime the thing. Some 150 grit paper using hand sanders and orbital sanders, angle grinder when necessary, plus some good ol' Rust-Oleum should do the trick. Probably the 2X Ultra Cover rattle can spray.
2. After that, time to cut our aluminum sheets. The camper is 20' long inside and 8' wide (except for the section where the wheel wells are). We picked up six 0.32" 4'x8' sheets of aluminum, to allow space for overlap. We will overlap front to back, so the "opening" will be towards the back, and water won't blast up and in easily as we travel forward. That's just one water precaution. Not to fear - there are plenty more, as sealing this sucker from the bottom up is our #1 priority. (We're working on it in a barn, so it's covered now. We'll tackle the roof and corners last.)
3. To connect and seal the aluminum sheets, we plan to first attach them to each other with 3M VHB 5952 tape across, which should secure + act as water barrier. Second, we will attach the sheets to the frame using 1/4" rivets. Third, we will seal each end where an overlap occurs (top and bottom) with Seal-Tite 2" Corner Tape. (I know it's meant for corner molding, and we will also be using it for that down the line, but this tape looked like one of the better flexible, durable, waterproof tapes on the market.) Last, we will seal over that tape with either Pro Flex Super Flexible Elastomeric Sealant or Dicor 501LSW-1 Self-Leveling Lap Sealant.
Note: we would normally be concerned about the reaction of aluminum to steel, but we live in Colorado and have been advised from many people that we don't need to worry about galvanic corrosion if the beast is going to spend its life with us out in this dry climate. So, we stopped worrying about using spacers or anything like that before attaching sheets to the frame.
4. Repeat the tape + sealant process from #3 to secure sheets to the surrounding aluminum (the folds down from the exterior siding) and to the wheel wells.
5. Lay new wood. Our frame has two sections that run the full 20' length front to back, and eight sections that run the width. We plan to lay a 20' 2x6 down the middle (front to back), and a 20' 2x4 along each side (front to back). Then, we plan to lay 2x6's horizontally above each of the horizontal cross sections of frame (side to side). We'll have to measure and cut these to fill in between the front-to-back 2x4's and 2'6. I have uploaded a diagram of this plan. It's a lot of framing for the floor, and we are trying to think of any reason why that would not be a good idea. Might be overkill, but I don't know if there's any reason to NOT do this approach. Would appreciate any input from this group.
6. Secure wood to aluminum with some kind of glue. Any tips for a good aluminum-to-metal adhesive? JB Weld seems like it's probably more heavy-duty than we need for this job. Trying to find one that adheres to both wood and metal and would last in various temperatures. Well, I guess it has to adhere to a metal surface that has been painted with Rust-Oleum + a wood surface (our lumber is white fir).
7. Re-frame exterior of trailer. Used to be two 2x2's stacked. We plan to use 2x4's for the bottom layer and 2x2's for the top layer around the exterior, to connect back to the vertical studs. Same glue aluminum-to-wood process as in #6. We plan to attach the wood to each other with a combination of pocket holes, corner braces, wood screws, etc., depending on the instance.
8. Bolt in places where there's a bolt hole in frame.
9. Fill in spaces between wood frame with foamboard insulation.
10. Finally, cut plywood. We got 3/4" 4x8 sheets to cut and lay. Attach plywood to framing with wood screws.
Does this sound like an effective plan to you all? Anything else we should consider?
Thanks in advance!