LED light fixture to replace F15T8 florescent fixture?

The friendliest place on the web for anyone with an RV or an interest in RVing!
If you have answers, please help by responding to the unanswered posts.

mikeylikesit

Well-known member
Joined
Sep 15, 2017
Posts
116
Location
Oakboro NC
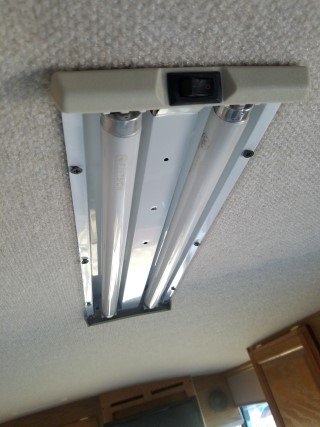
converting most of the coach lamps to LED, but having trouble locating a fixture that will replace the 2 F15T8 fixtures on the ceiling.  Most LED fixtures I've located are not long enough to cover the recess in the ceiling of the coach.

I don't really want to go with the LED "tubes" unless that's the only way to do it.

any suggestions on a supplier?

thanks!
 

Attachments

  • 20180122_163146 (Mobile).jpg
    20180122_163146 (Mobile).jpg
    58.3 KB · Views: 43
HueyPilotVN  (Bill W.) is showing people at the Quartzsite rally how to inexpensively convert those fixtures using the 12 volt LED strips you can buy by the roll.

Basically, you disconnect the fluorescent ballast, leaving only the power switch.  Clean the reflector surface with an alcohol wipe, then press a length of the self-adhesive LED strip to the reflector in place of each of the bulbs.

Wire them to the incoming power and the switch and you're done.
 
x2 what Lou said.  It's really easy and can be done for the cost of a $10 roll of LED strip, which will do several fixtures.  You do have to carefully solder wire leads to the LED strips to connect to the 12V power supply.  I'm all thumbs so the soldering took me a couple tries on the first one, but I soon was able to do it quickly.  I just reused the wires that were connecting the ballasts.  If you get "warm" LEDs, it looks a lot nicer than the bluish fluorescent color.  Here's an example:  https://www.amazon.com/Flexible-Non-waterproof-Christmas-Celebration-Decoration/dp/B00JQV6NNC/ref=sr_1_6?ie=UTF8&qid=1516742791&sr=8-6&keywords=led+strip+warm+white.  There's no need to purchase ones that come with a power supply, because you only use the strips themselves.

I'll try to take some pics of my conversion tonight.  I had some, but they were on a now-deceased phone.
 
BTW, I originally had the same thought to use the LED tubes, but decided they were over priced and I could do the job so easily myself.
 
Ok, here are a few photos of my install. As you can see, I put a piece of white electrical tape on the metal of the fixture underneath the solder joints to make sure it doesn't short out. The two like-colored leads are tied together with the corresponding 12v supply wires.  I drilled holes and used zip ties to secure the leads to the fixture.  When you view the strips from straight underneath you see e individual LEDs, but if viewed at an angle you just see a line of light.  They look much better than the original fluorescents. 
 

Attachments

  • image.jpeg
    image.jpeg
    34.1 KB · Views: 41
  • image.jpeg
    image.jpeg
    36.7 KB · Views: 42
  • image.jpeg
    image.jpeg
    17.1 KB · Views: 39
  • Light 1.png
    Light 1.png
    8.1 KB · Views: 86
Lou Schneider said:

Good point, Lou.  Not sure if I just didn't know about those when I did it a few years ago or what.  That would have cut my project time by about 75%.  Regardless, I think I did four fixtures in about two hours. 
 
Go to ebay and search for: 5 PACK 72-LED 40" Tube Rigid Bar Strip Light 12V Cool White with Milky Cover. The cost is about $20. The units can be shortened to be about 36 in. I purchased the 20 in units and shortened them to 18 in. The results were really nice.

 
When I converted my three fluorescent fixtures I went through four different iterations.  The first one was bright white SM5050s and got hot enough that I was worried about melting the vinyl ceiling.

I added a Buck voltage regulator to each fixture and set them at just over 10 volts.  No more heat, but the light was still to bluish.

Replaced the bright white LEDs with warm white.  Now it was more yellow than candlelight.

Final iteration was to alternate rows of bright white and warm white.  Perfection.  Looks just like incandescent light.

The clip on connectors are not that good.  Especially on something that moves and vibrates down the road.  I used several and every single one of them failed.  I used the smallest gauge wire possible and soldered only on the large pads between LEDs, not on the end of the strips.  Been using them like this for at least 5 years.
 
I cheated. Amaxzon has some LED stripsd 5 Meters lng abut 10 bucks or less as I( recall. (I have two of 'em somehwere here in the RV and will likely buy another becasuse it is easier than finding them.

I cut them into strips. add a whole bunch of jumper wires, gut the original fixture and use the base.  So the ficture on the ceiling is the original.. Just now it's LED. Got one more to go.
 
  To specifically answer your question, look at this and other fixtures on the page. http://www.campingworld.com/shopping/item/led-thin-lite-led112p/80411

  Also http://thinlite.com/

  I replaced a 12-inch Thin-Lite fixture and it was a direct fit.

  You can certainly find them cheaper but it helps to know specifically what you're looking for.
 
  Someone correct me if I’m wrong....it’s my understanding that the major consumer of energy in a fluorescent light, is the “ballast”! If you do not bypass or remove the ballast, you’ve achieved very little in efficiency. Though you will.....get instant and bright lighting in cold conditions!  We used the 12” replacement bulbs, carefully choosing lumen range and light color (temperature range). Seem to be fairly ruggedly constructed. We did research and purchased via the internet. A little effort to modify the fixture,but so far....we are very pleased.
 
If Mikey doesn't want to use the tubes, I suspect the led strips will be even less attractive. The tubes work great, but they are rather pricey. On the other hand, they last essentially forever.  I've not found the led flexible strips to be all that long-lived if used daily, but they sure work nice while they last!

When I replaced my twin-tube fluorescents, I found that one led F15T8 tube provided near as much light as two fluorescents, so I installed only one in each fixture. That helped keep the cost down. However, on fixtures with the shorter 12", F8T5 tubes, I had to use two.

Another solution is a DIY fixture, basically just a board with 2-3 led fixtures mounted in it. Small (4-6") recessed or flush mount 12v led lights are easily mounted in a 2 ft board (readily available and pre-cut at Lowes, Depot, etc) and wired in parallel.  Here's an example of the led used:
https://www.amazon.com/Leisure-Recessed-Ceiling-Aluminum-Downlights/dp/B075QMX4VH/ref=sr_1_4
 
Hey, THANK YOU for all the great suggestions.  :))

I think I'm gonna give 8muddypaws idea a try, as I'm pretty handy with a soldering iron.

I'll get some before and after photos to post as well.

  ;D
 
I went the expensive route and used the tubes. In the over counter kitchen, over counter nook, and over my lounge chair I went with a warm color because I use those alot in the evenings and am not a fan of the intense white light put out by colder colors. I also bought new switches from the OEM supplier, but got double throw switches so I could run one tube or both - as Gary mentioned many times one tube is enough. (I run on one tube 95+% of the time.) The color of the warm tubes is almost exactly like the incandescents they replaced.

For overhead "work" lights I also went with the tubes but for them went with the brighter/whiter color, and left the original switches so both tubes always run together.

While the tubes do cost way more, I figure it's a one time expenditure and it makes for a very clean install.
 
Back
Top Bottom