How can this be repaired??

The friendliest place on the web for anyone with an RV or an interest in RVing!
If you have answers, please help by responding to the unanswered posts.

jymbee

Well-known member
Joined
Feb 20, 2018
Posts
3,489
Location
Upstate NY
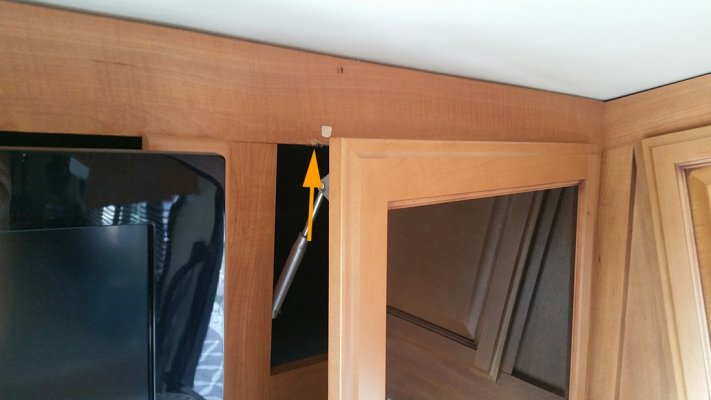
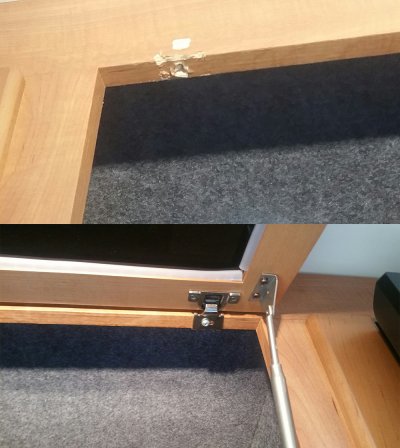
One of the screws holding a hinge on the compartment over the passenger seat has pulled out (see attached). Not enough material left in the original hole to just put the screw back in and not sure the best way to be able to reattach this hinge. There's quite a bit of pressure on this hinge and my concern is that it not done right I'll end up just making it worse-- a situation I have to admit I've found myself in more than once when trying to "fix" something.  :(
 

Attachments

  • brokehinge_sm.jpg
    brokehinge_sm.jpg
    207.4 KB · Views: 196
An old carpenter trick is to put some wood glue into the hole, then insert a golf tee into the hole as far as it will go. Let the glue dry and cut the golf tee off even with the door surface.  Predrill a small starter hole in the new plug, then run the screw gently and firmly back into the new plug. I have used it before and it works well.
 
SargeW said:
An old carpenter trick is to put some wood glue into the hole, then insert a golf tee into the hole as far as it will go. Let the glue dry and cut the golf tee off even with the door surface.  Predrill a small starter hole in the new plug, then run the screw gently and firmly back into the new plug. I have used it before and it works well.
I've also used wood skewers like you would use for shish kebabs and even matchsticks, although for that spring loaded door, I like the golf tee idea.
 
Depending on the load on the screw, match sticks will work when there is no stress, like hanging something.  For tougher jobs, I have used dowels or other pieces of harder wood. 
 
Could you just move the hinge 1/2" to the right and use a longer screw this time?
 
SargeW is right, this is also what tommy from this old house does. 

What is on the other side of that screw, is it a finished face or does the hole go all the way through?    If the hole goes all the way through im thinking nut and bold with a nice looking flat head on it that matches the face color.  Or you could drill an inset on the other side deep enough to hide the bold head, then use a tappered bolt and cover the head with wood putty and then paint it, youll never see the bold head that way.
 
djw2112 said:
then use a tappered bolt and cover the head with wood putty and then paint it, youll never see the bold head that way.

I've never heard the name "tappered" bolt. I had to look it up. I think you're saying a flat head screw.    :eek: ::) :))
Please correct me if I'm wrong.
 
Same basic idea as above... I use rectangular sandwich picks and JB Kwik 5 minute epoxy to fill the hole, and then drill a pilot hole. This also works well in stripped holes in the wall paneling where the wood is only 1/8" thick.
 
Jymbee,
Is the door really wood or is it actually particle board with a paper veneer over it?
 
Fill the hole with any kind of wood.  Tooth picks, wooden matches, a wooden stick, or a shave a piece off a shim.  I have used all the above.  I have even used epoxy glue, let it set, and re-dill a pilot hole.
 
With the stress from the spring hinge, I would go for a harder wood - golf tee or dwell rod rather than soft wood like match sticks.  I might try Gorilla Glue rather than white glue due to perceived strength of the glue. 

Good Luck!
 
I had a couple of cup hooks screwed into the wall near the door for the dog leashes.  When they pulled out of the paneling, I just shot some Gorilla Glue in the holes and put the hooks back.  Works okay for that, but I think I'd want some replacement wood in something like a hinge.
 
Good carpenters glue or epoxy will work better than Gorilla Glue.  Gorilla Glue expands and can push the wood apart it should also be put on one surface and wet the other.  Golf tee and Tightbond works best.
 
Jim Godward said:
Depending on the load on the screw, match sticks will work when there is no stress, like hanging something.  For tougher jobs, I have used dowels or other pieces of harder wood.

Good input from all-- thanks!

Unfortunately when I raised the door to look at the situation more closely, the screw holding the hinge on the other side popped out. One step forward...  :-\

As we're traveling I just took it completely off for now and plan on an approach at the next site.

The attached should show where/how these two hinges are attached and yes, I'd say there's a relatively large amount of stress on them. Not sure if this cross piece is wood or particle board but my guess would be the latter. (?) What likely contributed to the problem in the first place is that screws holding the hinges in place appear to be of the self-tapping metal screw variety! Perhaps a previous owner didn't know any better.

Sad to say my 20+ pound toolkit includes all manner of tools-- but it looks like the drill was left behind. Quite galling for a incurable over-packer like myself.

In my research one product that looked interesting was something called "screw it again". At least if you can believe the marketing hype:
https://www.screw-it-again.com/

The hardware store didn't have this in stock but did give me something he claimed was "just as good". Some kind of thin strips you cut and screw into the hole. I'll take a closer look tomorrow and see what I can come up with.  I did pick up a some wood screws at the hardware store.
 

Attachments

  • brokehingesm2.jpg
    brokehingesm2.jpg
    184.2 KB · Views: 50
Rene T said:
I've never heard the name "tappered" bolt. I had to look it up. I think you're saying a flat head screw.    :eek: ::) :))
Please correct me if I'm wrong.

Yes sir technically you are correct its just my mindset that is wrong.  I have always considered it a screw if it has a point at the end and a bold if it is flat on the end, my bad lol :)
 
It looks like that air spring mounted so close to the hinge there may be extreme leverage on the hinge.  Could you mount the hinges on the side, thus eliminating the springs altogether?
 
Looking at the picture, there a ton of space behind the board the hinge is mounted to. Just install flat head machine screws and put a washer and nut on the backside unless I'm not seeing the right picture. Do the same for the other hinge. You'll never have any issues again.
 
Rene T said:
Looking at the picture, there a ton of space behind the board the hinge is mounted to. Just install flat head machine screws and put a washer and nut on the backside unless I'm not seeing the right picture. Do the same for the other hinge. You'll never have any issues again.

That would be ideal, however the previous image wasn't descriptive enough to show how it's attached. Here's some shots showing the intact hinge over the driver's seat compartment and the damaged one over the passenger seat. The screw holding the hinge goes up into that cross piece, not through it.
 

Attachments

  • hinges.jpg
    hinges.jpg
    338.4 KB · Views: 35
Do you happen to have any scrap pieces of the same material laying around maybe from another remodel.  If so you could just cut that small block out of there and put in a new block same size using your scrap, if you do it just right and fit it nicely the line of the cut will be very small and may even be hidden by the cabinet door when closed.

You could also cut a tiny bit out of that and replace it with a strip of metal like some kind of thin bracket from the hardware section at lowes. That would give something for the screw to bite into.  The job would be similar to doing door hinges in the way that you trim a bit out and then put metal to replace the removed wood. 
 

Latest posts

Members online

Forum statistics

Threads
131,913
Posts
1,387,266
Members
137,665
Latest member
skibumbob
Back
Top Bottom