1994 Roadtrek 190 Popular black tank removal repair

The friendliest place on the web for anyone with an RV or an interest in RVing!
If you have answers, please help by responding to the unanswered posts.

Yukonr

New member
Joined
Jun 2, 2019
Posts
4
Has anyone had experience with removal of black water tank from a Roadtrek?
I have a leak in the black tank about half full. Luckily, I have discovered this in a van that has not been used in many years and I only put water in to test as I just recently bought it.
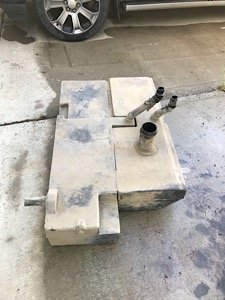
So I have started the process to remove the tank.
Removed the toilet and flange
Cut the black tank vent and cut away the sealant where it goes through the floor
Removed the knife valve
Removed the straps
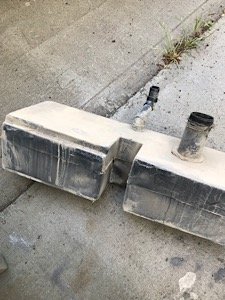
Cut through the spots along the bottom edge where the black and gray tanks were plastic welded together
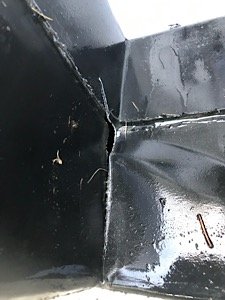
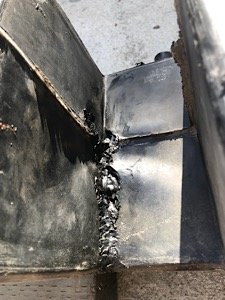
One would think that should be it, BUT, it appear the tanks are still connected to each other. maybe plastic welded at the top as well? Tanks fit together like a jigsaw puzzle, supposedly where the gray tank vent comes out.
Does anyone know if the gray tank has to come out with the black as a unit?
I?m nervous about the vent pipe from the gray being problematic as it comes through the floor at a 45 degree angle and there isn?t room to cut and leave space for a union to put back together.
Any insights appreciated.
 
I have 93 Roadtrek 210 popular and the black and gray are fastened together as one unit probably for strength and ease of installation. I suggest repairing the spot welds you cut before removing the tanks.  Baking soda and superglue trick will repair the spot welds to stronger then original. Also, baking soda/superglue can repair leak if you can access it.
 
Instead of a union, how about something like this? They have them for 1-1/2" pipe but I couldn't find it.

https://www.homedepot.com/p/Fernco-3-in-x-3-in-PVC-Plastic-Socket-to-Plastic-Pipe-Flexible-Coupling-1059-33/203310955?MERCH=REC-_-PIPHorizontal1_rr-_-305363231-_-203310955-_-N
 
Jubileee, I will remove both tanks together and may look for the coupling that Rene T has suggested. I have to cut them apart at some point for sure as the black tank is leaking from in between the two. It's only a drip (quick drip) when the tank is over half full, and it's coming from the area where the gray tank "keys" into the black tank (presumably for the vent) and there is less than 1/4" gap between. These suggestions raise two questions:
1) What is the baking soda and super glue trick? Is there a ratio to blend? These tanks are polyethylene, I think (flexible), not like an ABS/PVC type tank I have seen on any repair or replacement parts sites. same kind of material as the fresh water tanks are usually made from.
2) The coupling Rene T has suggested looks like it is stepped. Is it meant to install over a joint where I could cut the pipe directly beside the existing coupling and clamps onto the coupling with one end and onto the pipe with the other? That's the difficult part is no room to leave a space to glue on another coupling.

Thanks for your input guys
Sincerely appreciated
 
Yukonr said:
2) The coupling Rene T has suggested looks like it is stepped. Is it meant to install over a joint where I could cut the pipe directly beside the existing coupling and clamps onto the coupling with one end and onto the pipe with the other?

The one I showed was stepped. That was the only one I found. I was in a hurry. They do sell them at Home depot that are straight. 1-1/2' to 1-1/2".  3" to 3". etc.
 
Found the culprit. Someone went off-road a bit too far. I?ll try to post some pics so the next guy can see what the heck it all looks like. I couldn?t find any pictures of tanks to see what was the best way to disassemble.
 

Attachments

  • DFFF13B1-43D4-49EB-B92C-8569F6E83AE7.jpeg
    DFFF13B1-43D4-49EB-B92C-8569F6E83AE7.jpeg
    30.4 KB · Views: 33
  • 64CA6D89-5AC0-40CD-A095-E6DA27B15515.jpeg
    64CA6D89-5AC0-40CD-A095-E6DA27B15515.jpeg
    33.2 KB · Views: 31
  • 0862EB3E-DE46-4114-9E49-3B1147CDB9F5.jpeg
    0862EB3E-DE46-4114-9E49-3B1147CDB9F5.jpeg
    26.5 KB · Views: 26
  • 38C6C902-AC0B-423E-8CFF-7541CC080A5A.jpeg
    38C6C902-AC0B-423E-8CFF-7541CC080A5A.jpeg
    31.5 KB · Views: 26
So the tanks are polyethylene (pe) or polypropylene(pp) so I don?t think the superglue trick would have worked. I read a few places that ?nothing? will stick to pp or pe. I bought some pp welding rod on Amazon and used a heat gun and small torch. It didn?t weld perfect or easy but it?s sealed up now. I did consider if I had trouble I was going to add Black Death (acoustic sealant) because it DOES supposedly stick to pp or pe as that?s what vapor barrier is made from. Just a thought. I hope this helps someone as I had a heck of a time finding resources for info.
 
Hi, has anyone found after market replacement tanks (grey and black water) for a 1994 RoadTrek 190 popular? My local RV shop is telling me the OEM version is no longer available... bummer.

Also, if not, has anyone come up with a sealant that will work on the original tanks to address a minor leak.

many thanks
 
Where’s it leaking? We have both a 93 and 95 210 popular in our family. Both black tanks developed leaks where the drain line exits tank. This was originally a fused connection.

I was able to remove fitting, clean it up and bolt it back to tank with sealer on both units successfully. Also, the super glue- baking soda trick works well and is permanent on non moving parts, if you can get it clean and dry.
 
thanks for the quick response. it seems to be at or near that exit drain but to be honest, when I saw the leak, my initial plan was to have my local shop just replace the entire tank. per the shop, they can't get the OEM tanks, and they want to remove the system... and THEN come up with a plan. my concern is that once that system's out, there may not be anything than can go back in, and it could possibly be damaged in the removal process... and then I'm without any tanks. So, I'm shifting to figure out how I can fix it without removing it. I totally understand the shop isn't all that interested in putting bandaids on the old tank so I'll need to spend a bit more time underneath and really identify the source. Once I have seen it with my own eyes I'll obviously have a better idea how to move forward. Thanks again.
 
Repair is coming back to me. A short 3” nipple is fused to tank And breaks partially loose. I think I cut it out with a hacksaw blade.

Then in a rv sewer line kit, there was a threaded 3” flange with about 1” flange a 1” of threads. Simply drilled flange and tank and bolted together. Able to reach through flange and hold nut while turning bolt.
 
Back
Top Bottom