Replacing Waste Gate Valve on Holiday Rambler with Valve Handle Extenders

The friendliest place on the web for anyone with an RV or an interest in RVing!
If you have answers, please help by responding to the unanswered posts.

RamblingJohn

Well-known member
Joined
Sep 3, 2018
Posts
46
Location
Whidbey Island, WA
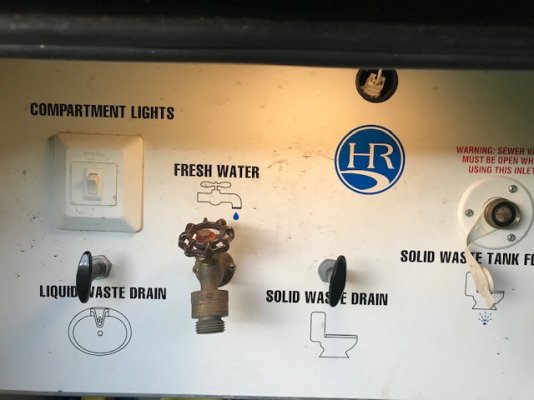
I recently purchased all the tools and parts to fix a leaky black water tank waste valve. The issue is that there appears to be valve handle extenders that place the handles conveniently on the water access panel. I'm assuming that the extenders are HR design and once I can access the actual valve, I can replace it with my new one and it will attach to their setup. Not sure how to tackle it though.

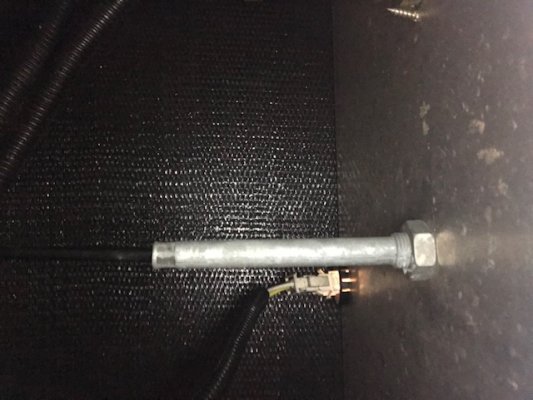
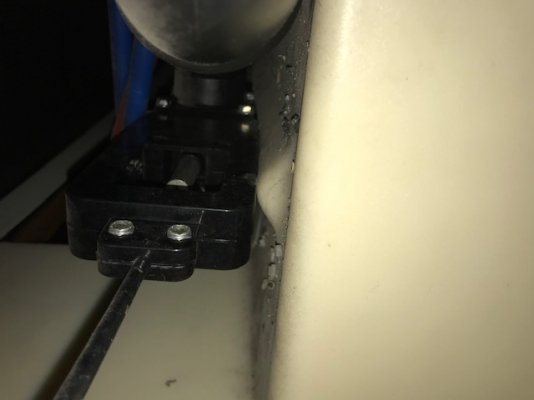
My plan is to cut the existing water lines going to the water panel so that I can remove it and get at the gate valve. I'm not sure how to get the panel off with these valve extenders though. I've attached pictures of the front of the panel, the back of the panel, and where the grey tank handle leads, black should be similar but too hard to photograph. Has anyone ever dealt with these? How should I go about it?
 

Attachments

  • IMG_5734.jpg
    IMG_5734.jpg
    64.8 KB · Views: 60
  • IMG_5735.jpg
    IMG_5735.jpg
    84.3 KB · Views: 54
  • IMG_5739.jpg
    IMG_5739.jpg
    39.6 KB · Views: 54
They are not a HR design. I had them on my Montana High Country and I hated them. The black tank drain especially. I always had trouble closing that valve because it there was any crap stuck in the track of the gate valve, the steel cable would just flex and the valve would never shut all the way. I removed the cable system and installed a standard valve and added extension rods so I could operate them. I did the same thing with my 2 gray tank drain valves.

As far as your situation, can you get to the valves by removing some of the belly under the area where the valves are located? That's typically how it's done.  Or cut a hole in a wall to gain access.

What pipes are you planning on cutting?
 
Well the water panel wall has several pex connections for water that will need to be removed to take the panel down. There is the water line output for the fresh water and the water input for the fresh tank/city connection and another for the black water tank flush. I think this is the only way to get at the valves themselves. So are the entire valves different than normal? I assumed they were standard and the system to extend them to the wall was not.
 
I saw in another thread where someone suggested filling the black tank with soapy water and operating the valve over and over to clean it. I might try this before ripping everything apart!
 
RamblingJohn said:
So are the entire valves different than normal? I assumed they were standard and the system to extend them to the wall was not.

They are different. But the square flanges are the same. In other words, you could remove the cable operated valve and install a standard manually operated valve without cutting any pipes.

https://www.amazon.com/Valterra-TC372-Flexible-Cable-Kit/dp/B002N5L9R8

https://www.amazon.com/Valterra-T1003VPM-Bladex-Waste-Handle/dp/B000BGK22E/ref=sr_1_3?gclid=EAIaIQobChMIzvyol9Sr5QIVC4rICh1EDAk5EAAYASAAEgLomfD_BwE&hvadid=174250845965&hvdev=c&hvlocphy=9011814&hvnetw=g&hvpos=1t1&hvqmt=e&hvrand=2715018315801470997&hvtargid=aud-647846986441%3Akwd-141729836933&hydadcr=7500_9322319&keywords=rv+sewer+valve+replacement&qid=1571602674&sr=8-3
 
You can find RV Drain Valve Lubricant and try that too. I think walmart has it.
 
If the extenders are a replacement issue, why not just change the seals in the valves. Easy job. Also while you have the valve out install grease zerks so you can lub the valve and seals. The OEM valves in my 95 bounder open and close really easy, when greased once a year. And before someone jumps on the grease attacking the "rubber" seals, they are not rubber.
 
House Husband said:
And before someone jumps on the grease attacking the "rubber" seals, they are not rubber.

If they're not rubber what are they?
This description says they are rubber.

https://www.amazon.com/Camco-Black-1-5-39500-Replacement/dp/B07FJFD45P/ref=asc_df_B07FJFD45P/?tag=hyprod-20&linkCode=df0&hvadid=385217038031&hvpos=1o1&hvnetw=g&hvrand=5650158880543343496&hvpone=&hvptwo=&hvqmt=&hvdev=c&hvdvcmdl=&hvlocint=&hvlocphy=9012405&hvtargid=aud-800703102928:pla-801200870833&psc=1&tag=&ref=&adgrpid=79334632300&hvpone=&hvptwo=&hvadid=385217038031&hvpos=1o1&hvnetw=g&hvrand=5650158880543343496&hvqmt=&hvdev=c&hvdvcmdl=&hvlocint=&hvlocphy=9012405&hvtargid=aud-800703102928:pla-801200870833
 
House Husband said:
If the extenders are a replacement issue, why not just change the seals in the valves.

The hardest part is just getting access to it, unfortunately. I want to try the soapy water tip first and hopefully I won't have to replace anything. But yeah, now that I know you can replace just the seals, I'll probably do that. The valve I purchased won't work unless I build extenders like Rene T did. The grey tank isn't leaking so I'm hoping there is just some obstruction preventing the black tank valve from closing all the way that I can work loose. I'd think if the seal was bad they'd both be bad.
 
How about trying something like this. I would think that if you only had one 90 degree elbow to get through, you may be able to reach the valve.

https://www.amazon.com/Rutland-3-Inch-Pellet-10-Feet-Handle/dp/B009YMV5FE/ref=pd_sbs_201_2/144-8848226-4114667?_encoding=UTF8&pd_rd_i=B009YMV5FE&pd_rd_r=c6e96161-f3ef-413f-8c6e-855c994b04f9&pd_rd_w=aVXgC&pd_rd_wg=QP2gi&pf_rd_p=52b7592c-2dc9-4ac6-84d4-4bda6360045e&pf_rd_r=9THP6A2PX2J4BEDS0HAT&psc=1&refRID=9THP6A2PX2J4BEDS0HAT
 
If you are trying to get to work right, you are on the right track.  If you just want to stop the leak, here is another approach.  (I have one gray tank I can not close completely)  Install a valve - and cap - on the end of your sewer drain line.  Keep it closed and capped.  When it is time to dump, open the cap, connect the stinky slinky (no leaks so far - the last valve is closed).  When everything is in place, open the valve at the end of the pipe, releasing leaked fluids and proceed with your tank draining.  When done, close the new valve, then remove and store the stinky slinky.
 
Rene T said:
If they're not rubber what are they?
This description says they are rubber.

https://www.amazon.com/Camco-Black-1-5-39500-Replacement/dp/B07FJFD45P/ref=asc_df_B07FJFD45P/?tag=hyprod-20&linkCode=df0&hvadid=385217038031&hvpos=1o1&hvnetw=g&hvrand=5650158880543343496&hvpone=&hvptwo=&hvqmt=&hvdev=c&hvdvcmdl=&hvlocint=&hvlocphy=9012405&hvtargid=aud-800703102928:pla-801200870833&psc=1&tag=&ref=&adgrpid=79334632300&hvpone=&hvptwo=&hvadid=385217038031&hvpos=1o1&hvnetw=g&hvrand=5650158880543343496&hvqmt=&hvdev=c&hvdvcmdl=&hvlocint=&hvlocphy=9012405&hvtargid=aud-800703102928:pla-801200870833

Good question. Why don't you do the research and let us know. Never mind, I just found the answer.  Buna-N.
Again, if they were rubber, mine should have failed years ago with chassis grease on them. Those un-known folks call any thing black and flexible rubber.
 
To be clear; Rubber is a collective for both Natural Rubber (NR) and any one of the synthetics that are usually petroleum based. Motor vehicles use very little NR and often Nitrile, Buna N, Neoprene , and other synthetics.

Ernie
 
Ernie n Tara said:
To be clear; Rubber is a collective for both Natural Rubber (NR) and any one of the synthetics that are usually petroleum based. Motor vehicles use very little NR and often Nitrile, Buna N, Neoprene , and other synthetics.

Ernie
Well stated and correct.
 
So I bought all the tools/parts to fix this proper but then later found a bayonet Valterra waste valve that will fix the issue immediately, even if as a stop-gap. I bought and installed this so I've kicked the can down the road, for now. At least I don't have black tank nasties leaking into a bucket that has to be emptied. I will fix it proper at some point but at least the pressure is relieved, for now.
 
Back
Top Bottom