Mounting Magnum Magna Sine MS2012 - Direction?

The friendliest place on the web for anyone with an RV or an interest in RVing!
If you have answers, please help by responding to the unanswered posts.

jnwhite

Member
Joined
Aug 25, 2015
Posts
20
Location
Eastern WV
Getting ready to mount the Magnum MS2012 in place of a dead Dimensions 2000. My Dimensions was in the upper left corner of the electrical bay. The connections were toward the door. Reading the manual for the new unit, it appears that is not a valid mounting direction. That leaves mounting horizontally the other direction with the connections toward the center of the RV or vertically with the connections at the bottom. I know lots of people on the board have done this conversion, which way did you mount yours?

Thanks!
Jay

edit by staff - changed message icon to topic solved
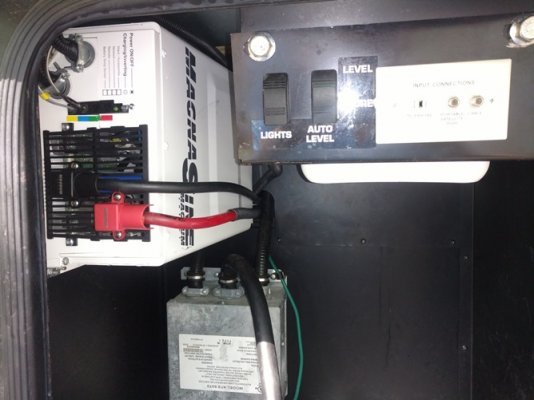
 
My Magnum (same model) replaced a Xantrex RS2000 which replaced the Demented 2000. The Xantrex was an easy swap,  the Magnum was okay as far as wiring. 
 
There are warnings in the manual about mounting the Magnum MS2012 with the DC terminals pointing down for 2 reasons:
(These are listed in the manual)
1.  Debris could fall into the top and cause damage--electrical shorts, etc.
2.  If the internal components overheated and melted they could fall out the end pointing down and cause a fire. 
Magnum has shields available to make the unit safe. 

You will have to decide if you feel the two safety warnings apply to your install and if not take the risk and mount it with the DC terminals pointing down. 
 
I got a hold of SCVJeff who has the same setup as I have (only he did his in 2013).  I am mounting it in the same orientation as the Dimensions.  I hung it yesterday.  Esisting AC Cables just fit.  Battery feeds look too small.  They are only 1/0.  Magnum recommends 2/0 if under 5 ft or 4/0 if 5/10.  I have to see how they are run today and figure the length.  Also need to makeup adapters for the remote and re-run the battery temp sensor. 

This is part of a bigger project.  I pulled all the batteries (Interstate 31MHDs) and found two bad chassis batteries. Am going to 4 6V GC2 from 3-12V for coach and moving two existing coach batteries down to chassis.  Just got done sanding and using bedliner on the battery trays.  Some of the cable ends don't look so great.  Still figuring out everything.

I took off all the other covers in the electrical bay to see what is lurking there (2 fuse blocks, relays, other ground points, lots of wiring and a seeping slide hose.  I took lots of pictures.

Will post pics when I get a few minutes to down convert them.

Jay
 
jnwhite said:
... moving two existing coach batteries down to chassis.  J...
I think you should reconsider this.  House batteries are deep cycle, chassis batteries need to be starting batteries--they work differently.
 
The house and chassis batteries are some of those dual-use Interstate 31-MHDs maintenance free batteries that were in the motorhome when I got it a few years ago (3 coach new, 2 chassis older, not my choice).  They are not really deep cycle, but work fine for starting.

Going deep cycle Trojans for the house batteries (4 - T105).

This will have to do for now.  This has been an expensive month.  Lightning Strike on the power pole next to the house took out Dimensions Inverter/Charger in the motorhome and 2 TVs, a sound bar, a DVR, Wireless router and a ceiling fan in the house.  Could have been much worse.  I also need to replace all the slide topper fabric to fix the leaks in the stupid slide locks.

Jay
 
Yikes. At one of the Winnebago Grand National rallies, lightning struck a power pedestal and it took out a transfer switch and did some other damage on a coach, not ours fortunately.
 
I was glad the lightning strike didn't catch the house on fire and take out all the electronics.  Things that died were on UPSes and surge suppressors.  I have had fun soldering new fuses and MOVs into various equipment.  Some is not cost effective to repair like the Dimensions inverter.  It was on the list to upgrade sometime anyhow.  Surprisingly found schematics and new boards for some items.

I got 4 fresh dated Costco Interstate GC2s today.  The place I thoght had Trojans does do batteries any longer.  These will do for now...

Jay
 
jnwhite said:
I got 4 fresh dated Costco Interstate GC2s today.  The place I thoght had Trojans does do batteries any longer.  These will do for now...
Jay

The Interstate are good batteries and should last a long time.
 
Inverter and Batteries Installed. Used original cables.  They just fit.  Planning new heavier cables in future.  I need to start gathering parts and tools to accomplish.  The Winnebago ones are undersized for the inverter.  Also I am not happy that there is no DC disconnect other than removing a battery cable.  After seeing that, I now know why SCVJeff added a disconnect.  Will add one when I re-cable. 

Here's a picture of the completed Inverter install.

Jay
 

Attachments

  • NewInverter1.jpg
    NewInverter1.jpg
    92.9 KB · Views: 34
Looks nice and tidy, good job  :)). Those cables do look a little light, they should be rated for about 150 amps. My Horizon has an inline fuse on the positive lead to the inverter located near the battery bank but a disconnect switch would be a worthy addition.
 
Yeah, those are 1/0 factory cables including the fuse for the inverter near the battery like yours. The Magnum MS-2012 manual specifies 2/0 for cables under 5 feet and 4/0 for 5-10 feet.  These go across the width of the motorhome, plus connection turns and/or fuse runs.  Definitely over 5 feet.  The battery cables to the chassis and the jumpers between batteries are all 3/0.  I will just go 4/0 throughout.  A little overkill never hurts.

Jay
 
cbeierl said:
I think you should reconsider this.  House batteries are deep cycle, chassis batteries need to be starting batteries--they work differently.
Hi Chris, I've not been around lately and just today read a PM from him about mounting those batteries for Diesel starting service with essentially the same warnings. That kind of a load (starting a C/7) on those cute little batteries could easily represent a short to them; thats not what they do..  Don't know but suspect you could possibly explode them.
Jeff
 
I bought the coach used and it came with 2 of them for starting and 3 of them (slightly newer) for coach.  I replaced the 3 coach ones with 4 Costco 6V GC2s when I replaced the inverter.  I kept the "best" two of the "dual" use Interstates for starting for now until I can afford to replace them.  They have worked for the last 3 years, so will probably be ok until next year.  I will then replace them with real starting batteries. 

I still have to replace all the leaking/seeping HWH hoses before winter.  They are all leaking between the hose and fittings.  I am not looking forward to doing them.  That project will start as soon as I finish the residential refrig install currently in progress.  Retirement sure is busy!!! :)

Jay
 
jnwhite said:
....I still have to replace all the leaking/seeping HWH hoses before winter.  They are all leaking between the hose and fittings.  I am not looking forward to doing them.  That project will start as soon as I finish the residential refrig install currently in progress.  Retirement sure is busy!!! :)

Jay
I had to replace all of the hydraulic hoses on my last tractor, they were about 20 years old and fairly easy to access but what a messy PITA. I don't know if it might be any help for you but I wrote up our residential fridge install on my Horizon projects website link (in my signature.) I had to buy a new tool to make a plunge cut to lengthen the fridge opening - I love projects that require new tools to be acquired :D.
 
Hi John,

I have read most of your How To articles on your site.  They have been extremely helpful.  I have lots of tools but am installing a refrigerator model that I haven't seen used before.  It is a 17 cu Ft HiSense.  Counter depth, bottom freezer, single door on top.  Got it because of a wall right next to the refrig opening and thought it would work better with one door and being only 31" wide.  $700 on sale too. 

I have already lowered the floor about 5-6 inches. I am now working on how to fasten it to my satisfaction.  Interestingly, Winnebago never screwed in the top straps to the original refrig.  Straps there, screws lodge between the refrig and top coils, no holes where they were ever attached.

I wish I could buy an whole kit of HWH hoses, but they don't know.  So I need to get to the tags on each one to verify.  My biggest concern is no concrete pad to work on.  Lifting the motorhome on gravel not good.  Jackstands can sink in. 

Jay 
 
For jack pads make a pyramid of 3/4" plywood  - mybe a 20 " square on the bottom and reduce the square size one or two inches as you go up in height. Some of the 'industrial' or truck centric auto parts stores will make hydraulic hoses, so remove a hose or two (or four) and take it to them to duplicate.

If the fridge is a fairly close fit in the opening you can put a few screws in the fridge bottom frame and wedge the top in with a 12" or 20" long cleat attached to the cabinet frame in contact to the top of the fridge. Ours has been immobile for many thousands of road miles like this.  However this is just my redneck engineering, your results may vary.
 
Back
Top Bottom