Roof Dicor Material & Sealer Caulk at Seams (Joints /Connection Points)

The friendliest place on the web for anyone with an RV or an interest in RVing!
If you have answers, please help by responding to the unanswered posts.
X

X-Roughneck

Guest
Hello board.  We own a 2017 Winnebago Aspect 30J. 

She is a real particle board and cheap plastics beauty for sure. 

Looking to purchase some caulking material.

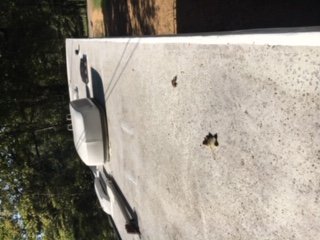
Looking at the roof around drain pipe and skylights I guess it is the self leveling Dicor material still looks good "doughy" & pliable.

The question is not so much about that doughy Dicor material,

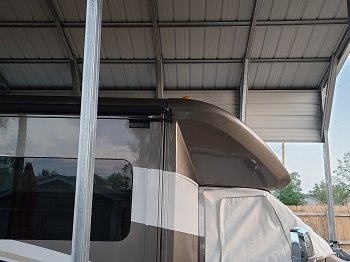
but the Slide Seams where the box joins and is screwed together at the seams where it was caulked or glued at the factory and the seams of the port hole hinge doors on the basement low riding doors.

What would be the best re-application (Caulk Material) be? 

Just something house related Home Depot?

I am looking at this as more a a pre-emptive strike and Preventative Maintenance.

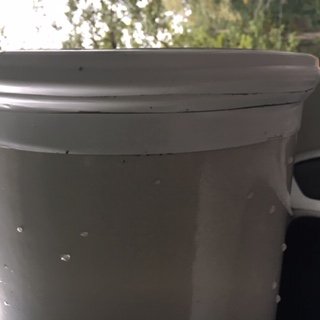
Luckily it only sat under the direct sun for one summer down here in Texas back in 2019, but the sealers at the seams are getting a little "Crackly" / "Crow Footed".

I think I want to carefully razor out and lay a fresh bead of ________ , RV specialty caulking material if there was such a thing only in certain areas?  Nothing is leaking or so I think anyway.

Fill in the blank name, of CAULKING Product X " _________" the ones that RVrs trust and use to do joints on slides and maybe around basement door where they installed the port hole hinge doors?

Not taking about disassembly and gouging out all the material.  Just more of a tape up, carefully touch up and reseal as required.

Select resealing on some of those basement doors that get the road juice slung on them because they are low riding, the ones that take the rain off the tires.

Is there a RVrs rugged choice of sealant type caulk product not dicor self leveling but a thinner sealing product?

John
 
Winnebago specifies adhesives and sealants for their products.  Find the catalog/diagrams for your model and year and what adhesive/sealant used is listed by each specific location.

<http://catalog.winnebagoind.com/menu/Parts.htm>

Mark B.
Albuquerque, NM
 
Utclmjmpr said:
Look into  Eternabond tape..>>>Dan

Dan I am poor boy, but come on... ;D, Tape?

Tape, on the slides yea I can see it actually.  Good Idea  :))

It would have a clean look to it, and with the tape width the overlap I won't have to worry about the shrinkage for years down the road.

JD 
 
Eternabond is not what you think it is even though it's called "tape" thats just the shape, and it comes on a roll..  Very easy to apply store and use, covers large or small ruptures and adheres to any surface...>>>Dan
 
The joint where the roof tucks under the awning rail. Winnebago says to check it every 6 months.
 
Utclmjmpr said:
Eternabond is not what you think it is even though it's called "tape" thats just the shape, and it comes on a roll..  Very easy to apply store and use, covers large or small ruptures and adheres to any surface...>>>Dan

Agreed...It's called "Eterna" for good reasons. The stuff lasts forever and it's really easy to apply. I used it quite a few years back, fixing some leaky roof junctures of an old TT. It worked like a charm and it was still holding when I sold it years later!
 
    We had a perpetual problem where the front cap meets the roof, I used RV and high end caulking, but the leaks always came back.  I could only source the 4 inch wide eternabond tape locally, so I cut it in half giving me a 2 inch tape, I cleaned the old caulking as if I was going to add caulking, layed the tape, and problem solved.  We got 5 or 6 years without any moisture.

Ed
 
Although I agree Eternabond will do the work, I don't think it will look pretty. MHO
 
All in the eye of the beholder,, It can be shaped with scissors and if done with care ,, looks like any other seam would,, don't knock until you have tried it..>>>Dan
 
Lots of good replies that got the old hamster wheel in my head in motion.  Now that I am firing on the 3 active brain cells available I have developed a course of action. 

I will email Winnebago Customer support and request a product list of overpriced sealer products they sell.  I did read somewhere that no longer can you buy direct from Winnebago as Joe Q Public.  If Not I will call Lichsten the big Seller a mile away.

Now if their sealer W products are Branded with the Flying W then they will probably be W with no other markings on the product.  Meaning Generic Looking like that failed Shock on the W one that failed on our Aspect did at 7000 miles on the odometer.

I think I will purchase their product the first time, if available, or use what they recommend. See if I can read the label and home Depot Purchase for the following Maint / Touch Up services. 

We called that Preventative Maintenance Checks and Services (PMCS) for all my Army Sibling Grab your -10 Op Book and meet me at the Motor Pool with you DA Form 2404 ready to Knock out Maint Day.  :D

Note: I say the first time application as the Sun is Brutal where I live.  MFGs Claims of "Lifetime Use" means I personally am hoping for 10 years if left eXposed to the direct UV. 

The Sun coupled with our sometimes scary winds provides the desert dwellers here in my neck of the Cactus,.. that fresh and Hot sand blasted feeling  ;D

Army did have a good concept.  Take care of your stuff.  In the OilField we had the Mindset of Run it Till It Craters! Seen some "REAL" train Wrecks on what lack of maintenance can do in the Patch. 

Got to keep up the TLC on these rattlin pieces of Plastic and Particle Board for sure! Part of that is the skin. 

This big old 32 ft Lumbering Beast of Class C I got.....Twisting and Banging down the Pot Holed Highway of Life.

Thanks everybody.

John

 
Mine is considerably older than yours but in the W documentation it shows the OEM adhesive brands/types.  Dicor, 311, etc.  They're fairly unique in texture and appearance.  Once you know what one type of sealant looks like you can just see it on the RV and know what it is.  FWIW I've sourced all my various sealants off of amazon.

Mark B.
Albuquerque, NM
 
I've used the clear Geocel caulking where Eternabond tape is not appropriate like around windows and compartment door trim. I'm not removing the RV windows and trim to caulk under them like some people do. I would not do that on my house so I'm not doing it on my RV. The clear doesn't show little mistakes as much. Really sticky gooey stuff and has a good reputation in the RV world. My caulking is only 4 years old so I cannot say how long it lasts.

To attempt to be roof maintenance free forever I used over 100 feet of Eternabond to cover every bit of caulking on the roof and around the rounded front of the overhead bunk. Then I put a coat of Liquid Roof over the Eternabond and entire roof. That was six years ago and its looking good so far. 20 years from now I'll let you know how well that worked out.
 
TheBar said:
I'm not removing the RV windows and trim to caulk under them like some people do.

The Bar, Agreed...100%

Have learned over the years that things do seem to go back together much much harder than they came apart!  ;D 

And before you throw in the towel and bash the problem with a hammer out of frustration trying to Re-assemble, remember kids, "Real Men Read the directions"  ;D

Well maybe not so much with windows but I do, "Drink" to your "Bar" of Philosophy when it come to disassembly on a cheaply glued together product.

JD
 
Hfx_Cdn said:
    We had a perpetual problem where the front cap meets the roof, I used RV and high end caulking, but the leaks always came back.  I could only source the 4 inch wide eternabond tape locally, so I cut it in half giving me a 2 inch tape, I cleaned the old caulking as if I was going to add caulking, layed the tape, and problem solved.  We got 5 or 6 years without any moisture.

Ed

Good Point Ed. 

I had a screw I tightened up today on the belt molding on the roof Headliner "Seam" back a bit behind where the Ford and House meet and I think I may have a tiny leak too! Yikes.

Actually screw snapped banging down the highway so there has to be slight flex of some type on that lumbering beast up there in the front cap area I reckon?

When I got up on the roof the day I bought it I did not like the look of the OEM Seam where the caps on the Glassed ends of the house and in my case the small overhang on my Aspect 30J are mated up and glued and screwed into place at the Factory.  It is a crowned Fiber glas Roof though.  I fell in love with the small overhang and the shape of the end cap but not impressed with their Assy line joining of the pieces.  Mine does have a strip of OEM eterna bond on the back cap so it might be OK, will give the roof another hard look though. 

Cracks and water....a Losing battle...I see your tape theory may be a winner on that cap. 

Those caps from day one seemed a little squirrel-y.


Getting off topic which I love to do BTW, but Imagine the eterna bond tape application will have a clean look if I get the Tape Hand Roller like a DIY YouTuber "RV with Tito" used on his video when using the eterna bond on his solar panel drill less application on his Class C.  Looks like you need a good clean surface and give it a squish when you put it with application pressure.  This Tito guy has some Mad DIY Skills!! He did a solar panel install with eterna bond tape.  He has alot of great ideas for RV remodels tips, etc.


I am going to have to go up and look at the roof tomorrow, but I bet I have a Slight leak off that front cap seam on the flat part. I hope to bring the repair down slightly off the crown of the roof keeping repair on top and roll it down to shed water not cup the water.  I really Do not want to disturb the paint on the side by going hog wild on a cap removal.  On the top roof of the RV I don't care what it looks like.  I am sure pilots flying over my RV would not care either.  That Tape Sounds like a good idea. 


I think the wood discoloration I saw today is a seep that may have just started.

PMCS!

JD
 
Squishing Eternabond down is the secret to making it waterproof. I had a 2" steel drywall tape roller which costs $5 vs the Eternabond roller for $25. Same thing. Even a wide wheel on a non pivoting caster will work. Be very careful laying down Eternabond. Once it sticks it ain't coming off come "heck" or high water. It is stretchy but loses strength and adhesion when stretched. If doing a curved surface you can cut it in narrower strips then overlap to keep it from bunching. In the first picture I ran a strip over the aluminum trim on the overhead bunk then another strip overlapping it on the fiberglass. I later went back and painted the grey adhesive you see that squished out between them. Now it looks factory applied, although I wouldn't do this on a rig as new as yours. The second picture shows the Eternabond going down the roof edge side and overlapping the edge trim so no screws are exposed to the weather. It took 30' of a 50' roll on each side so there were no splices in the Eternabond. I used the left over 20' on each roll plus about 30' more on the end caps, vents, A/C etc. I used a straight edge and a magic marker as a guide to laying down the tape in a straight line. As you see Eternabond doesn't stain so its pretty maintenance free. At least theoretically I won't need any caulking on the roof until a vent or something has to be replaced.

BTW - acetone will remove the glue but work quick and don't get it on any painted surfaces.
 

Attachments

  • eternabond cabover.JPG
    eternabond cabover.JPG
    29.6 KB · Views: 40
  • eternabond roof.JPG
    eternabond roof.JPG
    41.3 KB · Views: 41
One of the things we found useful for the roof was to use Eternabond tape on exposed seams. Caulk the edges. Has stood up well for us.
 
RVRAC said:
Although I agree Eternabond will do the work, I don't think it will look pretty. MHO

My potential for people to say. "That Repair job looks like crap" will be 4" wide and 1" of tape. 

The eye of "Joe Q" (my opinion)  will not be drawn to it, I do not think.  My MH is Massive.... I am talking a 1x4 inch strip, laying like a professionally installed band aid lump. 

The entire 8 ft or what ever of the seam will covered after the repair but conclude at the awning area.

Factory caulk W put up there don't match either anyway. Job looks like it was done at the factory for a guy making $1 above min wage.

I though being overkill guy will always scrutinize the repair because I know where the problem area is. 

My area of concern which is on TOP width of where the Front Cap near the Overhead Markers meet the House Box and I bet my leak is from AC water flowing off the outside portion when is sweats operating. 

I could NOT care less what a 911 helicopter view sees of my RV roof.

My the cap is huge and to gouge out or selectively gouge amd grind the putty out of the seam only on the top, well, still not worth the effort and did I get the cancerous crack? 

Next Banging Trip BAM "Hello old Crack" is also a real possibility too.  Too much flex....for lightweight stretched Utility van Frame of the E450.........STRETCHED by the same $1 an hour above MIN wage crew.  On a wing and a prayer.... ;D 

It would take a cut off wheel and Dremel type surgical repair taking hours for a "I hope this will work" repair. 

I read about "The Bars" dreaded 6 year crack and I will rely on the pain and suffering of him, to take a different approach. 

I hate to follow the masses in life anyway.  I march to the beat of what Persuades me.  Not Book Theories. I am calling my shots. 

I am also lack the money to get it professionally repaired so also a factor.  I think I am going to come out a winner for under 40 bucks with extra tape so I can seal the slide seams.   

I rolled the dice and quit working at 56 so I hope both plans of action work out.  ;D  YOLO!


Side panels are also painted part of the cap, and I do not want to disturb molding and chipping paint off bolt screws off trim pieces the cap top or if I can get that ac sweat to cascade to the vertical drip I will solve.  I got 50 ft and roller off The Big River for 39 bucks, hopefully a day or two and I will be in business.  I will do some pics and post it

From a ground view point of view, I am only going to make a slight run with tape edge of Etrna Bond to the Vertical Point of the wall.  If I can get the water to flow over the ditch of crappy and thinly applied OEM Caulk then it will free fall to the ground...I hope.  That is my theory anyway.  We were in Colorado recently taking in the Epic Sights.....running ac 2 weeks constant recently too.

I can get a touch up paint can and mask and tape the 1" of the what ever color the tape is...scuff and paint to match.

Plan is solid...on paper anyway.  ;)

JD
 

Attachments

  • Front Cap Gap.jpg
    Front Cap Gap.jpg
    47.1 KB · Views: 17
John and Angela said:
One of the things we found useful for the roof was to use Eternabond tape on exposed seams. Caulk the edges. Has stood up well for us.
Yes the Port hole cut for the basement access point a definite no go for tape.  I am poor boy, But into Beautiful Looking Poor Boy repairs...well try anyway.

Mark B mentioned the product list but I am going to look at the geocel products a mentioned and try and snag it for quick delivery.

I got carpal tunnel op #2 on 29th so I need to get this solved ASAP.

Any places where the joints come together on this motor home is a POTENTIAL leak waiting to happen. 

Items left out in the Sun down here as well as Plastic Caulking if you are not TLC they are going become a REAL leak "in time" for sure. 

The Sun and the Brutality of it, rule the day down here in my Dusty Desert I will assure you, throw in a little hail and wind with a smattering of dust just to add to the harshness. 

I envision my repair will have 4 inches of shrink wrap...basically to guard a 1/2 gap.... I may go for a slight gouge out and repair.  ALso I want a sloped are not a cliff drop off so I may have to apply a bit of filler to roll the tape on top/
 
The edge of my fiberglass front cap was causing a constant pool of water from rain and A/C condensate. I applied a liberal amount of caulking on the roof side of the seam about 2 inches wide and smoothed it down with a body filler spreader. After it dried I put 1 inch of the 4 inch wide Eternabond over the cap edge and 3 inches on the roof. Its been 6 years and still firmly attached. It still pools some but 3 inches away from that seam where it won't cause problems. I wouldn't use sandpaper on the Eternabond. It doesn't need painting but paint will stick to it if clean without roughing it up.
 

Latest posts

Members online

Forum statistics

Threads
131,929
Posts
1,387,650
Members
137,677
Latest member
automedicmobile
Back
Top Bottom