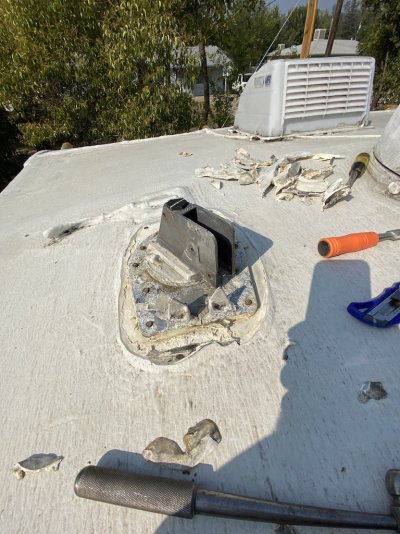
Replacing a broken off Winegard batwing with a King. Roof sealant question:

The friendliest place on the web for anyone with an RV or an interest in RVing!
If you have answers, please help by responding to the unanswered posts.

larryr

Well-known member
Joined
Jun 20, 2016
Posts
70
The Winegard is buried in sealant which I need to cut out in order to remove it.  Any tips on cutting the sealant to minimize damage to the roof?  I downloaded an install manual for the winegard, so should have a good idea of the size and shape of the buried rooftop base....
 
What do you have for roof material?
I would use a hair blow dryer and heat it up real good. Then using a good 1? wide putty knife laid on the roof, tap it under the caulking slowly using a hammer while occasionally using the blow dryer
 
Larry,

In addition to Rene's "Food for thought" morsels he threw out here, go to big box store to purchase some quality Razor Knifes, eXtra Blades, Thick Leather Gloves. 

You may need to Perform DIY Open Heart Surgery on it,  OEM Nightmare Dicor Self Leveling?

Sure Looks like it! 

I will admit, I don't have that T-Shirt yet, but that stuff does look like a challenge for sure. 

Look like repeated Licks from a 12 LB Sledge figuratively speaking. 

Not sure if you have a rubber of Fiberglas roof you are working with but

DON'T get in a hurry try not to Stress the original material too much ..

when you are slashing with Wide Eyed vigor and Scorching the thing, along with an occassional barrage of 4 letter words.  ;D

JD

Killing Time, Waiting for the Sun to Break!

https://www.youtube.com/watch?v=HXzVzxdwYxo
 
I've never had a problem clearing away Dicor with just the careful use of a utility knife. Be aware though, you're giving up some performance with the King antenna versus a Winegard Sensar IV. The King is particularly poor for receiving the low-VHF channels 2-6, and the lack of height when not installed on the Winegard arms also affects the other channels. The link below goes to an excellent technical comparison of the two brands as done by a professional broadcast engineer.

Batwing vs.BatMan vs. Jack: The Results
 
Thanks to all for the replies.  Heat is a great trick to know and will get used.  The link to the spectrum analysis comparison between the Jack and Batwing is really significant. 10 dB is a lot of Signal to noise difference. 

This poses 2 quandaries:  I just bought this Tioga 29 class C rig and found that the Batwing had been cut clean at the base where the two parallel risers go.  (guessing that it was damaged by being left extended while driving.  (No raising or lowering was a sweet advantage of the Jack).  I bought a Jack online and assume I can return it.  I have an old class C up on blocks with a working Batwing I may be able to steal parts from.  If going with a winegard batwing, I can hopefully not have to remove the bedded in rooftop base(I might be opening a can of worms trying to put parts from two maybe different models together)  or I can bite the bullet and buy and install a totally new batwing.
 

Attachments

  • winegard rooftop.png
    winegard rooftop.png
    325.3 KB · Views: 20
larryr said:
Thanks to all for the replies.  Heat is a great trick to know and will get used.  The link to the spectrum analysis comparison between the Jack and Batwing is really significant. 10 dB is a lot of Signal to noise difference. 

This poses 2 quandaries:  I just bought this Tioga 29 class C rig and found that the Batwing had been cut clean at the base where the two parallel risers go.  (guessing that it was damaged by being left extended while driving.  (No raising or lowering was a sweet advantage of the Jack).  I bought a Jack online and assume I can return it.  I have an old class C up on blocks with a working Batwing I may be able to steal parts from.  If going with a winegard batwing, I can hopefully not have to remove the bedded in rooftop base(I might be opening a can of worms trying to put parts from two maybe different models together)  or I can bite the bullet and buy and install a totally new batwing.
larryr
Go with a winegard batwing.... (The reception of a King Jack is disappointing).
 
I like the heat and putty knife but I really do not like the Jack antenna. Winegard Sensar IV is what I put up when I opposed my ole III+Wingan and glad I did.
 
The sealant came off easily.  I am concerned with the rusty fasteners between the base and the roof.  It look like there is a leveling wedge that I hope to not disturb or destroy.
 

Attachments

  • bedding clear.jpg
    bedding clear.jpg
    305.7 KB · Views: 14
Do you still plan or removing the base from the roof? Looking at the picture, I would even if you?re going to stay with batwing. What I would do is once you get it off and all the caulking cleaned up, I would drill out the holes in the base one size bigger and go with stainless steel screws.  Lay a huge bead of Dicor under the wedge then a huge bead on top of the wedge and roof then install the base with new screws and tighten them just a little bit at a time working your way all around. Keep going around several times until the screws are tight. Even out the Dicor with a putty knife or your finger. Use a little water on your finger. It may help. Once it cures, you may have to add a little more Dicor.
 
Is Dicor water soluble?  I use thinner for silicone to finger shape.

I have a  Batwing sensar IV sitting on a table waiting to go in.  I plan on doing a total replacement w new base, keeping the leveling wedge if possible. The thru roof hole should be good or may need some build up around the hole.  Gonna wait til the cool morning to finish that project.  I may ring out some interior coax lines today.
 
Larry,

Never underestimate the power of WD-40 Spray! In concert with soaking spray, let penetrate a couple minutes, Respray, along with Vibration of the threads on the bolt.

BTW: If my new mount would get the holes to line up on 2 or 3 bolts adjacent I would just use the existing threads in the roof to go back to.  If they would really tighten up, that is.  You got more than enough to hold something down if you are using a loctite and reapplying a big blob of Self Leveling..Heck add a couple "X" strips of band aid tape then Eterna Bond when going back with it. You are baking your own cake, right?  The sky is the limit, or rather your creativity.

Find some Metal Rod / Big old Scrap Bolt laying around in that tool box of yours....one that will cover the bolt head and Lightly Strike it to Vibrate the head being careful not to hit so hard to Mar the cross tip Phillips slot. 

1. Spray them.

2. Ring it! Pop it! with the hammer and short Rod......adding some Vibration to it (Pop/ Vibrate each Bolt Head)......... Short Metal Bolt/Rod and Hold it with long set of Channel Lock pliers so you can smack it without worry of hitting your hand!  ;D

Spray it Again.....then remove them simply.

JD

Plus....Pre-Going back together you are going to have to acetone it all to remove the oils before you bond up the next piece of Antenna Bracket you reinstall.  I would scuff it all too with Like 180 grit, blow it too in prep for the new stick-Um after antenna Upgrade.
 
I did not spray penetrating oil yesterday when I removed the bedding.  I am going to try to break the fasteners by hand.  They have a hex head + phillips.  I have a very small pipe wrench to unscrew headless shafts.  I hope to use the same holes, but may rotate a couple of degrees if I'm left with old fasteners (ground off at roof level). 
 
larryr said:
I did not spray penetrating oil yesterday when I removed the bedding.  I am going to try to break the fasteners by hand.  They have a hex head + phillips.  I have a very small pipe wrench to unscrew headless shafts.  I hope to use the same holes, but may rotate a couple of degrees if I'm left with old fasteners (ground off at roof level).

You never know they may surprise you and come out easy. 

The self leveling may have prevented water from getting at those threads all those decades. 

It has been over 10 years since RV MFG date, right?

Should be a testament to their product if you have no Grief removing the metal screws.

JD
 
No real input here on the project at hand, seems the OP has things well in control but I get a kick out of reading about managing the minutia of the detailed tasks all in the interest of preserving the original configuration, where there is likely little reason and some risk to preserve it in the first place.  After a few decades of building and fixing stuff from cars to motorcycles to electronics to houses, doing the "surgical" repair where one tries to disturb as little as possible and retain as much of the original integrity is wishful thinking bordering on folly.  For a long time now I view every project as scorched earth, wipe it clean and start from scratch.  Saves a lot of piddling around trying to get things out intact, having to clean stuff up and often only to find you end up starting from scratch anyway because some hidden damage is discovered or OEM parts can't be sourced.  If one was restoring a priceless antique then the painstaking process is warranted.  An RV that gets used, sits in the weather and has birds poop on it will suffer zero intrinsic value impact if one were to install something other than an OEM part or in a different way.  My goal is to make it work, and make it better than I found it which with RV's is usually not hard to do.  Tear it all out, salvage nothing, clean it bare and bring it up from there because more often than not you're time and money ahead. 

Mark B.
Albuquerque, NM
 
Mark_K5LXP said:
No real input here on the project at hand, seems the OP has things well in control but I get a kick out of reading about managing the minutia of the detailed tasks all in the interest of preserving the original configuration, where there is likely little reason and some risk to preserve it in the first place.  After a few decades of building and fixing stuff from cars to motorcycles to electronics to houses, doing the "surgical" repair where one tries to disturb as little as possible and retain as much of the original integrity is wishful thinking bordering on folly.  For a long time now I view every project as scorched earth, wipe it clean and start from scratch.  Saves a lot of piddling around trying to get things out intact, having to clean stuff up and often only to find you end up starting from scratch anyway because some hidden damage is discovered or OEM parts can't be sourced.  If one was restoring a priceless antique then the painstaking process is warranted.  An RV that gets used, sits in the weather and has birds poop on it will suffer zero intrinsic value impact if one were to install something other than an OEM part or in a different way.  My goal is to make it work, and make it better than I found it which with RV's is usually not hard to do.  Tear it all out, salvage nothing, clean it bare and bring it up from there because more often than not you're time and money ahead. 

Mark B.
Albuquerque, NM
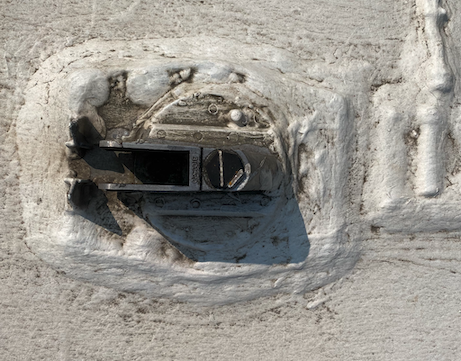
Mark I was hoping he could use 2 screw adjacent from each other for the next, new and improved antenna bracket he is putting up.  ;D

Yes disturbing the original goop too much may create a leak. 

With Eterna Bond Tape and Dicor Self Leveling, and Geocel RV caulking products there is really no worry about putting another tiny screw hole in the roof. 

I present the argument... look at all the square holes you could fall thru the MFG cut in it?

JD
 
Back
Top Bottom