Headliner / Ceiling problem

The friendliest place on the web for anyone with an RV or an interest in RVing!
If you have answers, please help by responding to the unanswered posts.

carson

Well-known member
Joined
Sep 1, 2006
Posts
4,919
Location
Florida, USA
A thorough Search turned up nothing in this category.

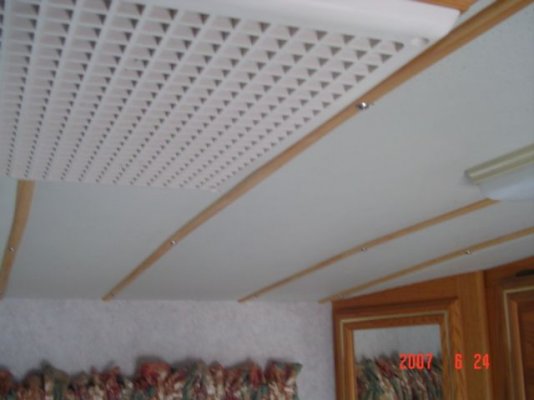
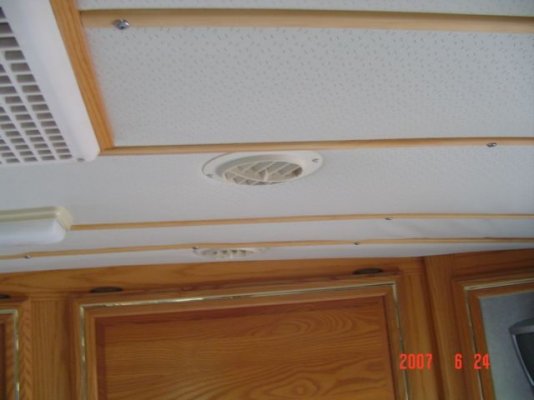
    Older motor homes have a tendency to get, well, old. One result is the drooping and or dropping of the headliner. I found out last year.(Lotsa Florida heat in the Summer.)

  One third of the bedroom dropped completely (no vents on that side to hold it up).
The remaining parts started drooping shortly thereafter. Then the problem migrated into the galley and forward section of the RV, all within a couple of weeks.

  Moisture was definitely NOT a factor; the adhesive just gave out.

Wonder if anybody has stories  be told about this matter here on the forum.

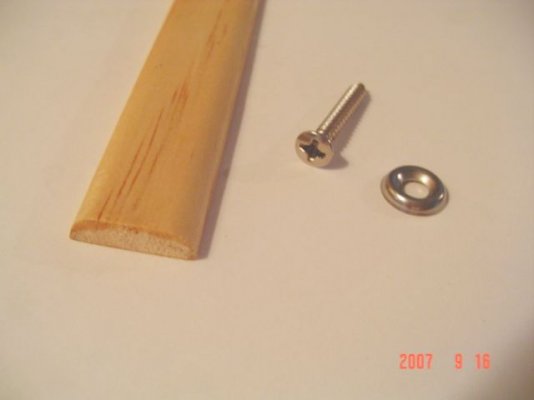
  In lieu of spending thousands, I decided to repair it myself. Am happy with the result.

Will be glad to outline my procedure, with images, if anyone is interested.

carson FL
 
Many people have reported the same problem. A description and pictures of how you redid the headliner would be great.
 
Ok, Whodo--- I hope that's not your real name :)

I'll get my images ready and my dissertation this weekend. ::)

Still would like to get some more comments, before I prepare my master piece.

Com'on folks, lets hear your woes. Maybe you have a fix-it story to tell as well.

I know... now everyone is waiting for my story first, but at age 172 one doesn't move that fast anymore. :)

See you soon,

carson FL. 90.3F

 
carson said:
...I know... now everyone is waiting for my story first, but at age 172 one doesn't move that fast anymore. :)
...

I suspect I won't be moving at all when I hit 172!    ;D
 
Frank, you have to think positive!

What is a century between friends? Nothing has really changed except the rhetoric now-a days. I think I was happy when I was born, (my memory fails me), but I am happy that I am here now, and I'll be happy when my time is over. That's all that counts.- No regrets.
  All my problems, headaches, disasters, crises and mistakes are now past me, just waiting for new ones, but at our age we have learned how to avoid them in the future. Wish our Young'ones knew what we knew a few years ago; like a century ago.
Happy to have met you on this cyber-world.

I'll be at the Alabama rally in October, why don't you come. I won't lecture you there.:)

carson FL
 
carson said:
Ok, Whodo--- I hope that's not your real name :)

I know... now everyone is waiting for my story first, but at age 172 one doesn't move that fast anymore. :)
See you soon,
carson FL. 90.3F

Actually it's our initials put together, it just happens to come out WHODO.  Thought about using all of our current & ex-ham call signs in a single string, but the better half liked the initials better. (She cooks better than me, she speaks I listen, err well sometimes.)
Dang I thought I was old, but both of us adding our age together doesn't even make it to 172...
 
Hardware:  Screw - Metal screw #6 x 1" with oval Phillips head, stainless steel
                Washers: Finish washer #6 ,also called cup-washers. stainless steel.
  Both these items shown in images below. Available at ACE hardware.
          ----------------------------------------------------------------------------------                                                                                         
Here is my method of repairing the 'dropped/drooping' headliner in my RV.

For reference on the problem, see my first post in this topic.

The general idea was to use lateral straps/moldings to hold up the fabric, with some sort of reasonable appearance and stability. The option of re-glueing everything is out of the question, unless you are very rich. In an older RV, who cares.My warranty ran out over 10 years ago.

Materials needed: Straps/moldings - 3/4" x 1/4" unfinished wood???. They come in lengths between 10-12 feet at HDepot. I cut each strap to size and applied one coat of wood-sealer. I used a sanding sealer,which I happened to have in my workshop; worked really well.
  I prepared one strip at a time to ensure accuracy with each one.

  Pre-drill each hole in the strap and simply screw into ceiling at various points. The ceiling,in my case, has plywood (I think) and makes for a tight grip. Stay away from the far wall to ceiling corner as there is metal approx 1-2" from the wall. Spacing is your concern, there is no magic to that.

    I found it impossible to lift and fasten the fabric without the odd minor wrinkle noticeable. Again, perfection is costly. It might help to have a second pair of hands available for assistance, but not necessary; I did it by myself.

  If the fabric has actually slipped out of the roof/wall edge, it is impossible to get it back in. You might have to trim it a bit, carefully.

Here are the images:

Image 1- Strap and hardware
Image 2 and 3 - Screws and Washers
Image 4,5 and 6 - The finished look  (Bedroom, Galley, forward)

  Just think if I were a craftsman. ;D

carson FL


edit: one paragraph slipped to the top, don't know why. Guess you can figure it out.
 

Attachments

  • Strip Hdw.jpg
    Strip Hdw.jpg
    17.9 KB · Views: 221
  • Oval Phillips.jpg
    Oval Phillips.jpg
    29.1 KB · Views: 176
  • Cup washer.jpg
    Cup washer.jpg
    25.6 KB · Views: 150
  • Ceiling BR.jpg
    Ceiling BR.jpg
    33.5 KB · Views: 320
  • Ceiling strip 1.jpg
    Ceiling strip 1.jpg
    28.7 KB · Views: 244
  • Ceiling strip 2.jpg
    Ceiling strip 2.jpg
    34.8 KB · Views: 274
Very nice job. Bet it was a lot cheaper than pulling every thing down and replacing the material completely. Thanks for posting the pictures with material list.
 
Carson,
Very glad to see you post this.  The ceiling in my '94 HRI is just starting to do the same thing and I had considered the EXACT same steps to correct the problem - but hadn't gotten a roundtuit yet  ;D.  Now that I see how well your's worked, I'm a bit more inclined to get started - before mine gets any worse.
tks,
Steve
 
Carson,
Thanks for posting your solution. I think that the "new" ceiling looks very smart and neat. Good job.

Regards,
Liz
 
for some reason I can't download your pitcures. I would think you have done the same thing I did. I used oak trim that was finished so all I had to do was measure cut then put up. works great and if you pull the cloth tight it will stay in place. well it has for three years now anyway.
 
Carson,

I went ahead and put your repair procedure and photos into an article in our forum library here.  *

Thanks for sharing the information. The results speak for themselves.
 
Thank you Tom,

Just remember, no awards. :)

Too bad some folks still have problems viewing the images. Someday, someone will come up with the answer for that annoying problem.

Have a great day,  carson

Edit: PS- Thanks for the constructive editing, Tom. Almost reads professional.
 
carson said:
Too bad some folks still have problems viewing the images.

The same folks should be able to see the images in the library article because they don't use the forum software; They're not as large as your attachments, but should be viewable.
 
We had the same problem on my Dad's '93 Winnebago Vectra.  They used the same vinyl ceiling material with the foam backing and they went to a lighter weight material a few years later, then fabric, now back to the foam. 

A couple things I'd like to add to your repair that we did.

1. We were able to reduce the number of wood strips by pulling out the plastic seams and pulling the vinyl tighter and replacing the plastic strip.  There is a channel the plastic fits into and some of it had to be trimmed.  Some areas the plastic broke, so we used a wood strip there as well.

2. We called Winnebago and got their recommendation for additional spray-on glue from our local auto parts store.  When we pulled the plastic seams off, there was access underneath the vinyl, so we sprayed the "drooping" area with the adhesive, let it dry to a tacky consistency, rolled it with a j roller used for kitchen formica intallation (I had one at home) or you could use a rolling pin, and then installed either the plastic seam, or wooden strip.  It really helped firm up the vinyl inbetween the seams.  No wrinkles or pockets!

 
Thanks for that info dSolberg,

  I was hoping someone would have a differing idea. Well, my job is done now, so I won't be able to experiment anymore.

    I was wondering about those vinyl strips, but had no idea how they were held in. I didn't want to make things worse by ripping them out.

  Further, the foam layer on the ceiling, black stuff, was quite deteriorated, came off in lumps and dust, very crumbly. Can't believe anything would stick to that.

  The odd folds and lines in the fabric now don't bother me, it's a sign of age; I even have a few on my body.  ;D  My total cost for materials was less than $30.00.

  Thanks for the input.

carson FL.


Latest posts

Forum statistics

Threads
131,929
Posts
1,387,651
Members
137,677
Latest member
automedicmobile
Back
Top Bottom