Questions about my new Fleetwood

The friendliest place on the web for anyone with an RV or an interest in RVing!
If you have answers, please help by responding to the unanswered posts.
I wonder if that hatch opens from the top and pulls downward via an elaborate set of hinges. Too bad we don't have a photo of the door.

  If so, you may want to pull the top edge out and downward. I know the engine compartment door works like that on my Winnebago. I even have a little home made tool to help open it. It's a flat piece of metal (1'2" wide) with a 1'4 " bend at the end, which when inserted in the upper edge facilitates pulling the door in a downward fashion.

  Just guessing here.

carson FL


Diesel generators don't have spark plugs  ???  No wonder I couldn't find the old ones to remove/replace  :(
 
I wonder if that hatch opens from the top and pulls downward via an elaborate set of hinges. Too bad we don't have a photo of the door.

If the door is like the one on the Excursion, it opens by first tipping the top out and then in a continuous motion pulling up and further out.  Yes, it does have "odd" and convoluted "hinges".

Don
 
Here come the pictures, finally.  Hope I can get these in the right order and explain clearly what you are seeing.

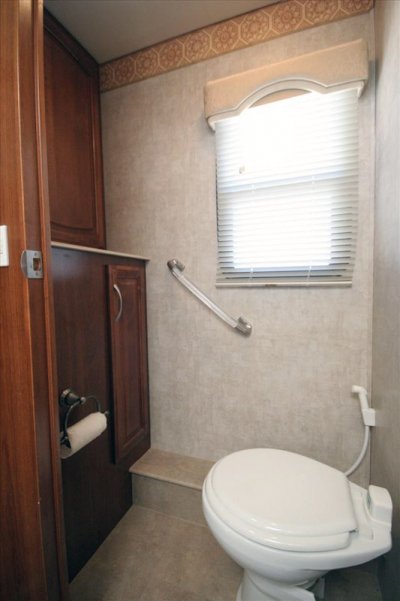
First, the mystery of the bathroom light switches is solved (memory loss).  Turns out we have 4 switches instead of 3. Doh! Picture 1.

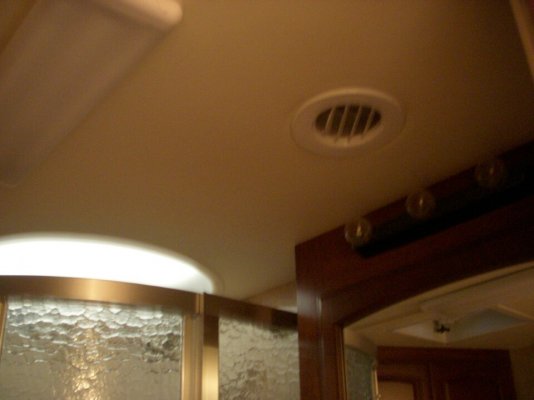
The 2 switches to the right of the Water Pump switch are for the ceiling florescent and the three light bulbs over the vanity mirror.  The switch to the left of the Water Pump is for the night lights.

I realize that his doesn't help you with your switches (sorry), but it might help some else who has this exact set up.

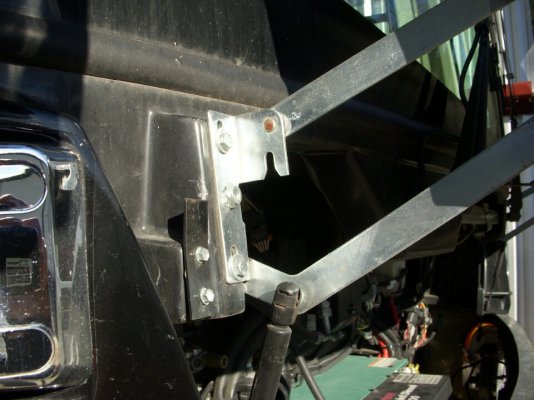
Next, the hood/door, hinge arrangement, and lock detail.

First (Picture 2), is a picture showing the door in the open position.  Note how the hinge assembly requires that you pull out and up to get it open.

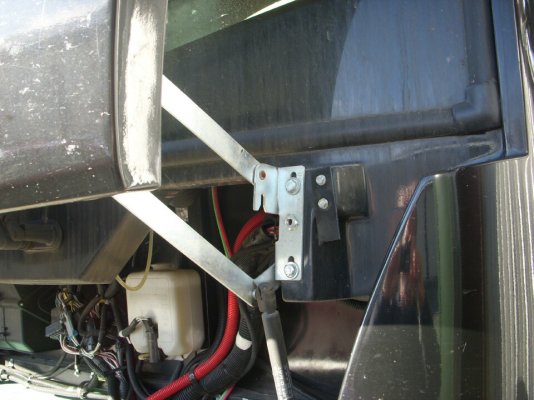
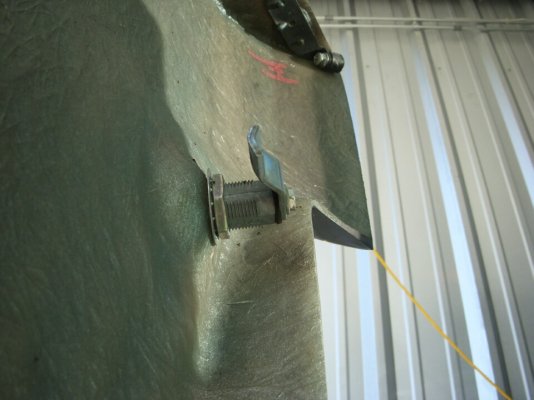
Next is  a detail shot of the hinge assembly and the lock receiver.  Picture 3 is the passenger side. Picture 4 is the driver's side.  Don't be fooled by the neat slot in the hinge arm -- that is not where the lock arm goes.  The lock arm just slides behind the flat black metal strap mounted just to the outside of the hinge assembly.  And yes, the one on the passenger points UP and the driver's side DOWN.  That is so that you can turn the key to the right to lock and to the left to unlock on either side.

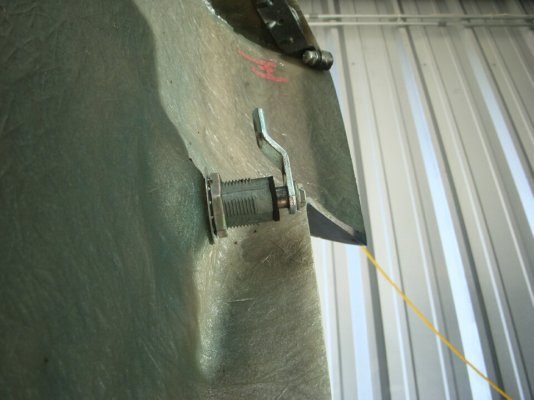
Picture 5 shows the lock assembly arm in the opened position.  Note the shaft showing between the lock arm and the lock body.

Picture 6 (In the following post) Shows the lock assembly arm in the closed and locked position.  Note that the shaft showing in picture 5 has been drawn back into the lock assembly body.

What happens when you turn the key to right is that the lock arm slides behind the lock receiver (that black strap) and when it seats as you continue to turn the key to the right the lock assembly pulls the shaft into the lock body snugging the hood against its stops.  When you turn the key to the left, things happen in the reverse order -- first extending the shaft, then turning the arm.

One thing I noticed while I was out at the moho getting the pictures (and then recalled how long it took me to figure it our when the moho was new) is that the key is not user friendly.  It will appear and feel as if it is seated in the hole and will turn with some resistance, leading you to think you are accomplishing something.  In fact, as I discovered eventually, it may well be that the key is not all the way in and nothing is happening.  For those who don't have this set up, the lock and key are circular with "ears' on the key that stick out and engage slots in the key receiver if you get it just right. I've found that by pushing the key in until it stops and then turning it while continuing to press in, the key will finally seat all the way and turning will produce results.

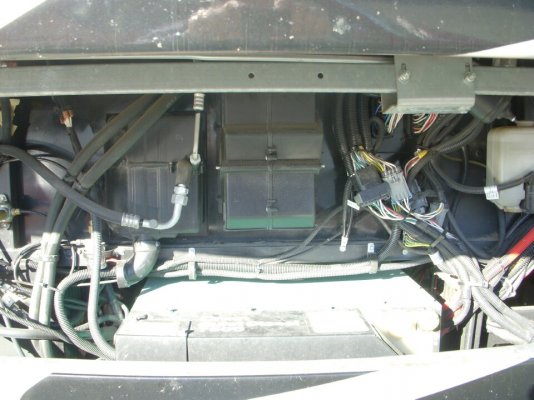
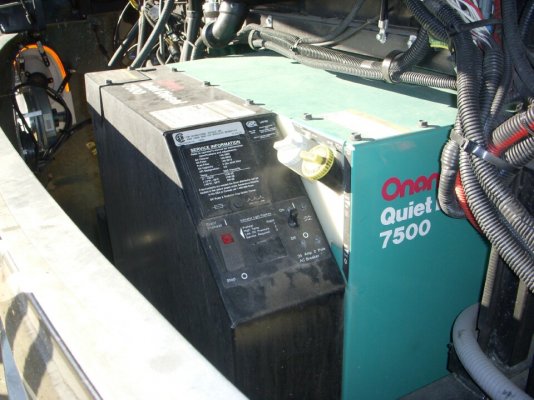
Picture 6 shows what's behind the door.  The jack for attaching the air hose is to the very far middle left; the windshield washer fluid reservoir to the very far right; the generator in the middle.

Picture 7 is a close up of the generator.

Hope this helps.  If anything is not clear, just say so and I'll try again.  It all seems to make sense to me, but I'm sure those incomprehensible computer peripheral manuals  ??? made sense to whoever wrote them, too.  :D :D

Good Luck!

Don


Attachments

  • RV Bath Light Switches.jpg
    RV Bath Light Switches.jpg
    129.7 KB · Views: 41
  • Excursion with Hood Open.jpg
    Excursion with Hood Open.jpg
    167.6 KB · Views: 49
  • Excursion Hood Hinge Assembly and Lock Receiver Detail - Passenger Side.jpg
    Excursion Hood Hinge Assembly and Lock Receiver Detail - Passenger Side.jpg
    153.4 KB · Views: 41
  • Excursion Hood Hinge Assembly and Lock Receiver Detail - Driver Side.jpg
    Excursion Hood Hinge Assembly and Lock Receiver Detail - Driver Side.jpg
    158.9 KB · Views: 40
  • Excursion Lock Arm Extended (Opened Position).jpg
    Excursion Lock Arm Extended (Opened Position).jpg
    120.1 KB · Views: 38
  • Excursion Behind the Hood.jpg
    Excursion Behind the Hood.jpg
    162 KB · Views: 40
  • Excursion Generator View.jpg
    Excursion Generator View.jpg
    171.6 KB · Views: 47
Shucks Darn! :mad: :mad:

I left out the first picture 6 showing the lock assembly in the closed position.

Here it is.  Sorry.

Don
 

Attachments

  • Excursion With Lock Arm Retracted (Locked Position).jpg
    Excursion With Lock Arm Retracted (Locked Position).jpg
    117.5 KB · Views: 40
Don - Thanks a zillion for the photos. Unfortunately my generator door does not look like yours. I have attached a photo. It is a rectangular door. I woke up this morning parked next to a 2004 Discovery so I went over and asked the owner if he knows how to open the generator door. He said he did and tried for ten minutes without any luck. We went over to his unit and he opened his door with ease. His door is just like your door. So then I crawled under my vehicle while he tried to open it. The first thing I noticed is that the key locks were not oriented the way I thought. They have to be horizontal for it to open. But even with the locks oriented properly it would not open. Tomorrow morning when it warms up I will crawl under again with my trusty can of WD-40 and spray it all down. I am pretty sure it is frozen. If that doesn't do the trick I will take some photos from under the hood.

The second photo shows the handle next to the commode. Is this what your right hand switch turns on?
 

Attachments

  • Providence toilet.jpg
    Providence toilet.jpg
    100.8 KB · Views: 43
Well, shucks.  I'd sure like to see your door......

We have a safety bar like the one in your photo.  It is turned on by the leftmost switch in the group of 4 in my picture.

My right hand switch controls the ceiling light shown in the upper left corner of the photo below.

Good luck with the WD-40 and your door.

I'd be interested in how you make out.

Don
 

Attachments

  • RV Bath Lights.jpg
    RV Bath Lights.jpg
    109.7 KB · Views: 25
I thought I did attach the door photo. So I will try again.
 

Attachments

  • Providence front end.jpg
    Providence front end.jpg
    33.2 KB · Views: 40
I WD-40ed the mechanism and it is still not opening. I got a bumper to bumper extended warranty so I guess I am going to have to take it in and have it opened for me.
 
Seilerbird:

Fleetwood has used similar looking access doors for years and our last Pace had one that looked very similar to yours. I also had lock problems but it turned out to be the latch had slipped on the shaft and did not move into the unlocked position. I believe it was held on by a bolt from the back that had loosened if you can reach it.

You also might check with your warranty provider, ours would not have covered this unless the latch was broken. (Adjustments, lubrication, etc were excluded)

Good luck.
 
Ditto what Jeff said.

The latch arm is held on by a bolt that goes through the latch arm and into the lock mechanism.  It can get loose and that has happened to ours. 

Fortunately, our door is flexible, so by flexing (wiggling) the door while turning the key, the pressure on the arm can be relieved and the latch arm can be made to move.

Maybe, if you can get close enough to the latch arm to get WD-40 on it, you could get a wrench on the bolt head that extends beyond the latch arm and turn it that way. Although it might help to have someone work the key at the same time, it may not be necessary because it really doesn't "lock" anything.

Don
 
I can see the latch mechanism real clearly when I crawl underneath it. That part is working fine. The latch is not the problem. The problem is the hinges appear to be frozen.
 
It would be odd if the hinges froze up - that is not a tight fitting mechanism and even if rusty they should still move. It's an awkward movement, though. and hard to get the motion started.
 
The problem I am having with this motion is that there is nothing to grab a hold of. I have tried pushing on every part of the door and I have tried pulling on everything I can pull on, but it doesn't move.
 
I even have a little home made tool to help open it. It's a flat piece of metal (1'2" wide) with a 1'4 " - 90 degree bend at the end, which when inserted in the upper lower edge facilitates pulling the door in an downward out and upward fashion.

  Try making a little tool as described above. It's a piece of aluminum about 6" long. Its about 1/8" thick. Just insert it it in the center bottom and pull out and then up, in your case.

  It is better than a screwdriver...won't mark the paint.

I think the hinges may be a bit tight and just need a little yank.

Good luck,  carson FL

 
carson said:
   Try making a little tool as described above. It's a piece of aluminum about 6" long. Its about 1/8" thick. Just insert it it in the center bottom and pull out and then up, in your case.

   It is better than a screwdriver...won't mark the paint.

I think the hinges may be a bit tight and just need a little yank.

Good luck,  carson FL

Thank you very much Carson. I didn't even have to make the tool, I had one in my toolbox that looked just like you described. I inserted the tool and it opened. I am soooooooooooooo happy. Now I can put windshield washer fluid in and change the oil in the generator. Thanks again.
 

Forum statistics

Threads
131,974
Posts
1,388,471
Members
137,722
Latest member
RoyL57
Back
Top Bottom