TOTAL re-roofing project with many questions.

The friendliest place on the web for anyone with an RV or an interest in RVing!
If you have answers, please help by responding to the unanswered posts.

ColoradoRV

New member
Joined
May 21, 2009
Posts
3
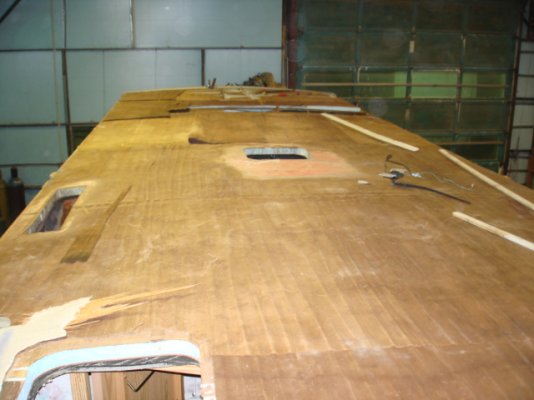
My husband and I are starting a TOTAL roof replacement on a 1993 Itasca Class A RV. Both inside and outside roof.  We have no experience with this, and are hoping to get as much input form anyone with advice.

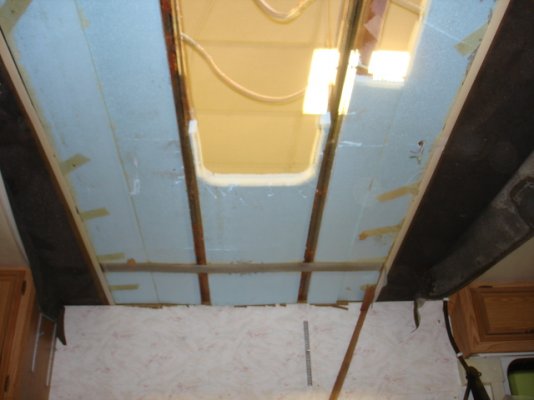
Yes, we need to do both sides, because all wood is totally water damaged, and headliner has fallen in entire coach. Roof is sagging inside as well. (Bought this used)

I have read many of the roof replacement posts and cannot find enough similar to compare. Please bear with me while I sound ignorant, mostly because I am!

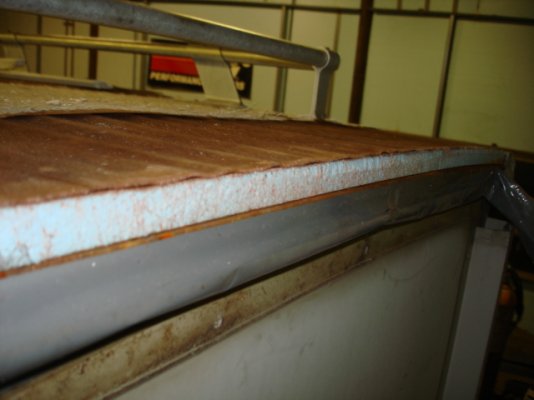
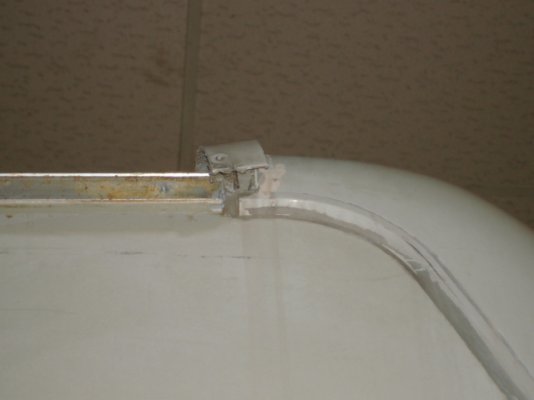
1. I am shocked to see how terribly THIN the roof structure is. The total thickness of roof is about 6" or less- is this common? Just a thin sheet of Luan inside (like 5mm) then 2" of foam, then the top sheet of Luan again.

2. When replacing this, should we be going thicker, or staying with the same setup?

3. We have metal framing going across the width of RV, not wood like I see in alot of the posts- is this a bad thing or good thing? Should we change it?

4. We are going from an old fiberglass roof, to EPDM roofing. I don't see that the old Luan is screwed into anything- is this possible? We have been able to just tear it off- no screws.

5. The roof overhangs on the sides- when tearing off old roof, there were rounded foam inserts in there (like quarter round) is this something that is still sold, and where?

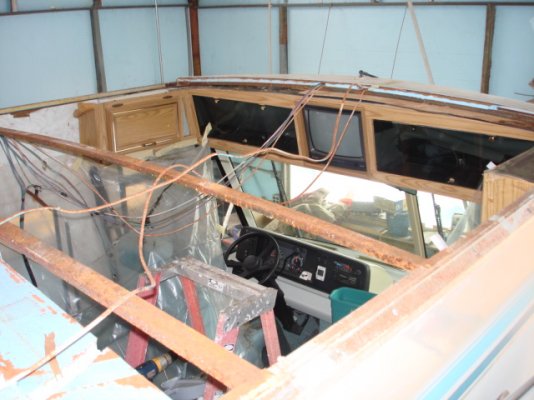
6. Having a real tough time getting the front metal strip off. Any advice?

7. At this point, I feel we should only replace one section (4x8) at a time, so we can see where the holes for things were, and wires, etc. I am afraid if we rip everything off, we won't know what went where. Will this make it easier or harder?

Thank you in advance for your patience and any advice. I can post pictures if that will help.
 
I can't help with any of the technical questions you asked, but have a little advice for your project. Take lots of pictures as you go along. It will be helpful when you can't quite remember what that little wire attached to or how it was routed, etc. Plus when you are done you can make a writeup and perhaps make someone else's job go a little smoother in the future.

I learned this from working on my jeep and it has saved me countless hours of random tinkering.

Hope this helps and good luck!
 
IN 1993, 2-3 inches was common. Even today, 4" is common and 6" only on the high end models. The roof is a s thick as it needs to be to conatin the amount of insulation used. If you want a greater R value, you probably need more thickness.

The luan was probably glued rather than screwed. Nothing wrong with that - a proper glue joint is stronger than the wood itself.

I don't know where you would get rounded foam panels. Probably have to get square ones and cut yourself, unless you can find a current manufacturer using the same technique.

Metal cross pieces are fine.
 
You can get either quarter-round or shoe mold made out of styrofoam at Lowe's. It is in the vinyl mold section and looks like vinyl but actual is either taped over styrofoam or vinlyzized styrofoam. It actually is a good product and reasonablly priced.

If it were me, and I have been doing a lot of roof repair to my unit, I would rather do the whole roof without seams. I know that might be difficult to put back together but I believe that is how it is done if you took into a trailer/rv repair shop. You would need two people and glue/roll as you go as there is not much ''set time'' with that dhesive. Keeping the bubbles out is key to a successful application. Good luck.

As far as the difficult trim to remove, it probably has butyl tape or some other product under and/or over it. I have found that it's best to use force if necessary, don't worry about damaging it as it is never good to put back old with new. Just replace it.

I am actually replacing the wood on my super slide this w/e and then regluing. It is amazin how much damage one very tiny pinhole can cause if left unchecked.
 
We did a tear off and reroof project on our RV last summer.  We fixed a number of problems that were age or water damage related.  The link to the project is in the signature line, below.  It was not a complicated job, just long in time.  I also created an article that is posted in the forum's library, acticle, and at the end are a few links to others that did similar work and some that were really extensive.

Certainly the info will rasie more questions, fire away.
 
What is the radius for the quarter round you need for the roof border? The roof lines I am familiar with use a large radius, perhaps 6". I don't know where to find anything that large. Smaller sections, e.g. 1/2" radius, are easy to find.
 
Thank you all for your help.

Gary- I don't think the corner round is very big- maybe 3" or so.

Bob- I have actually read your post/project all the way through, this is why I posted here. Yours and all of the links in your article also have wood beams- (we don't)- so we cannot follow the same process you did. However, it was extremely helpful to see your step by step. THANK YOU!

It seems as though everyone who replaced their roof, did not stay with the original Luan, but went thicker. This is a concern, because if you go thicker, then the vents and skylights would not fit the same right?

We will try to duplicate the original design if possible.  Should we keep any of the old foam insulation? (That is of course if we can salvage anything) Everything is glued together, so tearing it apart is a challenge.

I think that all of the layers (Luan-foam-Luan) are glued together and then held in place by the front metal strip and side metal strips. Does this sound right? Also, when putting this back together, what glue should we be using to glue whole sheets of Luan to the foam?

When I said I wanted to replace 1 section at a time- I meant for the wood replacement only.  The final roof will be the one piece rubber EPDM sheet.

 
To answer your questions:

When we replaced the roof, we replaced all of the vents.  When you install them, you have to cut the trim length to suit the roof thickness so increasing the roof thickness did not matter.

We used "Liquid Nails Panel Glue" and troweled it on both foam and Luan.  Once they came together, they are hard to position.  We made test pieces before starting the real roof so that we knew what we were doing before attempting the real thing.  After glued and placed, the panel was stapled along the beams.  After a couple of days, it was a strong assembly.  The original roof had no staples.

If yours is truly all metal beams, using screws in to the ribs would be the way to go, sinking them flush with the wood.  There are screws available with drill points that drill and tap their way into metal.  www.McMaster.com will show pictures and you can order parts too.  I'm kind of surprised that a 1993 Itasca would have an entirely metal structure in the roof, so I'd question if that is really true.  Looking at an old brochure, here, pg 8 shows some metal ribs.  I'd expect the rest of the ribs to be wood.  The pictures seem to imply that if you can unscrew the corner bracket, under the corner foam, you may be able to raise the ceiling to get old ceiling material out and new material in.

Looking closely at the detail picture of the roof, it suggests to me that the metal has a curve to it and the foam is laid on top of the curved surface, an easy thing to do.  I'd expect curved wooden ribs near the rear.  The foam boards between the ribs would have to be formed over a curved surface.  We used flat supports on the inside to support the roof when is was torn apart and to push the sagged area back to its proper location.  You could make curved interior supports to define the ceiling shape and work outward to recreate the built up roof sandwich.  Do that section by section as you work your way along the length of the unit.  You may need to add wooden ribs to suit available Luan sheet sizes, we did.  The backside (curved edge) of a large putty knife worked great to cut the foam.

Also looking at the brochure, I wonder if you would be better off to use fiberglass sheet again.  The edge trim that the pictures show are not suitable for a rubber roof.  Going with rubber would require an additional cap strip to capture the rubber's edge, as shown here.

If you could post a few pictures showing the trouble spots, we should be able to offer specific comments.

Talking to a local dealer's technician may yield a lot of helpful tips to make the job easier.  I'm sure yours is not the only one that has had the roof replaced.
 
Bob-
Thanks for your reply.  As for the all metal beams- we have removed most of the front half of RV and yes, the metal is all that there is, just like the diagram shows in that brochure. Checked the rear half, and no wood there either. Again, I am really confused as to why they would go 4 foot spans with NOTHING supporting it?  (See picture today) We are going to add  additional beams there to prevent future sagging. The only time there are beams with 2 foot spacing, is when there is an AC unit or other.

We originally thought that there must be a broken beam in the roof, since the water was pooling there and you could see a visible sag on top. After taking this apart, there is nothing broken.  ?? Nothing except rotted Luan there.

We have all of the fiberglass off, and all of the Luan sheets off the top now.  After looking it over, I think we might be able to get away with only replacing the front half (inside and out) and leaving the inside rear Luan intact. When looking at the top view, the rear seems to be supported well, with a good arch to it, compared with the front half.

We have already purchased a new rubber roof for it, so I guess we will have to look into the edge trim issue now.  I didn't realize this would be a problem, so thanks for your help on that one! Any ideas on where we can purchase those?

Also forgot to mention:

The entire headliner from one end to the other end has fallen off. Even inside of the cabinets. So for the parts of the roof we are trying to save, I have had to cut this headliner down with a razor. That leaves the nasty mess of the crumbling foam/glue mess. We have been using a putty knife, a wire brush and anything we can think of to scrape this off.  ANY SUGGESTIONS? This absolutely needs to come off completely, in order to be able to re-glue or reattach anything afterward.

1st picture shows roof from back to front. Notice the sagging up front where there are no supports- this is where water was pooling.

2nd picture shows inside view of front section where AC was. This is the only spot where there are metal supports 2 feet spacing.
(you can also see what is left of headliner and foam mess)

3rd picture is roof at the rear of RV showing water damaged Luan on top.

4th picture shows the open top (front of RV) showing the ONLY 2 metal supports in the roof.

5th picture is of the metal strip at front of RV that we cannot remove.


Attachments

  • Top.JPG
    Top.JPG
    141.8 KB · Views: 268
  • Inside.JPG
    Inside.JPG
    143.2 KB · Views: 205
  • Top rear.JPG
    Top rear.JPG
    140 KB · Views: 210
  • open top.JPG
    open top.JPG
    140.7 KB · Views: 258
  • Front metal.JPG
    Front metal.JPG
    113 KB · Views: 214
Suppliers for the new edge trim will be a shopping exercise.  Try RV dealers, boat or airplane repair shops, industrial metal suppliers, etc.  The longer the length of aluminum the better, just so you have fewer joint seams.  The cheapest grade of aluminum will be fine.  A local EAA (experimental aircraft association) chapter might be a help.  The Thomas Register can also help search for industrial supplies and materials.

To get it all apart, the tools needed are pretty much whatever works best for you.  I used a lot of knife blades and a stiff putty knife that I sharpened to a scraper edge.

For the inside, I'm still thinking that you will need to create a large curved surface to support the ceiling in its final location and build & glue the roof outward from there.  The factory would have had a large fixture to this for the whole roof before moving it up on the the RV.  I saw a TV show that showed how the floor, walls & roof are made as large sheets then assembled to create the box, impressive.  Certainly we do not have that luxury.  You may have to take upper cabinets off the wall to gain suitable access.  To add curved beams may require finding a local machine shop that can roll a straight tubular beam into a curved one.  They will be able to match a curved template that you provide.  The rolling machine is simple and fast.
 
It is not really an easy thing to replace a roof with just you and your husband. Every step for removing the old and putting the new one is quite hard.
 
shreadzeppelin said:
    RUN LIKE HELL! SELL IT FOR PARTS

    BUY ANOTHER RV OF SIMILAR VALUE AND CRUISE

His next one could end up needing major mech. work, then what?
They all need something.
J
 
Back
Top Bottom