2009 Winnebago Destination 37G - Adding Front TV
Well, wife and I decided that we did need a front TV. The 37 inch Flat Screen is nice, but you need to have the slide out to use it. When we make that quick overnight stop at Wal-Mart, Sam's or (insert location), putting that slid out is not a viable option. The Bedroom TV suffers from a view angle problem (which is on the to-do list), if you are lying on the bed or sitting on the bed, there is not enough downward angle on the TV to really see it. Besides if I want to stay up and watch the news and the wife wants to sleep well......
The front TV was an option (61E). The wiring was not installed for this (according to Winnebago) in my motor home, but all I need is the TV Coax which I can access from the wall plate by the passenger seat.
So, I have almost completed the installation - almost meaning I need to add a little trim work.
Will start with wiring. I contacted Winnebago Customer services and asked if the wiring was pre-installed. They advised that it was not. The wiring consisted mainly of an antenna cable and a composite video cable and audio cables all coming from the entertainment center in the center of the motorhome. As mentioned above I had a TV outlet by the front passenger seat, and that tested good, and it is controlled by the "TV 2" switch on the video switch. "TV 2" also controls the bedroom TV and the antenna outlet for the external entertainment area inside one of the bays. So, I knew that all that would be required would be a coax run from the passenger seat to the front overhead cabinets. (Photographs are attached and I will try and explain them here - this will be lengthy) I knew by looking at the wiring diagrams, it showed that there was a junction block in the antenna coax from the center entertainment center to the passenger TV outlet and that a coax cable off this junction block went to the front TV.
I started by removing the wall plate that the passenger TV jack was connected to. I found the coax, unmarked, (as per Winnebago Wiring Diagrams) going to the back of the cabinet it was mounted to. To really find out where it went, I had to remove the cup holder adjacent to the passenger's seat. Once the cup holder was removed, I found that the coax entered the wall to the rear of the passenger seat window. I then deduced that maybe it went forward and up the passenger side A-Pillar to the front overhead cabinet. After removing the A-Pillar cover, I could not find the coax. Next step was to remove a forward panel in the passenger side overhead cabinet that has the satellite switch attached to it. Inside, with the help of a camera (I am going to purchase an inspection camera one of these days) I was able to see a coax junction block, with all ports filled.
I was able to reach in and find a "loose" coax that was connected only to the junction block. The other end was free and I was able to put it through the existing cut out, into the front cabinet. This was a joyful moment. I was not going to have to run another coax cable. I searched around the best I could, hoping to find that the composite video cable and audio cables had also been installed, no luck. Well, I really just wanted the OTA antenna, and with luck, I should be able to get satellite through the coax from the switch (though satellite to the rear TV from the switch has not worked).
So now it was on to installing the mounting bracket for the TV. Since this post is long with lots of pictures, I will break here and continue with another post.
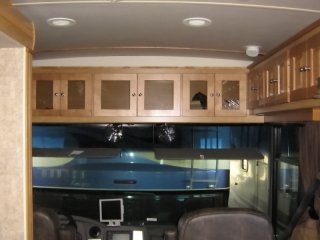
Photo one - the front overhead cabinet from the factory.
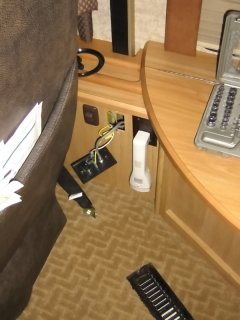
Photo two - the passenger seat TV outlet
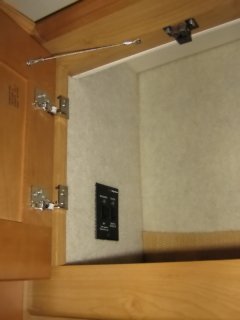
Photo three - panel in the passenger overhead cabinet with satellite switch
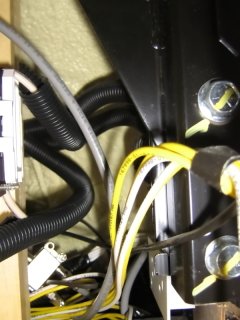
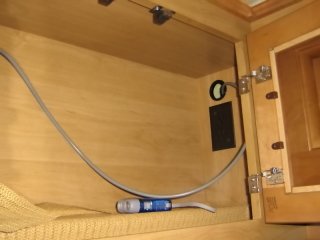
Photo four - wiring behind the panel - looking to the front cap. You can see the coax junction block in the lower left
Photo five - cable coming out the access into the front overhead cabinet.
Part two - later today or tomorrow
Michael
")