1st part of remodeling motorhome

The friendliest place on the web for anyone with an RV or an interest in RVing!
If you have answers, please help by responding to the unanswered posts.
We are still out here but not back on the RV remodeling yet.

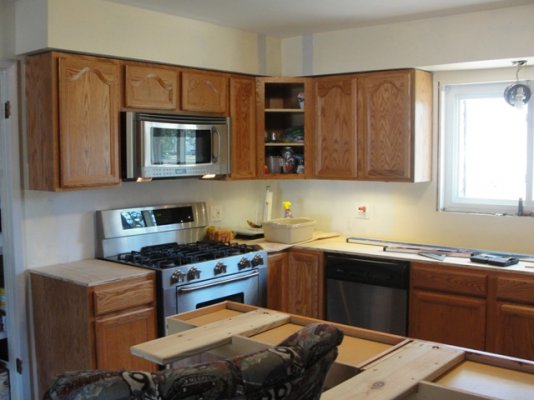
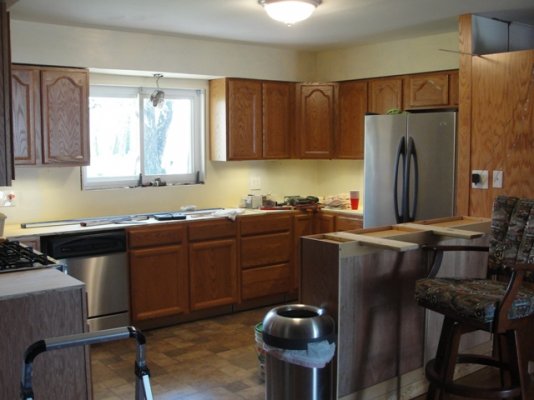
We stopped to remodel our kitchen, completely!  Almost to the granite stage but lots of trim and finish work to do. Ordered the sink and faucets today, not picking out tile backsplash material till we are done with granite.  Hubby put in undercabinet lighting which I love, he rewired it in there.  Then we have a rentor who got transferred and had to move so some work there, not much thankfully, they were really good tenants.  But we will be back to finish our motorhome. (Well I'm out to till in the garden in a few minutes)

2 pics of the kitchen so far! They are coming to measure for granite Monday so hubby has to get the bar top finished.

I can't wait to get back to the motorhome and finish it and use it too!!
Back later


Attachments

  • Pictures today of kitchen 2282010 003.JPG
    Pictures today of kitchen 2282010 003.JPG
    129.1 KB · Views: 115
Moderator delete that one, wrong one.
 

Attachments

  • Pictures today of kitchen 2282010 002.JPG
    Pictures today of kitchen 2282010 002.JPG
    127.3 KB · Views: 89
Tom is working on some things on the RV today, things I can't do.

We found the bumper and he was able to repair pieces in the back.  But this one panel he could not find so he is fabricating it from a section of aluminum.  He is rolling the edge and we will have to try it of for fit.  He said I will have to oxidize it, there is a solution for this?? before I paint it. It has a small separate piece he said he wished he had thought to incorporate with it.

As I stated, the leaks are stopped, but we have been really busy with a million other things here so just now getting back.

I checked the tires 2 are dated 2007, 3 dated 2006, 1 we think is 2001, and he has to check the 2 on the inside dualies yet.
 

Attachments

  • Fabricating a panel 001.JPG
    Fabricating a panel 001.JPG
    600.2 KB · Views: 63
  • Fabricating a panel 002.JPG
    Fabricating a panel 002.JPG
    500 KB · Views: 53
Tom corrected me, he said its de oxidize the panel not oxidize it.

Here is the panel inserted not fastened yet.
 

Attachments

  • Panel inserted 001.JPG
    Panel inserted 001.JPG
    415.5 KB · Views: 48
  • Panel inserted 002.JPG
    Panel inserted 002.JPG
    442.6 KB · Views: 44
I'm sure many of you can guess what is happening here.

That is spark plug number 4!!  I'm sure many of you have been there.

We are also getting ready to put new carpet in the cab and I'm waxing and using rubbing compound on the outside. We think Tom may only have till 2 more days to work on it.  He may be shipping out on Wed for 8 weeks.
 

Attachments

  • 002.JPG
    002.JPG
    552.1 KB · Views: 67
Had to take the seat out to get the engine cowling out, but since we are changing carpet out, good time to do it anyway..
 

Attachments

  • New carpet to go in 001.JPG
    New carpet to go in 001.JPG
    449.3 KB · Views: 64
Hubby also greased the U joint, I beleive that's what its called.  He said it was extremely dry took a lot of grease.
 
Working on the replacement carpet.  I had it folded so we are letting it relax before we put it in.  Hubby said that the other was glued down, we intend to use spray glue on this especially where the drivers feet go so we won't have the "toyota effect" with the accelerator or brake.

Our problem is the carpet is not long enough to go over the hump in the class C, the hump from cab area to back area that is, so Tom is going to stain a board to replace the cheap piece slanted in there. It was under the carpet.  Then get a thresshold type board and plane the edge down so it is sort of an angle to meet the other yet covers the edge of the laminate. I think that will look ok.  We have stain and a sealer that we ordered to match our new kitchen cabinets, supposed to be very good quality so think we will use that.  Have to experiment a bit, but think we can get it in ok.
 

Attachments

  • Flooring in cab 001.JPG
    Flooring in cab 001.JPG
    415.8 KB · Views: 70
It had blue in it, wish I had ordered blue, but the whole cab is that color of tan so thought it would go better. 
 
You can cut the carpet for the transmission hump separately then the floor. That will take care of the angles that occur.
 
There isn't any hump for the transmission Ernie, its where the cab is connected to the motorhome living area.  The cab metal goes behind the seats, then it had a connector piece of a board maybe 6 inches wide that was covered with carpet and was slanted and connected to the upper level where it met with the carpet.  Now with laminate on the flooring and this cab carpet it doesn't meet, the carpet is to short.  I ordered a regular van cab carpet for it. I need to check but I think I can buy the same carpet in a roll and do it the same way it was done before, if not we will use the hardwood solution.
 
I've used rubbing compound and waxed halfway up to the white stripe, and not the hood yet.  I washed the whole motorhome with something called Nanowash and its even made the other part look good that hasn't been worked on yet.  I cannot believe the compound and was took the oxidation off the stripes without making them come off, and its really improved the blue, I may wax it all again once I'm done.  I also used a 6 inch buffer, great little item.  We are going to replace the black stripe on the cabover. I will use chrome cleaner on all the chrome, not to bad for an old 20 year old motorhome I don't think that was heavily oxidized.  Far from new, but I agree with hubby to old and to high mileage to spend the money to have it repainted so this will have to suffice.  He is going to put some type of spot mirror that we have on our other trucks so I can better see behind me. 

Back to working on the inside also.  We want to finish the flooring this week hopefully.  I can't take the seats out and put them back by myself, need him to do that.
 

Attachments

  • Cleaning outside 001.JPG
    Cleaning outside 001.JPG
    503.6 KB · Views: 60
PatrioticStabilist said:
I've used rubbing compound and waxed halfway up to the white stripe, and not the hood yet. 

What is the coach outside material?  I notice your is smooth like mine ('87 Fleetwood) but almost all of the older rigs I see look like corrugated or ribbed aluminum.  Is your fiberglass or what, if you can tell...?  After second look, probably aluminum, hence the name "Aluma-Lite"

TY,
Bob
 
Thanks its getting better, need to post a before and after on the outside.

Tom said all but the front and the back are aluminum.

He is wanting me to tape off the joining strips and spray painting them to match like they originally did, but have to think on that.  Lots of work.
 
Tom thought this might work as new improved seating.  The dog sure got excited when he grabbed his leash, thought he was going.  Now could be a few safety features we may be missing. :eek:
 

Attachments

  • New improved seating 001.JPG
    New improved seating 001.JPG
    395.7 KB · Views: 73
Hubby fixed one step today.  The aluminum step that let you step up into the drivers side had started to rip at the back. He said the bracing underneath was a very thin piece and actually bent when you stepped on it.  He took the whole support bracket off, made a new piece for it and fastened it back.  Now its very nice and sturdy, going to do the passenger side too.  He also has to fix the slide out step, its out and won't go back in, he thinks its the ground, has to work on it further.  I'm still waxing. :-\
 
I am convinced that you are a great couple and neither of you ever run out of energy.  You certainly have it looking good.
 
I have to get back on the inside and finish up in there also.  Going to see if I can order a strip of car carpet to match what we have that will decide on how we will bridge the 2 surfaces.

By the way we almost have our kitchen done, the tile guys worked on the backsplash for 4 days and they have to grout yet behind the fridge, yes I had it run back there too.  Hubby has to do the trim in there and the beadboard behind the bar.  Looks like we may have a bit of time before he leaves yet hope he can get it done.

Thank you for the compliment, we just had our 42nd wedding anniversary on the 28th of March, so we must be doing something right. ;D

We are going to try and finish all we can.  If he is still here we have decided to take it for an initial spin to Corrigan, Texas only about a 125 miles.  A friend of his bought a farm up there and is having a crawfish, shrimp. sausage boil.  Another friend and his wife are taking their travel trailer and staying overnight.  Hubby said it would be a good time for us to go and also stay overnight, that way we can see how it does with help nearby in case we have problems.  I think we can get it all done except building in the couch, but we will have 3 seats with seatbelts so are ok in that department.


Anyone have an idea of how to clean our front seats in the cab?  They are sort of a velour kind of stuff and not very clean.  We saw some used ones on Craigslist we considered buying but they said they were filthy so no use in that.  I thought upholstery cleaner and vacuuming them good first, but not sure. 
 
Back
Top Bottom