How to access the coach blower motor

The friendliest place on the web for anyone with an RV or an interest in RVing!
If you have answers, please help by responding to the unanswered posts.
Dirk
You are FAR to optimistic. Two years & it will fail? I got about 20 minutes of running on mine when  smelled what must be the dropping resistors burning then the 15 amp fuse went.
I can see part of it by looking into the compartment. If I move enough plumbing I might get it out without moving the water heater.  Is that how you did it?  How difficult was removing the water heater. Thanks for your input. Art
 
Hi Ho Art:  Sorry this has taken so long to reply.  Getting the water heater out is straight-forward but does require removing all the caulk around the thing and taking off and plugging a few hoses.  (Be sure to turn off the propane before removing that connection).  It took me a couple of hours and some more time to clean up and repair the broken stuff.  In all it took most of a day to get the things apart and back together.

I would definitely not take the water off next time.  (Assuming that I haven't gained too much weight).  I ran into a tech who has replaced the blower and he said that they don't remove the water heater.  Now that I have seen exactely how it comes apart I'm sure that it would be no big deal.

One thing that might convince me to take the water heater off is that the electrical connectors on the water heater use Amp fast-ons and WI used the wrong part on one side of the connection in our coach.  You might say "no big deal" but the problem is that the elecrical connection for the electric heater goes thru this fitting and on mine it became a higher and higher resistance until it got really hot and destroyed itself.  It easily could have started a fire if I hadn't caught it in time.  I can't believe that WI would allow such a dumb thing to cause them to have a liability.  Anyway, I don't know how many coaches, what models, or what years are involved, but if you understand the quick disconnct system you will immediately see the problem

Good luck with the blower motor.  I have to take mine apart again because I was unwilling to take the motor completely apart for a permanent fix.  If I think about it I will take some pictures and post them.

Dirk
 
Dirk
Thanks VERY MUCH for the post reply. I am in South Texas But will be home in 3 weeks & will pull the water heater & thanks for the electrical problem connection heads up. I will also post photos when I do it. Art
 
I have started to remove the floor heat exchanger that is hidden behind the water heater. First problem I found & should have done something sooner was the pressure relief valve for the hot  water heater was dripping as they do from time to time & all that hard south Texas water rusted things very badly. The door hinges are almost gone. (first photo) Burner tube almost rusted threw. The upper parts are fine as no water drips on that area. You would think a drain line would already be engineered in. This is why I do my own repairs. I will run a drain line down below when I install the new water heater. In the second photo you can see the heat exchanger that heats the floor ducts with hot water from the engine. It appears to be mounted to the top of the compartment. It has the blower motor in it with the bad bearing. I am going to love getting it out. The third photo is a closer shot. This is where I am now. I hope that Dirk chimes in here again as he has some good hand knowledge about how it is mounted to the overhead & EXACTLY what bearing is the problem. Keep tuned to this channel as I am sure between Dirk & myself we will have a very good fix for this problem. I sent Dirk a PM. Perhaps another squirrel cage blower from some type of auto. Will provide photos of the fix. Give Dirk & I a few days. Art
 

Attachments

  • WATER HEATER DRIP.JPG
    WATER HEATER DRIP.JPG
    17.8 KB · Views: 101
  • VIEW WITH WATER HEATER REMOVED.JPG
    VIEW WITH WATER HEATER REMOVED.JPG
    32.7 KB · Views: 107
  • FLOOR HEATER CLOSE UP.JPG
    FLOOR HEATER CLOSE UP.JPG
    29.5 KB · Views: 118
Close up shot of rear mounting bolts. They are hooked to the overhead in the compartment. I hope the front is secured just by a flange slipped into a grove so I can just pull it to the rear to take it out. I can't see any front bolts.  It looks like no problem to undue but this photo was taken with my hand way into the compartment! I will let you all know how it goes tomorrow. Art
 

Attachments

  • CLOSEUP OF MOUNTING BOLTS.JPG
    CLOSEUP OF MOUNTING BOLTS.JPG
    73.6 KB · Views: 87
Art,

I'm needing to get after my coach heater blower, too.  What are the next steps?  Any more pictures?  The ones you have already posted are very helpful, but I would like to see the continuation and conclusion to your story before I really get my hands dirty.  Any chance you have documentation/pictures on your computer that you could send me?

Dean
([email protected])
 
Dean
After I removed the water heater I took the photos you see in my post. I used to be very nimble so I thought my long orangatan arms could reach in & get it out. I am 6 feet two and am used to working in places like that. After several attemps I CRIED UNCLE and it is still in there. I could reach the rear bolts you see in the photo but never found how the front was fastened. The engine coolent lines are above the tansmission & even with the doghouse out almost impossible to get to. Looked like some glue & foam also up front. Mine still works but I had to run it on its own fuse. I did NOT increase the fuse size. The house battery charge sel. operates on the same fuse and with the bad bearing & the seloniod being on the same curcit was just to much. They never planed on anyone working on that blower motor at the Winnebago plant! Sorry I can't be more help. As I spend winters in San Benito Texas I can live without it but don't like having something on the coach not in proper order. If you have better luck please let us know and good luck to you. Art
 
Art,
I did check for messages or emails, but sorry I didn?t get back to this thread sooner.  I don?t blame you for ?uncle-ing.?  Body size does count in this scenario; I?m 6?4? and 220 lb.  After gathering as much info and pictures as I could from various sources, I am two sunny days into my repair project and still have a long way to go; it?s raining today!

First, a word to the wise for some Winnie/Itasca owners about the power supply for the coach heater (or rear heater, part of the motor aid system).  I know this is different in different coaches, but in my 2004 Itasca Suncruiser 38R, the power for the coach heater blower fan comes through the ?STEP ALARM? fuse #24 (15 amp) in the upper right corner of fuse block at the left side under the dash in front of the driver?s seat.  The electric entry door steps are NOT powered through this puny fuse, but the auto-retract feature of the steps IS powered through this fuse.  This means that if your frozen up or dragging coach heat blower motor has blown this fuse, when you start your engine, the entry steps will NOT auto-retract if you have forgotten to retract them with the switch by the door.  That?s how I bent my steps into a pretzel--$600!

Back to the heater.  I pulled half the muscles in my body wriggling around on some blocks and a platform to get at it way behind the Atwood 10 gal water heater.  I managed to get six screws out of the galvanized plate on the left (coach rear) side of the housing, then two more out of the 90 degree one inch bend that that wrapped around the curbside (heater core finned) end.  I expected the whole plate to come off, but it is fastened or clamped at the left (streetside) end, which is inaccessible.  So I pulled the right end out and propped it open with a 7? stick.  This allowed me to see the motor end of the blower assembly.  I also removed a couple of screws that hold the whole assembly to the floor, but there is one screw way to the coach front curbside that I can barely touch, but can?t possible unscrew.  The whole unit does move around slightly on its platform, now.  With the access propped open, I have showered the motor with PB Blaster, but no luck in powering up the fan (yet?).  I am unable to reach the squirrel cage blower to manually try to move it.
Dean
 
More . . .
So I finally bit the bullet and I am in the painful process of water heater removal.  I started by cutting AC power to the WH at the c/b panel. (Does anybody know how to open the flush 12V pushbutton c/bs in these rigs?)  I also shut off the main propane supply valve.  I removed the caulking from one of the door hinges to remove the hinge link and remove the door.  I took out the 20 screws around the WH?s front flange and went on to try to remove as much of the caulking as I can beside and behind the flange.  I am using a wood chisel and a sturdy paring knife to remove the black gook.  Next I drained the thing and thought I better go ahead and flush out the calcium buildup, using my copper tube wand on the end of a water hose.  And then the rain started, so I am still in the midst of the flush out and holding for better weather.

I also loosened the flare connection from the propane copper tube to the burner.  I suppose I will remove the pile of black gook around where the copper comes out of the bottom left.  I?m not sure what will happen with the copper propane line when I get to the point of pulling the WH away from the coach.  If anybody can tell me what to expect here, thanks.
Stay tuned . . . .
 
Dean
As for the flange for the water heater it is VERY thin so pry in a LOT of places. I replaced my water heater so I did not have to be so careful. I also ran a seperate fuse for the blower motor as I was sure something else was on the circuit. Thanks for letting me know it WAS the steps.  I also thought about just taking out the small screws to get to the motor only.  Another problem is the engine coolant hoses are in a REAL TIGHT place above the transmission. I sure will hope this whole Winnebago community here gives you the respect you should get if you can get it out & back in. Compaired to some other brands Winnebago makes good stuff but they sure fell short on thinking about any maintance ever being preformed on that blower motor! Also it seems to be a bad product as mine went before it had run 20 minutes. Could you take some photos of the bad bearing that is causing this problem for the rest of us if you get it out?
  Dean, My hat is off to you already as I know what a chore you are doing.  I compare this to when I had to squeese in beside the Black tank to replace the 3 inch coupling! Good luck & let us know how it goes. Art
 
Art, thanks for the encouragement.  When the rain died down late this afternoon, I finished flushing the calcium out, installed a ball valve in my WH drain, reinstalled the TPR valve, cut away most of the mound of black sealer around the copper propane line, and now if I can just find my missing pry bar (tomorrow), I?ll start seeing if I can get the unit to move toward me.  Dean  :p
 
Hello Art and everyone interested in water heater removal and/or coach heater blower repairs.  Rain and more rain is still hampering operations, but late yesterday I decided that the white ?wall? on the left (coach rear) side of water heater has to come out.  The water pump was already removed from that wall, so I continued by detaching a couple of water lines from their flare-it fittings and unscrewing the remaining clips, covers, and the compartment light mounted on that 1-1/16? thick piece of plywood.

So today the sun is out for a little while and I have removed the white wall successfully.  Having removed much (but certainly not all) of the black caulking at the flange around the front of the WH, I am starting to get a little outward movement by pulling on the black front box and the back of the WH, neither of which would be accessible without the wall removed.

CAN ANYONE TELL ME WHY THEY CAULKED THIS THING SO THOROUGHLY IN PLACE?  20 screws should provide an adequate mechanical anchor and modest sealing would prevent air or water migration in or out.  When it comes time to re-install, WHAT CAULKING SHOULD I BUY and from where?

Getting ahead of myself, I am scratching my head wondering where the coach heater blower gets its intake air in my rig, because the heater core sucks air from the entire WH compartment.  There must be an opening above to the cabin.  There is a grill on the coach front of the TV cabinet, and somewhere I recall someone posting that that might be the intake.  I've got to crawl in there and investigate.  Help!  ???
 
Well, I solved the coach heater blower intake question.  With the wall removed I can see there is an opening above the WH that goes up into the TV cabinet and removing the grill on the cabinet behind the passenger seat reveals the big bundle of yellow wires that come up from the WH compartment!

Still looking for advice on the CAULKING, though!
 
Dean
Thanks for the update. Just before I yelled UNCLE and when I installed a new water heater I just put a small amount of caulk back on the frame of the new water heater flange. As it is away from the heat any calk can be used. Like you I could not see ANY reason for that much calk in that area. My blower motor has a spring trap door that openes when the blower motor comes on. I found even the new water heater flange to be VERY THIN so be careful prying it out. I still want to let you know we are all supporting your effort & if at all possible we would like a photo of the bad bearing and how the blower is mounted to the front. After a heart attack & open heart surgery I just didn't have the stammana to keep at it. My old one still turns but after 1 or 2 minutes blows the fuse.  Take a brake & get away from it for awhile if you get to stressed. Good Luck. Art
 
Got the WH out yesterday, though I still have to detach one engine coolant line and the AC supply.  Sunny today, so maybe I?ll get the Coach Heater blower out.  As you say, Art, the flange on the black tin box that fronts the WH is very flimsy.  Prying on it was pretty useless.  But I did lift it to almost a 45 degree angle in most places and found that I could pull on that with my right fingers while I used my left hand to pull on the back of the tin box or the back of the WH itself, now that the white wood bulkhead is out of the way.

I agree most any caulk will do, but sealing around this front edge is important to keep the Coach Heater blower from sucking cold air into the compartment where water lines, the water pump, the WH, and the Coach Heater air intake are.  But I?m not going to plaster it in like they did at the factory!
 
Dean
You are teasing me. I just can't wait to find out what is holding the heater blower box to the front! As you might be fulltiming in 2012 I think it is a good thing to fix incase you get caught where it is cold you can prevent the basement area plumbing from freezing. I sure agree a lot less caulk will do the trick when putting the water back in . Good luck Art
 
Yesterday I had to ?wrassle? with the ?motoraid? heater hoses that bring hot engine coolant to heat the hot water tank and the Coach Heater (sometimes referred to as the rear heater) core when the engine is running.  Once the heater hoses were removed I brought the WH outside on a bench with the 120V AC line still connected.

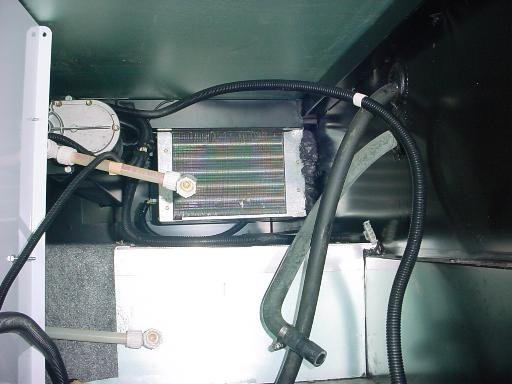
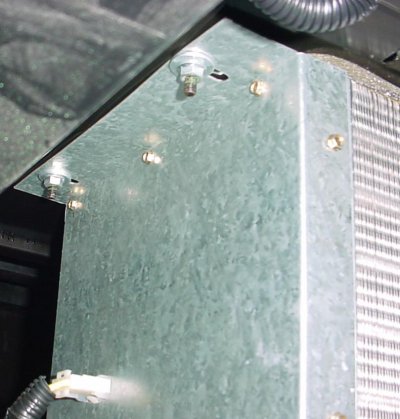
With that out of the way I removed the three screws that hold the Coach Heater to the platform it sits on.  Now it becomes apparent that the heater hoses have to be removed from the wheel well side if the coach heater box is to come out.  After pulling off most of the spray foam around the hose connections, my trusty and sharpened paring knife was called into service again to get these two hoses off the core nipples that project through the wall.  Easily disconnecting the 4-pin electrical plug that also comes in from the wheel well wall, I was able to withdraw the heater unit and get to work on it out in the sunlight!

Removing screws that hold the galvanized sheet metal box together got me access to the fan & blower unit.  Removing four more screws detached the blower housing from the galvanized outlet wall with the rectangular outlet opening in it. Yet another four screws separate the two plastic housing halves, and the motor and plastic squirrel cage blower are in my hands.  The squirrel cage can be forced to turn, but clearly it is binding and moves only ?? on the periphery before in sticks again.  Continued forced rotation results in a clicking sound every ?? as it rubs, then frees, then rubs, then frees.  Note that this is only the motor and the squirrel cage; this is not interference with the blower housing, which is laying on the work table in two pieces.  So, after removing the compression spring that holds (?) the cage on the shaft, with some tugging, I pull the squirrel cage a little away from the motor on the motor shaft.  Presto! The blower spins freely!  Thanks to some person in some thread on some forum, I implemented the washer solution.  I pulled the squirrel cage off the shaft, dropped a simple washer on the shaft, pushed the squirrel cage back on all the way, and found that this held the blower away from the motor just enough to prevent the previous ratchety binding.

Testing the blower reveals that it works just fine . . . on high.  But . . . not on low!  So now I think I have to replace the resistor pack that is mounted next to the heater core.  My next step is to research the part and acquire it, whether at a local auto parts store or at a Winnebago/Itasca dealer.  Can anyone advise the best/quickest source?

Warning: By the way, for anyone who gets this far, do NOT apply power to test the blower motor while it is in your hands or lying on the table by itself.  Despite its diminutive size, it is quite powerful.  The speed and torque might easily destroy the squirrel cage or your fingers when it kicks to life!  And I mean kick!  Remount the blower in its housing for safe testing.

I know some photos would help, and I have taken many.  But I haven?t had time to organize them yet.  I plan to revisit this entire project in a procedure document, complete with pictures along the way.  I have to get my heater fixed first!  Have patience.
 
The question in my mind is "how did the squirrel cage end up so close to the motor body that it now binds", or was it that way from the beginning... Curious minds want to know... ??? heh, heh...
 
The squirrel cage blower is all plastic and it pushes onto the steel motor shaft as a "snug" fit.  Then there is a 4-turn coil spring that is wrapped around the boss of the plastic blower through which the end of the shaft protrudes.  This, I suppose, to squeeze the plastic blower boss tight to the  shaft.  Thus, if you position the blower on the shaft so it doesn't rub, there is really nothing but the snug fit to keep the blower in place.  Over time (reading the forum, sometimes a short time), the blower migrates toward the motor, runs noisy  for a while, then freezes and pops a fuse, which may start another bag of worms because of a few other things powered through this same fuse.  There are pictures on related threads, and I will post my own pictures when I have my coach heater and water heater back in place.
 
Back
Top Bottom