Remodeling 1996 Damon Ultrasport

The friendliest place on the web for anyone with an RV or an interest in RVing!
If you have answers, please help by responding to the unanswered posts.

ScottMills

Well-known member
Joined
Feb 16, 2010
Posts
62
Location
Texarkana, Texas
I started remodeling our coach this past weekend...

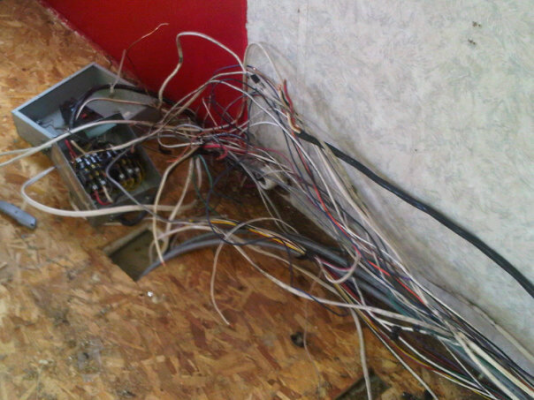
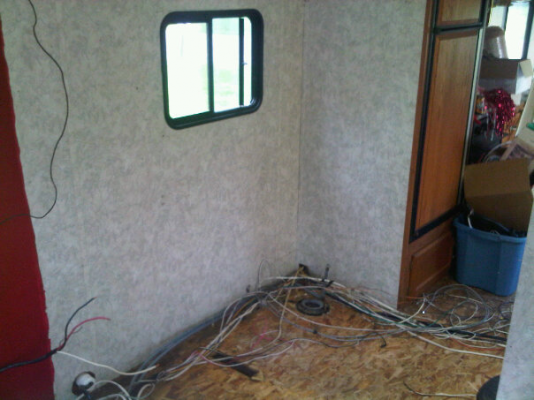
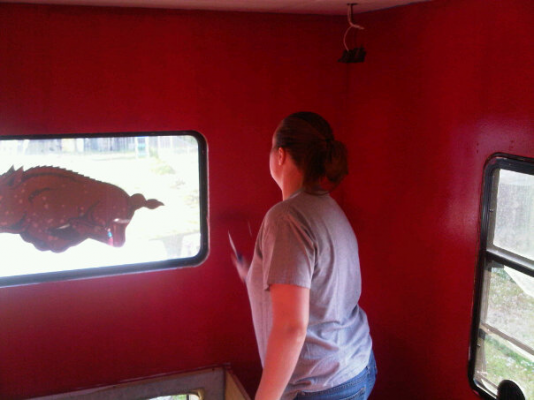
In the works: Paint over old wall paper.. Replace carpet with Laminate flooring. Repair interior sidewall water damage. Build base for jackknife sofa with drawers (instead of just shoving stuff under it). Rebuilding dinette. Minor re-wiring and fixing a mouse hole in the wall. I'm also resealing the entire coach..

I'm posting pics of what has been done so far..

Notes/Problems/Etc:

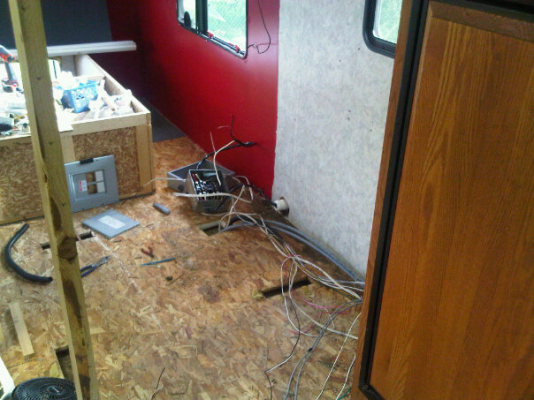
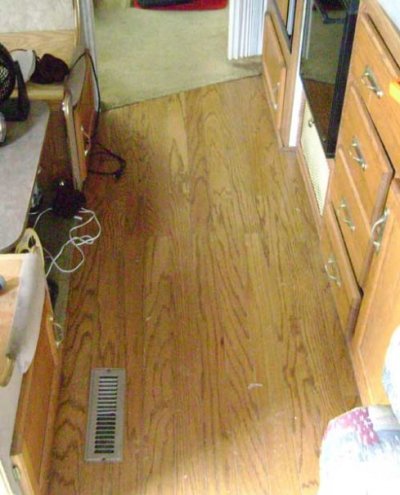
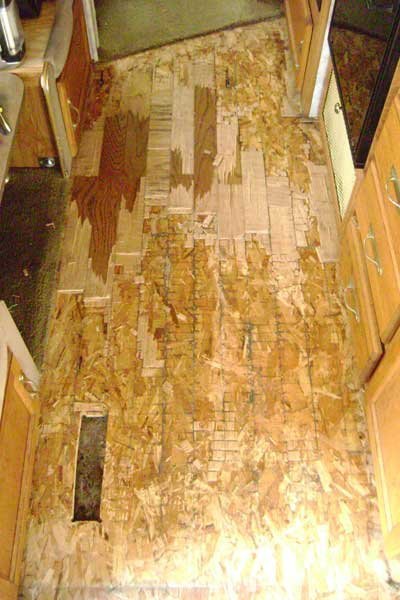
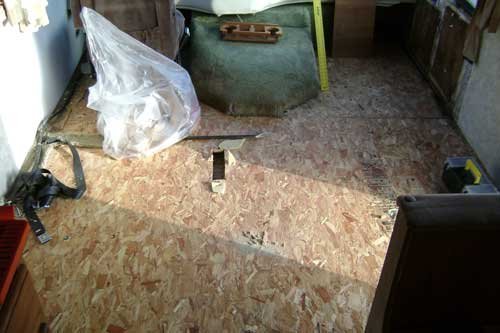
Laminate flooring in kitchen area was glued to floor... I used the end of a crowbar to strip it off (wear eye protection!). There are one or two small spots I'm going to fill before putting the new laminate on. I'm also going to lightly sand this area to try to strip the old adhesive off since this area is very sticky.

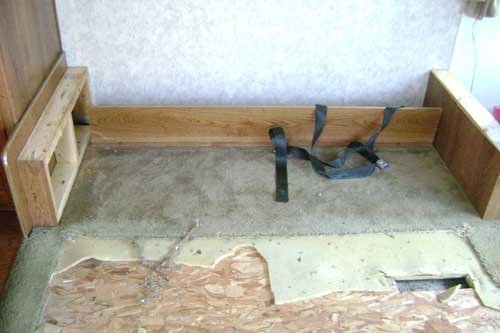
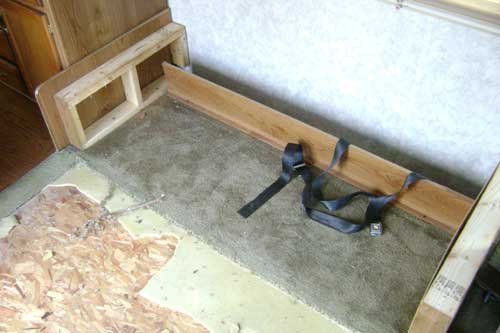
The hardest area to work on so far has been the area behind the dog box. Stripping the carpet off of this box without destroying it has been a royal pain.

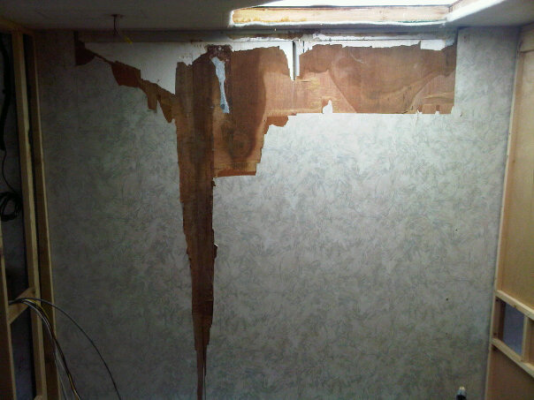
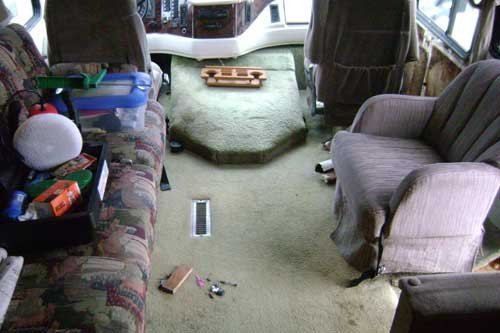
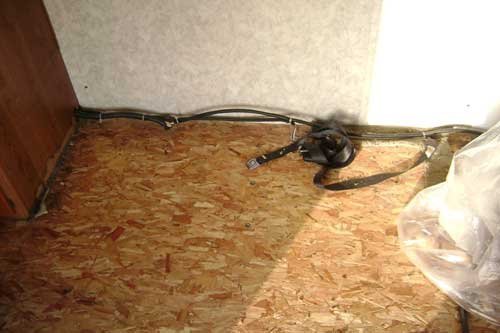
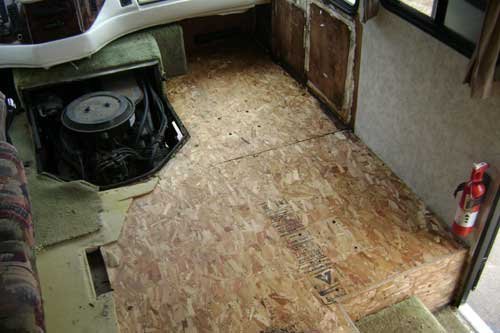
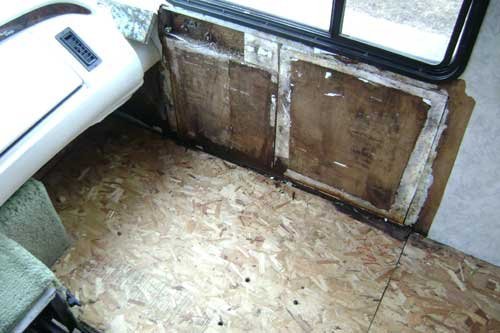
After pulling up the carpet under the drivers seat, I decided to replace the floor there. The drivers area floor is separate from the rest of the coach, so pulling this board out and replacing it won't be a problem. It has water damage from a leak under the drivers side mirror. The passenger side floor has similar damage, but it's isolated to one small spot so I'm going to apply "git rot" there, sand it and be done with that side...

More about this water damage: Soon after we bought this coach we discovered leaks on both the drivers and passenger sides. Looks like water came in through the mirrors and worked its way to the floor.. No telling how long that leak had been there. I repaired the drivers side with FRP paneling six months ago and that's worked fine until now. I noticed when pulling carpet, however, that the FRP panel is loose in several places. Mainly along the bottom (it seems to be sticking to the insulation just fine.. but not the metal frame. I think I may just put pop rivets along the bottom of the panel and see how that works). Since I have to repair the passengers side too, though.. I'm considering other options. There's a possibility I may full the FRP panel off the drivers side and use paneling on both sides.. since my wife wants to paint over the old wall paper in the entire coach, I'm thinking if I go this route we can make it look better than the FRP panel (which, as my 17yo pointed out, looks like the wall of a bathroom. LOL).

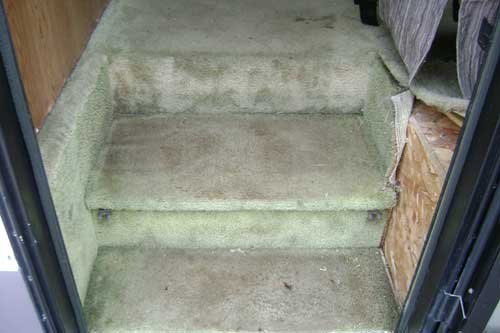
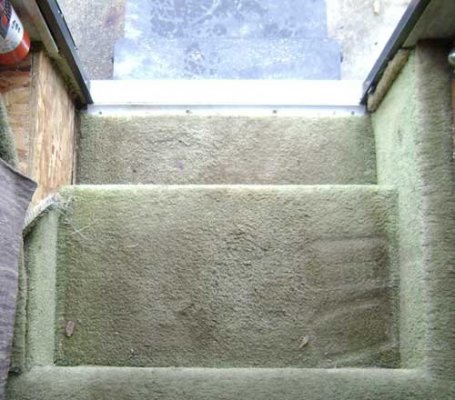
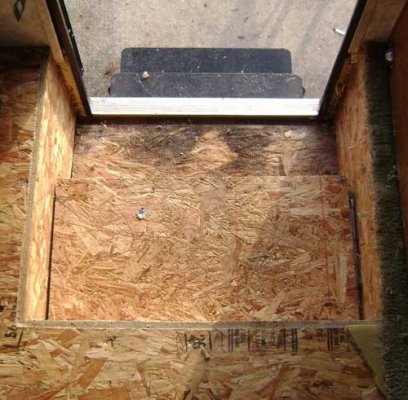
I'm also trying to decide the best way to cover the steps. When I first started planning this my original thought was to glue laminate around the stairwell and on top of the steps, trim it out and that would be fine. But, my battery box is under the top step so I need to figure out the best way to do it to allow that step to open for access to my batteries. So, I'm still trying to figure out the best way to do that without leaving a big gap to allow the step to open.

I'll post pics, ideas, questions, etc as I go along during this project. It will pretty much consume most of my free time for the next month or so..


Attachments

  • kitchen_before.jpg
    kitchen_before.jpg
    58.8 KB · Views: 336
  • kitchen_during.jpg
    kitchen_during.jpg
    55.6 KB · Views: 257
  • livingarea_before.jpg
    livingarea_before.jpg
    34 KB · Views: 293
  • livingarea_during.jpg
    livingarea_during.jpg
    33.3 KB · Views: 230
  • livingarea_couch_during.jpg
    livingarea_couch_during.jpg
    27.4 KB · Views: 210
  • livingarea_couch_during2.jpg
    livingarea_couch_during2.jpg
    30.7 KB · Views: 187
  • livingarea_couch_during3.jpg
    livingarea_couch_during3.jpg
    29.8 KB · Views: 166
  • steps_before_bottom.jpg
    steps_before_bottom.jpg
    29.7 KB · Views: 207
  • steps_before_top.jpg
    steps_before_top.jpg
    50.9 KB · Views: 187
  • stairs_during_top.jpg
    stairs_during_top.jpg
    61.3 KB · Views: 211
  • livingarea_damage_during.jpg
    livingarea_damage_during.jpg
    34.7 KB · Views: 208
  • livingarea_damage_during2.jpg
    livingarea_damage_during2.jpg
    38.2 KB · Views: 271
In a lot of the coaches I remodel, I use the commercial rubber treads. In some of the coaches with the stairs are either, like yours, batteries or the hydraulic tank for the jacks. I cut the treads to fit and instead of gluing them, I use a couple piece of velcro. Easy removal to access whatever you need to access. I also have installed some stainless steel risers.  Makes the entry very appealing.
 
Ernie, thanks for the tip!!!

In regards to the water damage I had mentioned above.... I've decided to rip out the repair I had made last fall to the drivers side... I've found some 1/8" thick Luan Plywood.. I'm going to cover it with paintable wall paper and repair the damaged area with that.. should look much better and the epoxy I'm going to use will be more flexible and hold stronger than the FRP adhesive I had used with the old repair... After the repair is done, we'll start painting...

I'm still trying to get the carpet off of the area behind the dog box... arrghh... There are four screws holding this box in place that I can't get to.. or, at least, I haven't been able to get to yet... I swear there's a million staples holding this carpet in place.. LOL..

More pics coming soon..
 
Congrats on your undertaking. If you are anything like us it will be a very exciting time and you may even become very addicted to the work. Its very rewarding and I am almost sad that our remodel is near complete. Good luck and I look forward to your pictures.
 
I have to admit.. I am definitely addicted to this remodel!! LOL.. my wife reminded me over the weekend not to neglect the house while working on the RV.. I enjoyed looking at your pics and reading about your remodeling job. It really inspired me.. seems like I've mumbled the words "well, while I'm at it..." at least 30 times in the past two weeks.. With every new area comes new challenges and ideas... Lowes will probably be sending me a Christmas card this year I've been in there so much..


Some things I'm doing to help me keep the chaos as orderly as possible...

I'm using sandwich bags for keep all of the screws I've taken out organized.. I label the bags with a sharpie to keep up with which screws are which...

I keep a notebook handy to write down notes from each area I'm working on.. as well as materials needed, a check list of things that need to be done, etc...

Old carpet, trim, etc.. is cleaned up regularly.. Last thing I do each day is clean up the area I've been working in so the mess is minimized.

I'm almost finished pulling out all of the carpet.. just the bedroom left... The checklist of things to do is growing by the day... but, it'll all be worth it!!

How long has it taken you to do your remodel?
 
Also.. my wife wants to know where you got the light fixture in the bathroom? I showed her your slide show and now she wants some lights like that over the sink.. LOL...
 
We started ours in January, right around the first and still have a few little things to do but are mostly done with the major tiems. I think thats about when i started posting pictures and such as well. We bought our MH this last summer with a lot of plans for her right away. Unfortuneately, I am in the Navy and had to go to sea from September thru December and really didnt get home till just before Christmas. Like you I tried organzing but i have a problem starting one thing and then realizing I wanted to do something else and starting that. Before I knew it I was working on like 5 different things all at the same time. My wife kept me straight and reminded me I should finish working on the projects I had started before moving on to too many others. It was slow going at times, or so it seemed. I guess I am lucky in that the Navy offers me some down time after an underway and that was perfect for getting all that we did done in a timely manner. I kept myself organized mostly using my iphone with checklists, dimensions, and other various tasks and such. Also, it took almost every picture I posted. I am yet to get in there with a decent camera and take some good pictures. Once we have our furniture back I will probably do that. As for our light fixtures, I got them all off ebay. Two different members. Take a look at these guys as both were nice dealing with and both provided quality products. Hope this helps and absolutely any questions you have feel free to ask and Ill do my best. Good luck with all of those staples in the carpet.

Heres a link to our vanity
http://cgi.ebay.com/ebaymotors/ws/eBayISAPI.dll?ViewItem&item=350138176397&viewitem=&sspagename=STRK%3AMEWNX%3AIT

Heres a link to one of the fixtures from the other user.
http://cgi.ebay.com/ebaymotors/ws/eBayISAPI.dll?ViewItem&item=170352016336&viewitem=&sspagename=STRK%3AMEWNX%3AIT
 
I know what you mean about trying to stay on task.. I do the same thing.. Thank God for good women to keep us straight! LOL..

One thing I noticed in your pictures.. what did you use to cover the water damage? Is that wood putty? Any concern that might crack due to the movement and vibration of the coach?

I have two spots with water damage.. I've taken down the wall between the dinette and bathroom and I'm using the Luan from that to repair these areas.. (I'm replacing that wall with 1/4" ply.. makes it a little better to hang some stuff on).. It's 1/8" and exactly like what was there.. I'm going to use West Systems Six 10 to bond the Luan to the insulation... I'll put paintable vinyl strips over the seems.. then, we're painting everything..

This project just keeps getting bigger... I'm hoping for some better weather the rest of the week so I can move a few things out of there and onto the driveway to give me some more room to work... I've been working in the bedroom today.. we've decided to rip out the cabinets and rebuild them in there.. Make them a tad bit larger and give us a couple of extra drawers.. And a bedside table on my side.. I'm heading to Lowes for a new router.. :)
 
Yes that is a wood filler and it is working really good on the small damaged areas but the way that I fixed the large damaged areas is not as good. Going with your methods is much better. Thank goodness for warm weather.
 
I wish we could get back to ours.  We did a lot then stopped and have been doing I guess a major house remodel.  I'm so hoping to get back to it real soon.  I stop and check and you guys are all going gangbusters while ours is just sitting out there.  At least its not leaking anymore and that's a huge plus.

Keep going, great jobs, love it. It's a lot of work but well worth it in the end.
 
I had to put the remodel on hold for a week.. discovered water damage in my house.. had to rip out the bathroom in the bedroom to repair it... yikes.. Almost done with that project.. then back to working on the RV.. still hoping to get it done by early April... (fingers crossed.. knock on wood..)..
 
Argh! We went through the bathroom floor thing last year when we found a pipe had been spraying water under the floor for some time. Did not realize it until the floor started to cave in! When we got into it, we found the floors damaged in two adjacent rooms as well, so major repairs.  :-[  Fortunately our insurance covered it cause the total repair bill was over $8000!  The good news is the bathroom got a remodeling we had been wanting to do for awhile.  :)
 
I figure I'll spend spring getting stuff done around the house and the RV ready to roll.. then, this summer I'll be at a lake somewhere.. :)
 
Looks like I'm finally about to be able to get out and work on this old girl.. Over the weekend I found laminate flooring at Surplus Supply for .55 cents per square foot!! I asked the sales person what the difference was between what I purchased and the higher end stuff and he said "nuthing.. we just got a great deal on that particular style".. which, just happened to be the style we were looking for.. woo hoo!!

I have four boxes full of new parts waiting to be installed. Including....

New Power Converter Upgrade.. PDI 4655 with four stage charging system...
Jensen 12v flush mount DVD/CD/MP3/Radio for bedroom.
LED floor lights.
LED under cabinet lights.
LED Ceiling lights.
LED reading lights in bedroom.
Washroom vanity light.
All new cabinet hardware. (and all new cabinets throughout!)
New wash/kitchen faucets.
New light switches throughout...
Ceiling mounted, crankable satellite dish.

Outside, she still looks like 1996.. inside she's going to look like 2010!! (well, except for the DVD player.. couldn't find a flush mount Blue Ray player.. LOL)...


Should have more pics to post next week! Expecting rain today, then it's time to get busy!!
 
Thats great to hear. Cant wait to see how she looks. Got my furniture in today and will be bolting the couch down tomorrow, then it will be dine and I will be taking some high quality pics and posting. Have fun.
 
Finally back to working on my old Wagon..... yesterday, I set out on a mission.... to remove that dog box over the engine so I could finish removing the carpet from it and all those staples... what a royal pain!!!

The end result.... A few pulled muscles from stretching out to each under the dash to unscrew the back screws... scrapes on my arm and a splinter in my finger...  But.. that dog box is out and sitting on my work bench this morning.... :)

Found a 12x4 remnant of carpet at Lowes this past weekend for 35.00... we're going to put this carpet in the drivers area... normally this same piece would be around 65.. DW is happy because it's what she wanted carpet wise.. I'm happy because we saved $30 bux.. LOL..
 
You might want to add some insulation to the backside of the doghouse while you are at it. Keeps some heat and noise out. I used the foil-back air cell stuff on one (most Lowes have it), but the heavy fiber insulation used under car hoods works even better.
 
This project is moving along.. slowly, but surely....

Restroom area has been completely taken out... working on repairing some damage I found behind the shower.. Then, the walls will be painted in this area and the vinyl flooring put in.. I'm putting in 1/4" luan for a sub-floor in this area.. after the painting and flooring is in, the walls will go back up and I'll run the new wiring...

I'm completely re-wiring this coach... I've found wires chewed up by mice.. wires that were charred.. Thats one of the reasons we decided to just completely gut this old girl and rebuild here.. I'll sleep a lot better in her at night knowing all of her wiring is done right...

Found a 1500watt inverter at an estate sale for $20.00.. It's never been used and works great.. I'm going to hook the bedroom TV up to that so my wife can watch a little TV at night when we're dry camping..

Here are a few more pics... hopefully I'll be able to start putting some things back together soon..

Pic 1 - The gen/shore power automatic switch and main breaker box...
Pic 2 - Looking back from the living room area into the bedroom... The bathroom area has been completely stripped...
Pic 3 - Looking from the bedroom forward.. where the potty use to be..
Pic 4 - Found some water damage under the skylight.. the leak has been fixed.. luckily this wall is hidden behind a sub-wall (well, it was in the original configuration).. I have a plan to fix it.. No delam going on with the outer skin... luckily..
Pic 5 - My DW painting the bedroom.. GO HOGS! :)


Attachments

  • wagon_wiring.jpg
    wagon_wiring.jpg
    508.6 KB · Views: 142
  • wagon-bathroom.jpg
    wagon-bathroom.jpg
    530.5 KB · Views: 128
  • wagon-toiletarea.jpg
    wagon-toiletarea.jpg
    437.5 KB · Views: 121
  • wagon-skylightdamage.jpg
    wagon-skylightdamage.jpg
    434.1 KB · Views: 112
  • wagon-paintingbedroom.jpg
    wagon-paintingbedroom.jpg
    361.9 KB · Views: 186
Wow. I think I am in the Ground Hogs day movie. I am doing essentially the same remodel on a 97 Winne Vectra. Your list of helpful hints was great. I will add one. Dont reinstall the the new countertop until AFTER you replace the plenum and ductwork cover...nice job
 
Back
Top Bottom