Remodeling 1996 Damon Ultrasport

The friendliest place on the web for anyone with an RV or an interest in RVing!
If you have answers, please help by responding to the unanswered posts.
Thanks for the tip. I finally have an open week to get in her again and get some things done... Hopefully by the end of the week we'll have some more pics to post.
 
Slowly, but surely.. this project is moving forward...

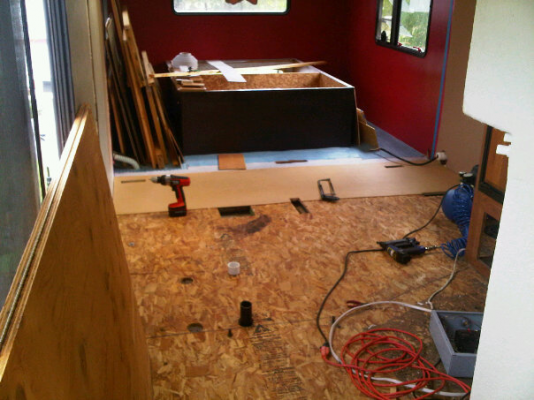
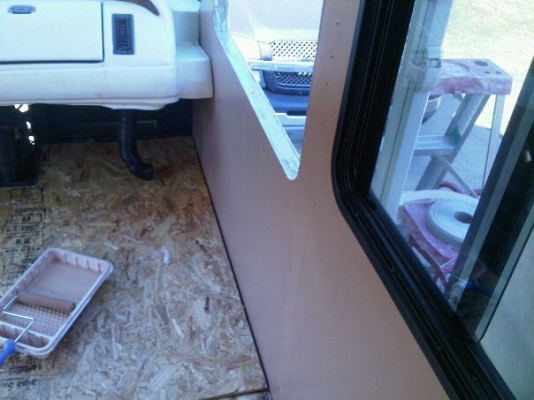
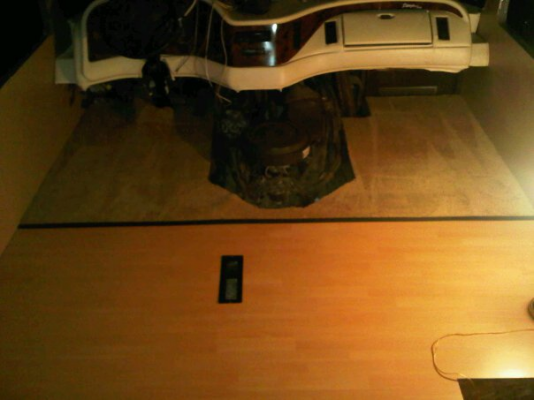
1.) Looking back... Bedroom and toilet area is painted.. floor is cleaned and sub-floor is being installed (raising that area up a little to match the height of the laminate.. going to put a piece of vinyl down in this area.)


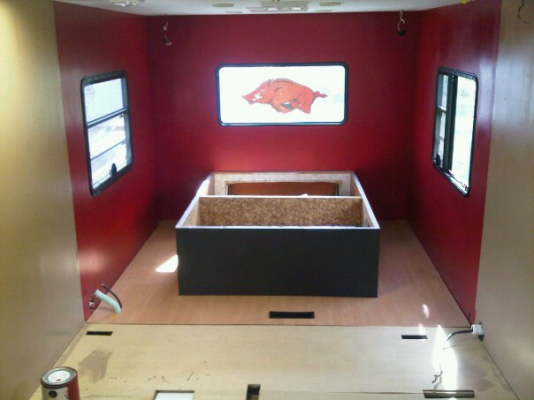
2.) Dining area wall is painted... repairing the water damage from the skylight.. No way to put clamps to hold the new piece in place while the adhesive cured, so I screwed strips of wood to the wall to hold this pice in place.


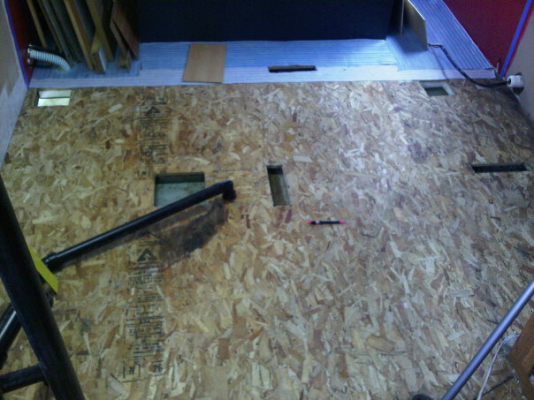
3.) A close up of the bath/restroom floor before I started installing sub-floor.....

A few notes on this area..

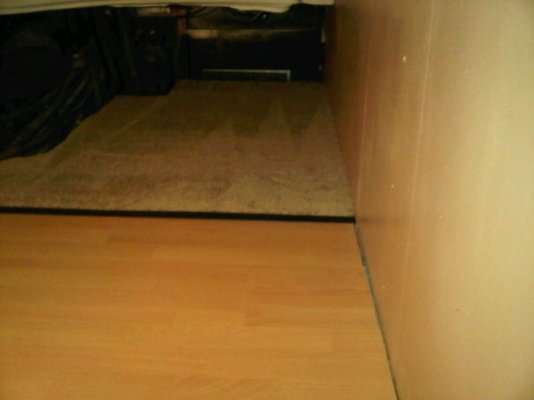
you'll notice the large holes right next to the bedroom on each side of the coach.. this is where wires and water pipes run. The water holding tank is directly below these holes. These holes are 4"x6".. way bigger than needed.. I've covered up all but a slit the size I need to run the wires and pipes back through.. I've also cut up some foam insulation to wedge in there to fill the gaps under the sub-floor.. Can you imagine the cold/hot air coming in and escaping through these huge holes??? Not anymore.. :)

I've also covered up and filled in four other holes that were used to run wires in this area.. No wonder it was so hard to keep this coach warm/cool.

A couple of questions..

1.) I'm using 1/4" Luan Plywood for the new sub-floor.. What's the best way to attach? Screws? Adhesive? Brads? combination? I figure once everything is put back in place on top of it, it's not going anywhere regardless of how I attach it..

2.) I need to remove the toilet flange... I'm guessing it just screws into the black water holding tank.. correct??

I wish I could take a week or two off from work and just work on this old girl. Especially now that the weather is getting cooler.. it's been a HOT summer here.. hard to work in there when it's 100+ degrees...
 

Attachments

  • bedroom.jpg
    bedroom.jpg
    475.4 KB · Views: 124
  • damaged_wall_dining.jpg
    damaged_wall_dining.jpg
    342.4 KB · Views: 109
  • bathroom_floor.jpg
    bathroom_floor.jpg
    516.9 KB · Views: 110
Scott- how thick is your OSB? If you use liquid nails and screws, you will be fine. I don't know what your finish material will be but countersink your screws. It might make you add some patch but if a screw head is elevated, it will telegraph thru to the new flooring. Your toilet flange probably is glued- will be a tough removal. I use a Dremel with a cutting wheel to remove it- Take the screws off the flange and pry it before you resort to cutting. Good luck. Great photos.
 
The OSB is a true half inch... I'm laying a piece of vinyl over this area.. Thanks for the great tips as always Ernie...


Below is a picture of that wretched dog box that took forever to remove.. and below that.. a pic of the new one I just built.. Ready to put the carpet on it!

I decided to replace the OSB in the front... both of those pieces had been damaged from the leaks around the windows... I went ahead and sanded the rust off the metal framing in this area and coated it with stop rust...

Carpet is all cut for this area..

Progress is being made! Working on base for sofa tomorrow..
 

Attachments

  • old_dog_box.jpg
    old_dog_box.jpg
    1.5 MB · Views: 139
  • new_dog_box.jpg
    new_dog_box.jpg
    1.5 MB · Views: 108
  • replacing_front_floor.jpg
    replacing_front_floor.jpg
    1.2 MB · Views: 103
  • new_front_floor.jpg
    new_front_floor.jpg
    149 KB · Views: 82
  • new_front_carpet.jpg
    new_front_carpet.jpg
    1.1 MB · Views: 88
The frame for my new couch base is complete... It's going to have a large drawer on each side.. I'll put the face on it and build/install the drawers later on.

I pretty much have all of the pieces ready to start putting this thing back together.. whew.. what a project.. I am LOVING it though.. :)


Question:

What is the best carpet adhesive to use? I bought some carpet glue (paste) from Lowes and started gluing carpet to the dog box.. I am NOT happy with it.. I'd like to find something better before I go any farther..
 

Attachments

  • new_couch_base.jpg
    new_couch_base.jpg
    91.5 KB · Views: 127
Those are still in a box somewhere.. as soon as I pull them out, i will post pics... The packing slip should still be with them.. I've ordered parts from about 20 different places over the past year, so not 100% sure where those came from....


Water damaged areas under the driver and passenger side windows is FIXED! Woo hoo! I'm really pleased with how it turned out...

Working on the floor now..
 

Attachments

  • drivers_side_damage_fixed.jpg
    drivers_side_damage_fixed.jpg
    401.5 KB · Views: 89
  • Passenger_side_damage_fixed.jpg
    Passenger_side_damage_fixed.jpg
    431.6 KB · Views: 84
Rather than the Reflectrix(SP) I would get the stuff J C Whitney sells for under the hood insulation.  It is more expensive but does a lot better job and it is fire resistant.
 
I have used that insulation from Whitney. Is very heavy but works. Get some foil tape for your seams.
 
Thanks guys! I appreciate the tips. I'm ready to put that dog box back in.. just need to insulate it..

Got the carpet installed in drivers area... and the laminate is down in the living area.. Moving forward.. :)
 

Attachments

  • front floor.jpg
    front floor.jpg
    325.6 KB · Views: 93
  • passenger side wall.jpg
    passenger side wall.jpg
    29.7 KB · Views: 75
Your project is coming along nicely. Reminds me of my last big project. I took a 1972 18' Roadliner TT, stripped it down to bare frame. Stretched the frame to 22.5', added another axle to make it a tandem, then built a new TT on that chassis of my own design using 1.5" square steel tubing to frame it (no wood). Finished that project in 1980 and used it for over 20 years before selling it to my son. My son sold it and last thing I heard is that it was involved in a wreck and totaled.

There's something about a DIY project that is very satisfying. I'm well into my second RV project and enjoying every minute of it.
 
After a record breaking winter here in the south.. The temps are warming up and I'm ready to finally get out and try to finish this project (is it ever really finished?? LOL)..

Ernie, I wanted to ask you.. earlier in this thread you said to get commercial rubber tread for the stairwell. Where do you purchase this? What exactly am I looking for? Thanks!!

BTW. I ended up ordering some "Ez Cool" http://www.lobucrod.com/index.html insulation for the dog box. Should have that in next week.
 
re: rubber thread for stairwell. I found a rubber mat at Lowes for 8 bucks made of recycled rubber for the steps! woo hoo! perfect. Here's a pic (still need to trim the bottom piece).
 

Attachments

  • 199965_1683020313828_1187196048_31432376_4538621_n.jpg
    199965_1683020313828_1187196048_31432376_4538621_n.jpg
    40.9 KB · Views: 83
Scott, I see by the blue tape that you are going to put a stair nose trim around the top?  That is what I use to finish the job.
 
The blue tape is holding the laminate panels in place at the moment. I haven't secured them yet. Just getting everything cut, sized up and in place.

Yes, I'm going to put nose trim around the top. Below is a pic I took last night. I have to go get another piece of trim today.

This project is taking forever it seems. But, I'm learning so much. Worth every second and dollar if you ask me. If you're gonna do it, might as well take your time and do it right.. :)
 

Attachments

  • step_top.jpg
    step_top.jpg
    42.6 KB · Views: 78
Back
Top Bottom