Need Advice on what to do, laminate flooring or vinyl flooring, replacing floors

The friendliest place on the web for anyone with an RV or an interest in RVing!
If you have answers, please help by responding to the unanswered posts.

TimFromFlint

New member
Joined
Jun 8, 2010
Posts
4
Location
Oregon
Hey everyone, So, I need some advice.  I have a 1985 Itasca Sunflyer, 28'.  When I purchased the RV, I knew that the floor in front of the pantry was soft. The fridge was leaking many years ago and has since been replaced/fixed. We have had no issues with it.
I am now looking to replace the original carpet but need to know what?s involved. We want something a bit easy to maintain and won?t wear. Vinyl flooring or wood laminate? Also now that we are replacing the floor covering I see this as a great time to replace the soft floor by the pantry. Is this going to be a huge task or just cutting some new plywood and screwing it back into place?
Any help is appreciated.
Thanks
 
Hi Tim and welcome. We don't have xray vision so none of us can tell exactly how deep the soft floor is going to go. Could be just on the surface or it could be several layers deep. The only way to find out is to remove the carpet and start digging.

I went through the vinyl vs laminate question a few months ago. I decided vinyl was the way to go for me. It is very easy to install, lightweight, not too expensive and looks great. I am sure there are some advantages to laminate but I could not find any. Our resident floor expert, Ernie, should be along soon with his take on your question. He knows a lot more about it than I do. We always love it when people post before during and after photos of their projects. Good luck.
 
Hi seilerbird, Thanks for the information. I took a peek at your photo gallery on Picasa, WOW, you have some amazing eye for composition.
I really enjoyed looking at those pics!
I hope the project isn't too complex, I understand what you mean about X-Ray vision... I will be pulling up carpet this weekend if I get my way.
Is the carpet traditionally glued to a sub-floor ?
Do you have some pictures of your before and after when you updated the flooring in your RV? I would love to see them.
 
I'd be cautious if you go with laminate.  I've seen a lot of it that doesn't behave well if it gets wet.  Some of it, when it gets wet, albeit repeatedly I'm sure, "curls" at the joints and leaves a ridge at every joint and a small gap between planks.  This may be a function of laminate quality and not a generic "laminate" problem.  Not sure how you intend to care for/maintain this floor, but if damp mopping is an option, you may be better off with sheet vinyl or vinyl tiles.
 
I put vinyl sheet in this spring.
An inexpensive "no glue" Armstrong product with a "cushy" feel (50cents/sf from HD).

It went in very smoothly with a nearly empty MH to work with but the next morning I realized an error.
TOWMBO had cold tootsies (I did too) and bare feet can feel the OSB ridges in a couple of spots.

Later this week I'll be lifting the vinyl up to install some (1/2") rigid foamboard insulation
and some (1/4") lauan underlayment followed up with setting 1/4round molding.
(both of these are also sold at HD)

The 3/4" loss of ceiling height will be worth it.
 
I put vinyl down in the dogs room last year, it lasted about 4 weeks before it was shredded, replaced it with hardwood laminate

I also put down the 1/2" rigid foam underneath also there is an electric underfloor heating you can get here to take the chill off http://www.rak-haustechnik.de/site/home_eng.htm

we arent too high here so it only gets down to -20 at worst in the winter
 
TimFromFlint said:
Hi seilerbird, Thanks for the information. I took a peek at your photo gallery on Picasa, WOW, you have some amazing eye for composition.
I really enjoyed looking at those pics!
I hope the project isn't too complex, I understand what you mean about X-Ray vision... I will be pulling up carpet this weekend if I get my way.
Is the carpet traditionally glued to a sub-floor ?
Do you have some pictures of your before and after when you updated the flooring in your RV? I would love to see them.

Thank you for your kind words. The project shouldn't be too complex. Normally the carpet is stapled to the floor. In some cases with an endless amount of staples. That will be your biggest challenge, getting all the staples out. I don't have any photos because I have yet to do the job. I did all the research and picked out my tile, but I am waiting until I am visiting a relative before I do the job. I am a full timer and I live mainly in the National Parks. I don't think that the middle of a National Park campground is the ideal location to replace flooring. When I am at a relatives house I will have another vehicle available to go back to Home Depot with. I know from experience that any home remodel project requires more trips to Home Depot than you can imagine when you are planning the job out.

The steps are pretty simple. Remove the old flooring. Remove the staples. Repair the floor. Sand the floor down smooth (if necessary). Put down the preconditioner to help the tiles stick better. Measure the room and run a chalk line down the middle in both directions. Lay the tiles starting at the middle and working toward the edge. Attach any moulding. Brag to everyone you see.
 
If you can stick a slender screwdriver in the floor and don't have much resistance, that area will need replacing. You can poke all around there to see the extent. Take a couple photos to give us a better idea.
 
Is this going to be a huge task or just cutting some new plywood and screwing it back into place?  Any help is appreciated.


Well, having just recently replaced the flooring in three rooms of our motorhome, I can say that ripping the carpet out is the easy part of the job.  I also replaced a section of sub-flooring, which was 3/4" OSB.  This part was the most difficult, as you must cut the old section out in the middle of the steel rail that supports it and cut the new section to fit perfectly.  I was able to reuse many of the self-tapping stainless steel screws that held our sub-floor down.  I couldn't find new screws of this type so I had to pre-drill holes for the regular screws I bought.  Our sub-flooring also had a layer of reflective insulation that we had to glue to the bottom of the OSB board. 


We installed a vinyl plank flooring called Allure, made by TrafficMaster that we got at Home Depot.  We chose vinyl because it is waterproof and has a 25 year warranty.  We have been told that most laminates are not waterproof.  Allure planks were very easy to work with, but they seem to show scuff marks easier than we anticipated.  The jury is still out whether a good coating of Allure One Step will hide the scuff marks or not, but I am having my doubts. 


Leveling the floor before installing the vinyl planks is very important as high spots show up very prominently after the Allure goes down. Don't ask me how I know.  Carpeting hides a lot of flaws in sub-floors, vinyl doesn't.


Slideouts are also a problem area when replacing flooring.  I was worried that our slideout would scratch the vinyl when extending and retracting so we have been using a few thin cardboard sheets under the slide when moving it in and out.  But by the looks of the undamaged cardboard, maybe we won't even need to use that.  When we get sick and tired of putting the cardboard down before moving the slideout in and out, we'll try it without the cardboard.  So far the slideout hasn't scratched the flooring, but we haven't yet tried it without using the cardboard either.
 
I purchased an inspection camera from harbor Freight. This way I inspect the underside of the slide to insure there is no debris to impact the rollers and the new floor. This is a great tool and for $145 was well spent. It has a 3 foot bendable wand and removeable color camera.
 
I purchased an inspection camera from harbor Freight. This way I inspect the underside of the slide to insure there is no debris to impact the rollers and the new floor.


Ernie, the inspection camera sounds like a good idea for certain types of slides with rollers.  The slide in our Rexhall, however, has no rollers.  The front, bottom edge of the slide has only a plastic runner (not sure if that's the right word) running the length of the slide (perpendicular to the direction the slide travels) with rounded edges on both the leading and trailing edges of the plastic runner.  I believe this plastic runner is the only part of the slide that makes any kind of contact with the flooring when the slide is moved in or out. When retracted, however, the flooring seems to make contact with the outside, bottom edge of the slide as it seems to rise slightly at the end of the retraction. 


I only know this much about our slide because I had to replace a section of sub-flooring right under the slide.  Without removing the sub-flooring, you can't see anything under the slide, and an inspection camera wouldn't help in this case.  I have not seen how other slides work, so I can only speculate what the rollers look like, how many there are, and how they actually work.  I have some pictures of ours if you should ever encounter a project with a similar kind of slide.
 
Rolf, there are many versions of slides, as you mentioned. I have observed the construction of various coaches. There are rollers that are fixed on the floor. Others are installed on the slide and actually impact the floor, There are slides that don't touch and those that do. The thing to do is articulate the slide and with a strong light- if you are old, like me, and observe how your slide operates. I usually go outside and pull the rubber seal down a bit and look in there. I like to know how they operate so I can make a plan on installing flooring.
 
I usually go outside and pull the rubber seal down a bit and look in there. I like to know how they operate so I can make a plan on installing flooring.

That sounds like a good plan Ernie and reminds me, I had to put a new rubber seal on the section of sub-flooring that I had to replace under the slide.  A new rubber seal for a residential garage door worked great for this purpose but I suppose you already knew that.

Before replacing a section of the sub-floor in our MH, I actually lifted (or pried) our slide up almost an inch or so on each side so I could look and work on the sub-flooring under it.  A pair of 8 foot long 4X4's works good to pry up one side of the slide at a time and to hold the slide up when wedges are placed between it and the rails. 

I guess replacing carpeting with vinyl or laminate flooring always raises questions about how the slide will operate on and affect the new flooring.  I figured that since the carpet and pad that I replaced  was much thicker (higher off the sub-floor) than the vinyl planking that I installed, the slide shouldn't be much of a problem.  It's a pretty inexact science and I guess you never know until you try it.  One of these days I'm going to bring our slide in and out without putting down cardboard for it to travel on.  Only then will I know whether the movement of the slide will or will not scratch the vinyl flooring.
 
We full time with our three dogs so just had to replace the nasty old carpet in our coach after only two years.  We decided on Allure as at least an interim solution.  We've been very happy with it.  We purchased matching area/throw/runner rugs from Walmart and cut them to size to recover our slide floors and to use throughout the coach.  Yes the Allure is colder on the feet but the throw rugs really help and are much easier to clean than carpet.  We can also change the entire look of our coach in the future by replacing these rugs with different colors/styles.  A few hours of work and >$300 would do the trick.

We did/do have a little problem with the slides because I wanted a "one level" look throughout the coach.  In other words, I wanted the Allure running from the firewall through the bedroom without interruption/elevation change. That meant using 1/4" underlayment ply where there had been carpet.  While this still didn't result in the floor being any higher than the carpet was, it doesn't have the "give" that the carpet provided so the slides wanted to push up the Allure as they retracted.  I needed to carefully trim the edges AND tack down the allure on the edges which meet the slides so it is no longer a "floating floor".  So far this hasn't caused a problem and we're so much happier with it than with the carpet.  Our slides are the type with "skids" rather than rollers and I've never been able to get an answer on whether or not there is an adjustment to have them retract at a slightly higher level.  I'll be visiting HWH next month and should be able to at least get an answer then... although I have read that HWH and Winnie sometimes bat this issue back and forth between them...
 
We decided on Allure as at least an interim solution.  We've been very happy with it.

I wish we could say the same.  Our Allure shows scuff marks everywhere and I don't think they're going to go away.  And although we used leveling compound to level the sub-floor in areas, we didn't put down an underlayment.  I was afraid an underlayment would bring the flooring height up too much for the slide.  The result is that certain high spots (like where the front cap is attached) show up across the width of the motorhome. 

I needed to carefully trim the edges AND tack down the allure on the edges which meet the slides so it is no longer a "floating floor".
 

The first time we retracted our slide, the slide moved our Allure a fraction of an inch also.  That forced us to use more double-sided tape around the edges and under the slide to keep the Allure in place.  I guess 'floating floors' don't work too good in some RVs.

We can also change the entire look of our coach in the future by replacing these rugs with different colors/styles.  A few hours of work and >$300 would do the trick.

We're using lots of rugs too and they can be easily replaced with new ones from time to time.  Of course, anyone could do a good job of that for >$300 (I think you meant to say <$300).  :p

Our slides are the type with "skids" rather than rollers and I've never been able to get an answer on whether or not there is an adjustment to have them retract at a slightly higher level.

Well, there's no adjustment to the skid on ours (we only have one skid at the very front of the slide and it's not adjustable).  I'm not sure but I think there is a way to raise the whole slide so that it rides higher off the floor, but I don't know how it's done.  My guess is that it would entail raising the slide higher above the rails that it is attached to and would require some clearance at the top of the slide also.  We made some adjustments to our slide but only on the outside edges to get it to move in/out more.
 
Go outside and look where the support rails are attached to the outside wall. If you see where the bolts are positioned and there is a groove in that area, you may be able to change the height on your slide travel. Without seeing this in person, its hard to pinpoint a firm solution.
 
Go outside and look where the support rails are attached to the outside wall. If you see where the bolts are positioned and there is a groove in that area, you may be able to change the height on your slide travel.


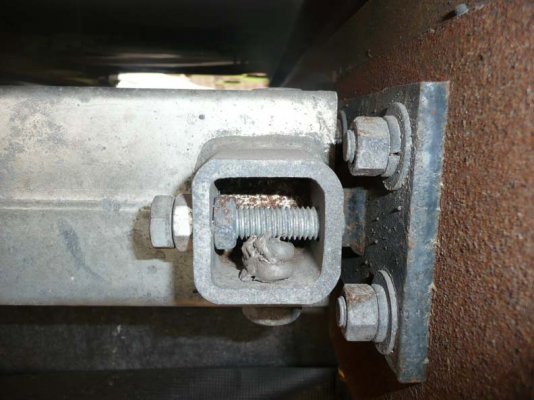
Ernie, I've attached a picture of it below.  It's coming back to me now how we adjusted the outside ends of the slide.  In the picture you can see one support rail for the living room slide.  The bolt and the two nuts seen in the foreground is for setting the stop for retracting the slide.  You can see that it's set to bring the slide in as far as it can go.  Under the rail you can see a little bit of a 1 1/8" nut.  When I loosen this nut, I can then get a hex wrench into the bolt that the 1 1/8" nut is screwed onto and turn the bolt to raise and lower this end of the slide.  I don't think there is a similar mechanism on the inside edge of each support rail.
 

Attachments

  • P1060074 Compressed.jpg
    P1060074 Compressed.jpg
    610.4 KB · Views: 83
The first time we retracted our slide, the slide moved our Allure a fraction of an inch also.  That forced us to use more double-sided tape around the edges and under the slide to keep the Allure in place.  I guess 'floating floors' don't work too good in some RVs.

Man, yours was closer than mine was.  Double sided tape wouldn't have helped me... the entire floor buckled in the middle.
We're using lots of rugs too and they can be easily replaced with new ones from time to time.  Of course, anyone could do a good job of that for >$300 (I think you meant to say <$300).  :p

Yep.  got me.
Well, there's no adjustment to the skid on ours (we only have one skid at the very front of the slide and it's not adjustable).  I'm not sure but I think there is a way to raise the whole slide so that it rides higher off the floor, but I don't know how it's done.  My guess is that it would entail raising the slide higher above the rails that it is attached to and would require some clearance at the top of the slide also.  We made some adjustments to our slide but only on the outside edges to get it to move in/out more.
[/quote]


My skid isn't adjustable either. I was refering to the entire slide riding higher.  I think the next post is trying to explain that.  I don't think he's referring to the adjusting bolt you pictured but rather one that's located on the outside slide wall behind a cargo bay door.  Mine were marked at the factory with paint to reveal if they've been moved so I haven't played with it yet but rather want to wait for my visit to HWH and Winnie next month.
 
Back
Top Bottom