How to make a canoe rack for a popup and fix a sagging roof .

The friendliest place on the web for anyone with an RV or an interest in RVing!
If you have answers, please help by responding to the unanswered posts.

starman2

Member
Joined
Aug 15, 2010
Posts
15
Location
Tenn.
Do any of you carry canoes on top of your pop ups?
Would love to see photos .
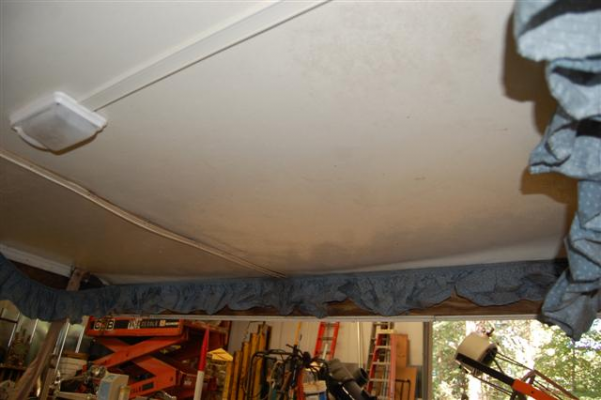
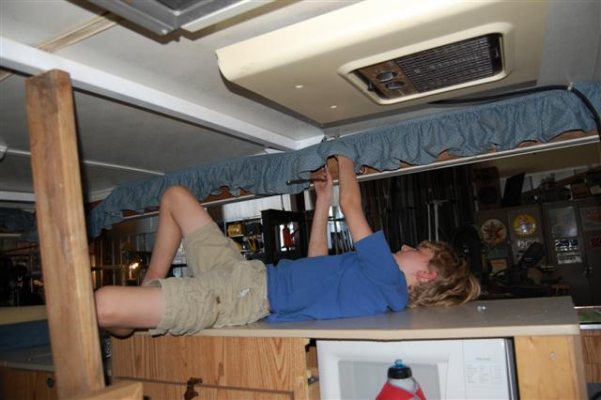
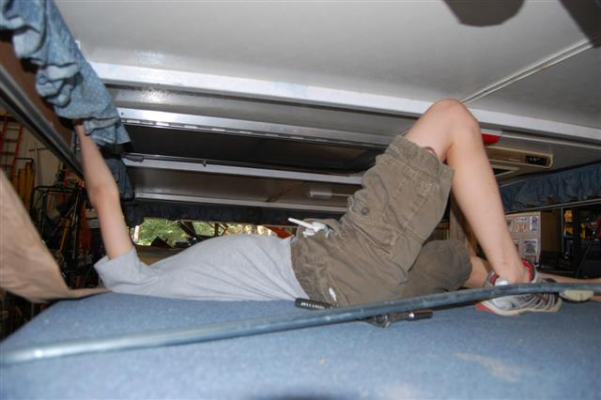
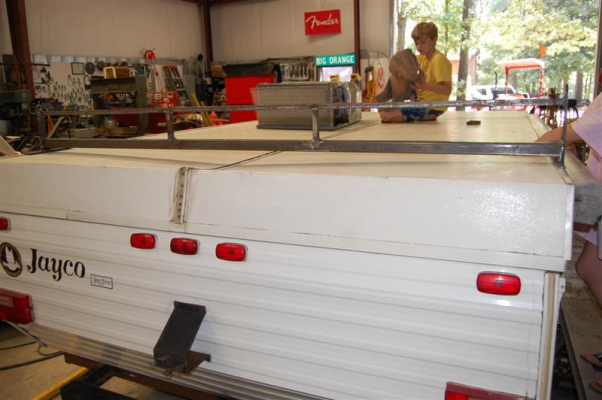
I have had a problem many of you have had with sagging roofs .
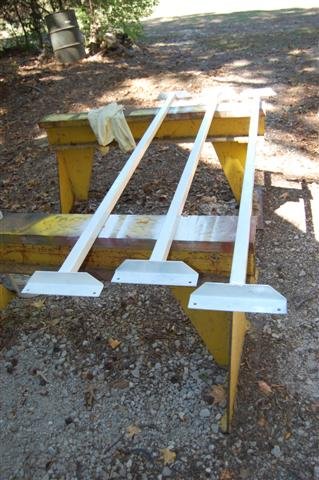
I will post some photos of my design and hopefull fix as I repair my Jayco
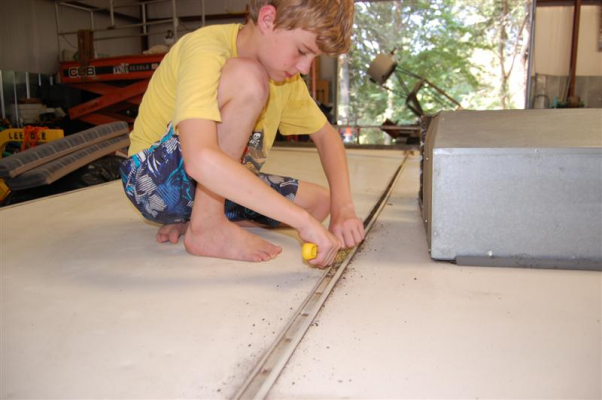
that you may follow. I started today welding  one of the racks and put
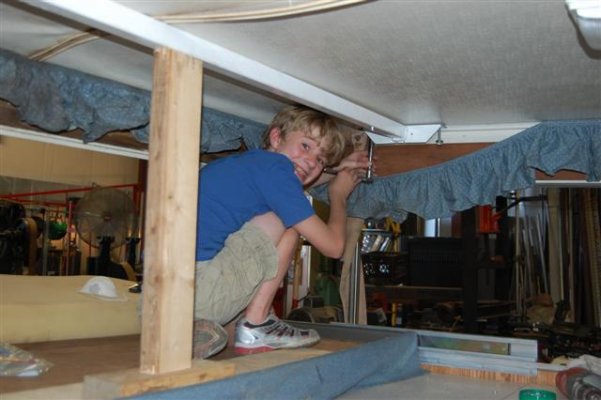
the lightest  kid I have in our posse on the top ,cleaning and preping the roof .
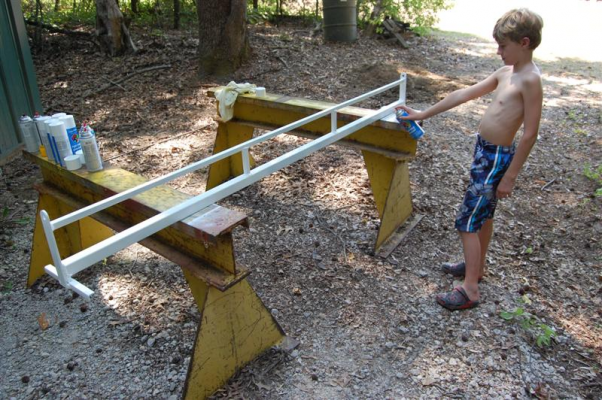
After sanding the sharp edges of the metal , got one of the racks painted.
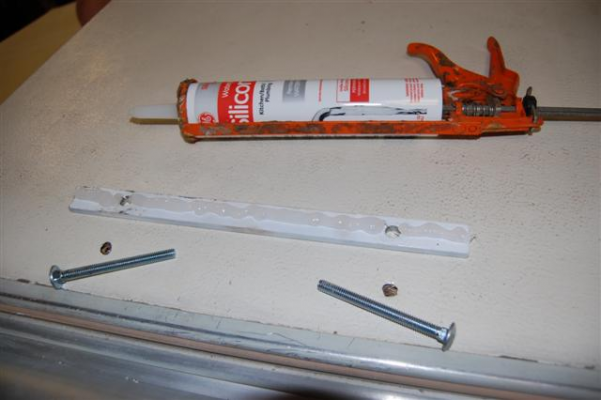
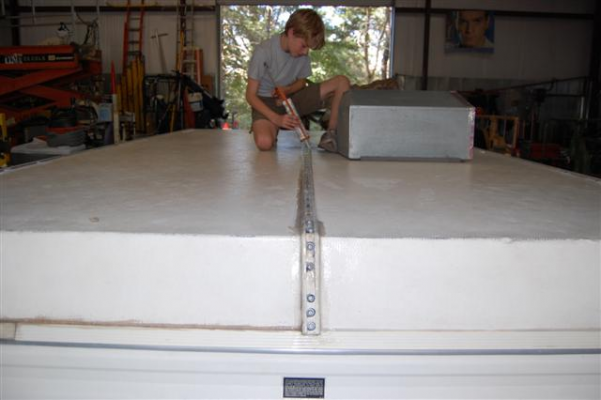
The idea is to bolt the 3 to 4 inch sagging roof to the three ,racks I will
build . One about a foot from the rear , one in the middle ,and one about
a foot from the front. The roof AC unit is way to heavy for the roof , and
bouncing down those gravel roads to white water is the reason of the failure .
I have also made the rack with a crown in the middle of about 1/2 inch.
this should allow water to shed off and keep it dry. I will post more photos
as we work on it.
 

Attachments

  • DSC_0021 (Medium).JPG
    DSC_0021 (Medium).JPG
    520.6 KB · Views: 99
  • DSC_0028 (Medium).JPG
    DSC_0028 (Medium).JPG
    485.7 KB · Views: 72
  • DSC_0034 (Medium).JPG
    DSC_0034 (Medium).JPG
    980.3 KB · Views: 86
OOF! I don't feel so bad about my roof after looking at yours.I took 2 2x4's and placed one near the rear and 1 just forward of the air conditioner. I raised the top and took a jack and some 2x4's cut to length and placed the jack on the floor the 2x4 scrap under the 2x4 running horz. and jacked it tight against the roof. Next I drilled through the sides of the top canvas and all and ran lag bolts into the 2x4 to hold it in place. I used fender washers with a rubber washer under it to seal the holes. So far works great. Just be sure you clear all the interior items when the top closes with the 2x4's in place. It also had the benefit of bringing the sides of the top back into alignment with the sides of the lower part of the camper when closed. As for racks mine came with stock ones and I took a foam noodle float the kids use, split it lengthwise and tied it on with large wire ties and strap  I use ratchet tie downs and throw my kayak on keel up then ratchet it down. So far works fine.
 
Yes ,It's in sad shape , a total falure of the staples  in the rear area has caused this problem
water pools in the rear area . but its so bad looking we can only make improvements from
this point forward. Once I finish the racks for the top I plan on using all thread and  drill into
the top and support cross members and that should hold it up fine. After making the first
rack for the rear I made it with a 1/2 crown to shead water off to the sides I think I will make
the center rack with a one inch crown. With the added weight of canoe and kayak and our
push up 2meter antena I dont want to have it sag at all. I want to paint on a white roof
sealing paint while I am at it . Has anyone used any good products for this use ???
 
Mine was in close to the same shape, bought it that way knowing I could fix it and so got a deal on the trailer. With my added roof supports it works fine now. I was thinking of using allthread but then decided on the 2x4s as I attached a pair of stereo speakers to them and have them hooked to an amp with an old computer with mp3's on the hard drive. I have over 6 months of audio and around 50 movies stored on the hard drive and can use the dvd on the computer to play either. I bought an lcd monitor from a pawn shop and now have a good entertainment system. Even put a jack in the side to plug in exterior speakers.
I have played around with drain lines on the Coleman ac unit and found that if you take the top off then the metal cover the condenser coil has a plastic tray under it with a hole in each end that drains on to the roof. You can take a couple of brass hose barbs and some goop adhesive and glue the barbs into the holes and run some hose over the side of the camper to divert the drainage. Just be sure the hoses remain below the top of the drain tray or the condensation with come in to the camper. Seems to work for now. I used clear hose to be able to see if the hoses are stopped up with algae. I am sure the stock way of just draining on the roof is used as a precaution to keep overflow from the tray dumping into the camper and so we have to deal with it on the roof.
 
That's a good idea on the drain line I took off the cover to give it a good cleaning and
there is a one inch hole that just lets it drain all over the roof . Bought a new canvas
and there is no way I want that AC dripping on my new tent so I will make a drain line
and run it off the side away from the wall. Found some roof paint called snow roof thats
white and claims to seal rvs and moble homes from leaks .Should be in stock by Fri ,
had to order from Ace hardware 23 bucks a gal. but the rv center was asking 84 bucks for
the same stuff ,wow what a rip off. Do you have any photos of your repairs with the 2x4s ?
 
30 years in the iron biz you dont want to make it twice, If you like that check out my welding
fab table. 8)
 
Joezeppy said:
I've seen some heavy duty saw horses over the years but yours take the blue ribbon for sure!

This is my new welding layout table I made last year ,Got all my favorite hammers and vices
on it . The other one is the one with the canon on it . All built to out last me and
provide me a chuckle from the grave to the lucky person at my estate sale that's
gotta move it. HAHA
 

Attachments

  • DSC_1000 (Medium).JPG
    DSC_1000 (Medium).JPG
    630.5 KB · Views: 47
Well It has worked out well ,the new supports pulled up the sagging roof and now we
are done . The before photo shows how much sag we had on the inside ,with the new
supports and only two in place it lifted the roof to have a crown in the center ,my son said
it was fun to fix and he cant wait to go camping. 
The canoe racks I put on the top only when we go canoeing ,one strap across and
every thing is good to go.
With this design the tent can be removed anytime because the support will not interfere
with its track it is hung in.
The steel tubing is one and 1/2 ,and the angle is 2 inch . :)
 

Attachments

  • DSC_0134 (Small).JPG
    DSC_0134 (Small).JPG
    301.1 KB · Views: 53
  • DSC_0137 (Small).JPG
    DSC_0137 (Small).JPG
    46.9 KB · Views: 54
  • DSC_0139 (Small).JPG
    DSC_0139 (Small).JPG
    47.3 KB · Views: 59
  • DSC_0144 (Small).JPG
    DSC_0144 (Small).JPG
    269.2 KB · Views: 52
  • DSC_0151 (Small).JPG
    DSC_0151 (Small).JPG
    358.8 KB · Views: 59
We installed the last rack and it made the roof really stable ,we are not saggars
any more. Time to calk the roof at every seam. I plan on painting the roof next.
The paint is a rubber type paint from ace hardware cost about $25 per gal.
 

Attachments

  • DSC_0163 (Small).JPG
    DSC_0163 (Small).JPG
    317.7 KB · Views: 55
  • DSC_0173 (Small).JPG
    DSC_0173 (Small).JPG
    248.7 KB · Views: 50
  • DSC_0158 (Small).JPG
    DSC_0158 (Small).JPG
    54.3 KB · Views: 38
That's a good point but its a rubber roof paint ,not paint ,don't know if it will be a problem
The can said it you can roll it over most any material . Problem should have read a little more
on the caulk.
 
starman2 said:
That's a good point but its a rubber roof paint ,not paint ,don't know if it will be a problem
The can said it you can roll it over most any material . Problem should have read a little more
on the caulk.

It's my understanding that nothing will adhere to silicone caulk, including re-caulking with silicone. I believe that there is a silicone caulk that is formulated to be painted but have never used it. I only use silicone caulk in areas that do not need painting or will never need to be re-caulked.

Richard
 

Latest posts

Forum statistics

Threads
131,972
Posts
1,388,446
Members
137,721
Latest member
Dmac3003
Back
Top Bottom