Try the Duct Tape and Bailing wire on just one project, and you will find out that she would not be satisfied. I did a temp repair on one trip, and got sick on the way home, and for a week I heard "I'll sure be glad when you are feeling better so you can fix that closet right."
You are using an out of date browser. It may not display this or other websites correctly.
You should upgrade or use an alternative browser.
You should upgrade or use an alternative browser.
My Itasca off season project
- Thread starter Jack D
- Start date
The friendliest place on the web for anyone with an RV or an interest in RVing!
If you have answers, please help by responding to the unanswered posts.
If you have answers, please help by responding to the unanswered posts.
OP
OP
Jack D
Well-known member
Today, we're off to buy materials for a new table and flooring, along with various trim materials. We're on the home stretch as far as the interior goes. The exterior will be a project all by itself.
OP
OP
Jack D
Well-known member
Plastic laminate for table top had to be ordered. We did find a flooring pattern that we liked. Allure tiles in a stone tile pattern with lots of oranges and earth tones. I'm hoping the decision to go with Allure is not a mistake.
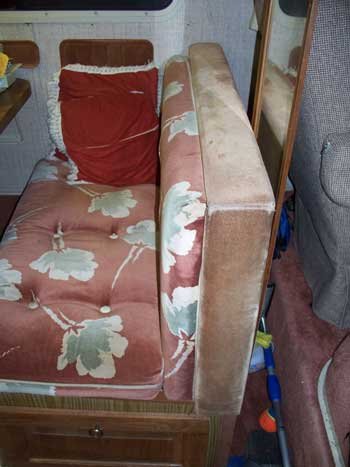
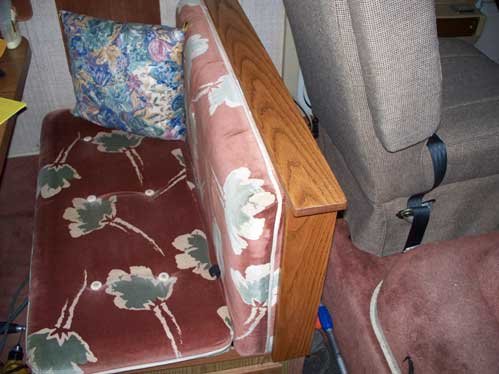
The dinette seat back trims are changed from that old cloth material to Oak stained Walnut.
More photo's: http://www.metalsmithpro.com/Itasca%20ProgressII.htm
The dinette seat back trims are changed from that old cloth material to Oak stained Walnut.
More photo's: http://www.metalsmithpro.com/Itasca%20ProgressII.htm
Attachments
OP
OP
Jack D
Well-known member
I started a new page for phase III. This page will cover the dinette and flooring and misc. interior work and should finish the interior.
http://www.metalsmithpro.com/Itasca%20ProgressIII.htm
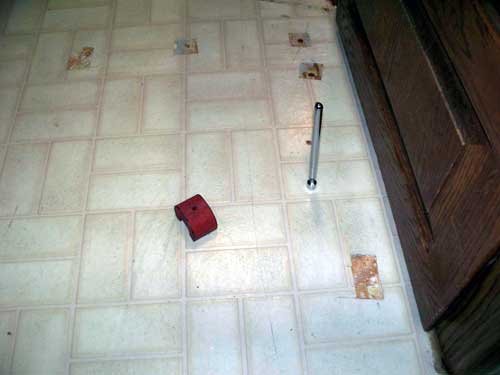
Removal of underlayment is necessary to find "hump" cause and repair prior to putting down the new Allure vinyl flooring. Removing the vinyl proved impossible, so I'm using magnets to locate screw heads, then removing a small piece of vinyl to access the screws. Removal of the underlayment should be quite easy after screws are located and removed.
http://www.metalsmithpro.com/Itasca%20ProgressIII.htm
Removal of underlayment is necessary to find "hump" cause and repair prior to putting down the new Allure vinyl flooring. Removing the vinyl proved impossible, so I'm using magnets to locate screw heads, then removing a small piece of vinyl to access the screws. Removal of the underlayment should be quite easy after screws are located and removed.
Attachments
Molaker
Well-known member
If finding the screw heads with a magnet doesn't quite get it, Harbor Freight has some metal detectors that beep when it finds a screw or nail. I don't see the one I have, but they do have a couple fairly cheap ones that should do the job.
mike eddleman
Well-known member
This is a great looking project I,m following it with great intrest. I have a little of the same work coming up if I keep our motor home.
OP
OP
Jack D
Well-known member
I've located and removed all of the screws under the old vinyl. Now I find the 3/8" plywood underlayment is also glued down. Dang!!!!Lots of company this weekend. I'll tackle the problem after they leave. Not sure how, but if there's a will, there's a way. Right?? At this point, any and all suggestions are very welcome.
Ernie Ekberg
Well-known member
- Joined
- Mar 17, 2005
- Posts
- 1,591
I wonder if your cabinets are sitting on top of underlayment? If so, removing the screws won't help much.
ZuniJayne
Well-known member
Arg. Ernie might have a good point. I know in both my 1992 fiver and my 2001 TT, the underlayment goes under the cabinets. AFAIK, most if not all RVs are made with all the flooring, including the carpet and/or vinyl, before the walls and cabinets are put down.
In the Fox's case, the vinyl was laid over the whole floor, then the carpet was laid over that in the bedroom and half the living area. They must make up the cost of the extra materials in labor costs to do it that way. I took up all the carpet in the bedroom and it's so much easier to clean.
I plan on taking up about 2/3 of the carpet in the living area (not IN the slide yet - no vinyl under the carpet there). Lou was right (no surprise there) about the metal slide runners supposed to ride on the rollers and NOT on the carpet. Since Ron made the slide adjustment, only the slide runner nearest the rear of the slide out rests heavily on the carpet, so I can leave part of the carpet in to protect the nice vinyl floor there. Will do pics when I get a round tuit. ;D
Jack, please keep posting. I am learning a LOT from your project.
OP
OP
Jack D
Well-known member
My coach was indeed made the way you suggest. The finished floor was laid first then cabinets on top. But what I'm trying to remove is an added layer that someone put down later. It appears they pulled up the carpet...up to the cabinets, then put down another underlayment of 3/8" plywood in the walking areas, then put down vinyl in the "kitchen" area and relaid the existing carpet in the entry and bed/ bath areas. But they glued and screwed that added layer to the existing underlayment or sub-floor. Un-screwing is easy, un-gluing is something else. That's my dilemma. My son suggested using a router. I can, by adjusting the depth of the router bit, cut away a small section in the hump area and see what's going on in that area. That might give me some answers and clues for a fix.
ZuniJayne
Well-known member
Sorry, Jack. I missed the specifics about the added on underlayment.
The router might work well, or how about using a very small hole saw blade to take a "core sample?"
The router might work well, or how about using a very small hole saw blade to take a "core sample?"
boatbuilder
Well-known member
If they are only small humps could you just router them out and fill them with a leveling compound? Or possibly just use a belt sander and level the humps?
OP
OP
Jack D
Well-known member
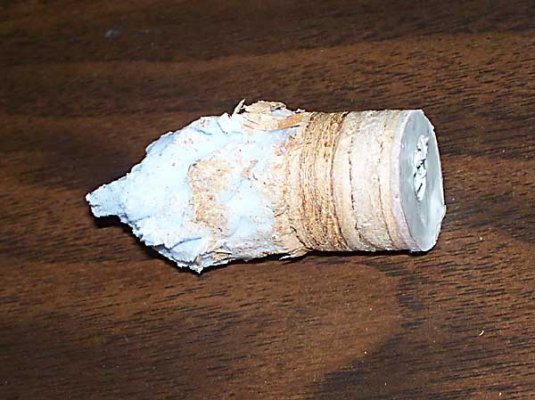
I did the "core sample" thing this morning and was surprised at what I found. I took the sample from the highest point of the "hump" using a 1" hole saw. I started the hole saw with pilot drill, then removed the pilot drill to finish. I found the floor is a sandwich construction, just like the side walls and roof. From the bottom up, sheet metal , 1.5" of foam, 2 layers of 3/8" plywood, vinyl flooring. I expected to find some particle board that had been wet and swelled up. But that's not the case......nothing is swelled up or distorted. So why the hump? My next step is to crawl underneath to inspect the bottom layer of sheet metal. Perhaps is was damaged somehow. :-\
Attachments
OP
OP
Jack D
Well-known member
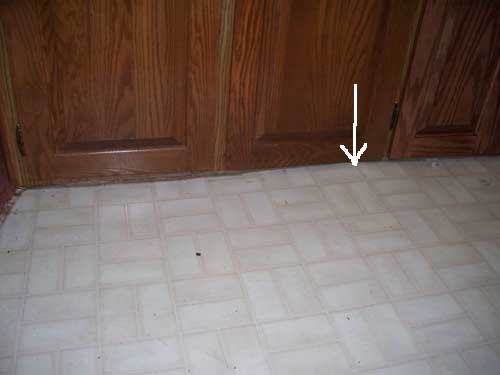
boatbuilder said:If they are only small humps could you just router them out and fill them with a leveling compound? Or possibly just use a belt sander and level the humps?
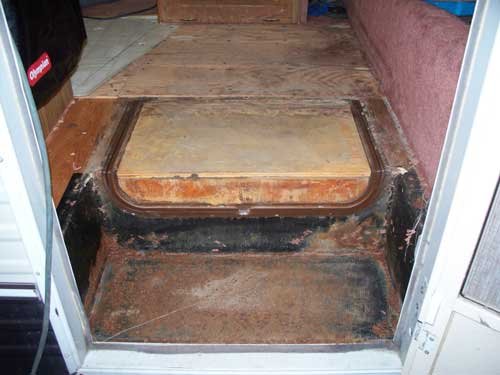
Something like that is a possibility. The hump is quite large. There is only one (photo with arrow). Judging from the bottom of the cabinet, it is raised about 3/8" and that is all there is in plywood flooring. Under that is foam. I haven't looked underneath yet, but I'm hoping (assuming the sheet metal is damaged) that I can just beat it down. Perhaps with a block of wood and sledge hammer? I'm not sure I can get to it from the under side. The drive line and mufflers could be obstructing that area. I could...worse case....cut out the damage, complete , and rebuild that section to level from above.
Off to the shop to check the under side.
OP
OP
Jack D
Well-known member
Looking at the underside, the area is covered with a heat shield and I cna't see the underside of the floor. There is no damage to the heat shield nad no sign that it has been replaced (welded). I have to assume the hump is a factory defect. We will live with it.
I removed the carpet in the entry. This area will be a challenge.
More photo's: http://www.metalsmithpro.com/Itasca%20ProgressIII.htm
I removed the carpet in the entry. This area will be a challenge.
More photo's: http://www.metalsmithpro.com/Itasca%20ProgressIII.htm
Attachments
Ernie Ekberg
Well-known member
- Joined
- Mar 17, 2005
- Posts
- 1,591
Jack- here is a long shot question? In what proximity is the holding or retaining brace for your leaf springs? The reason I ask, since you find no moisture damage is that the coach may have suffered a very bad part of the road- pothole and that part may have failed.
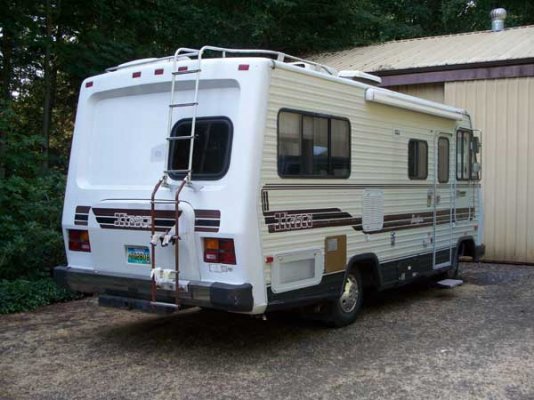
On a side note, I inspected a coach last year, with a tag axle. The marble tile in the bath had a crack running the width of the coach that I could stick my tip of my pinkie in. Thus- over 1/8 in width. Can you take some photos of the coach from the exterior? We might see a deviation in your outside skin. Although, we can't help get it back to factory, we might be able to ascertain what may have happened. Thanks, Ernie
On a side note, I inspected a coach last year, with a tag axle. The marble tile in the bath had a crack running the width of the coach that I could stick my tip of my pinkie in. Thus- over 1/8 in width. Can you take some photos of the coach from the exterior? We might see a deviation in your outside skin. Although, we can't help get it back to factory, we might be able to ascertain what may have happened. Thanks, Ernie
OP
OP
Jack D
Well-known member
Ernie Ekberg said:Jack- here is a long shot question? In what proximity is the holding or retaining brace for your leaf springs? The reason I ask, since you find no moisture damage is that the coach may have suffered a very bad part of the road- pothole and that part may have failed.
On a side note, I inspected a coach last year, with a tag axle. The marble tile in the bath had a crack running the width of the coach that I could stick my tip of my pinkie in. Thus- over 1/8 in width. Can you take some photos of the coach from the exterior? We might see a deviation in your outside skin. Although, we can't help get it back to factory, we might be able to ascertain what may have happened. Thanks, Ernie
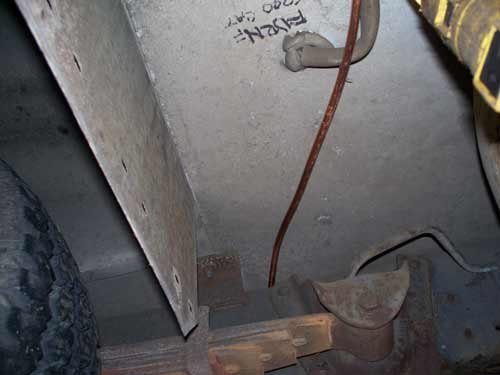
Attached are photo's of the side and the spring mount closest to the hump. The hump is centered about 2' forward of the spring mount. I see nothing in the sides or underside to indicate that it was damaged in any way. I've been underneath and inspected it pretty closely.....although, I wasn't looking for anything specific at the time.......just looking for potential problems and things that might need attention.
One thing does come to mind. A sandwich of thin sheet metal, styrofoam and 3/8" plywood is not really very substantial. Looking at the frame near the spring mount, you can see a bracket from the frame to the floor. There may be another one in the area of the hump. If that's the case, the hump may be caused by a sag in the floor between the brackets. It feels solid at the center of the hump and softer to each side. It makes sense.
Attachments

Kim (skyking4ar2) Bertram
Moderator Emeritus
Wouldn't you just kill for a set of factory assembly photos?
Your postings have been extremely informative - thanks for taking the time....
Your postings have been extremely informative - thanks for taking the time....
OP
OP
Jack D
Well-known member
skyking4ar2 said:Wouldn't you just kill for a set of factory assembly photos?
Your postings have been extremely informative - thanks for taking the time....
Thanks you....and yeh! I would. This forum has been very helpful to me. It's a two way street.
")
Jack does your exhaust system look like it has overheated in that area in the past? It might have just provided enough heat to cause further expansion of the foam in that area, causing the floor to buckle. A small hole through the floor outside of the raised area [probably inside a cabinet to keep it invisable.] should enable you to test for floor thickness and compare both areas to each other.