Winterizing...valve direction

The friendliest place on the web for anyone with an RV or an interest in RVing!
If you have answers, please help by responding to the unanswered posts.

johnny340

Member
Joined
Jun 11, 2010
Posts
15
Location
Vancouver, BC
I have a '99 Itasca Spirit and started what I thought would be a simple job of winterizing. 
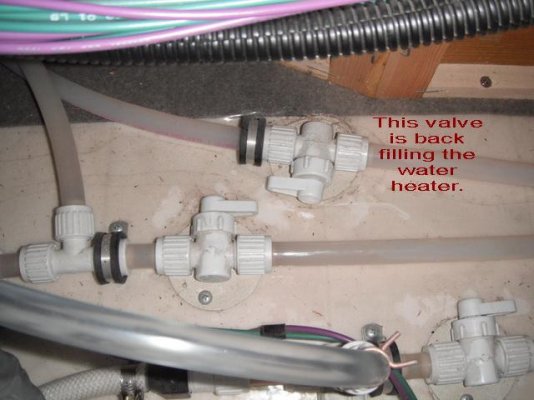
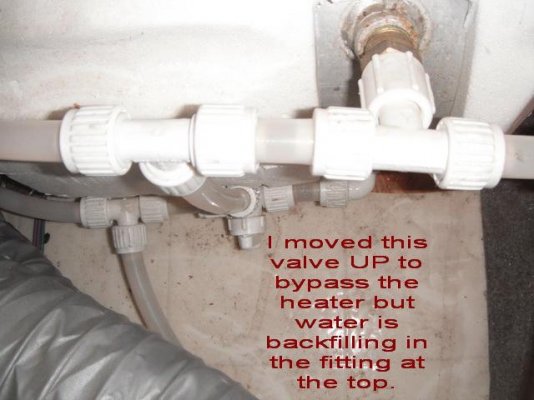
After draining the water tank and water heater I hooked up the anitfreeze line and opened that valve.  It seems that is about the only valve that's easy to know if it's open or closed.  I have lost track of the other inline valves and seem to dump antifreeze overboard no mater which way they are turned.  Is there a simple rule for these?  I know the tank drain orientation but there are two other inline drains that send water to the heater that I don't know what they are for.  Yes, i did change the heater bypass valve (the only other easy one to see which way is open) but still end up with antifreeze back into the heater.  Frustrating.  Here is the easy to read schematic for this thing:  :mad:  Oh, the attachment is too large...  It's the inline valve that you would think allows flow in one direction and sends overboard at 90? but the overboard setting is the 'other' direction inline with the hose.

Here's a link to the schematic if it helps:
http://www.winnebagoind.com/diagram/1999/99_324v_plumb.pdf
I can't even insert a link today....


edit:  link fixed by moderator
 
I think you have the wrong valve, because the winterizing valve for the water heater cannot send water "overboard" in either position. The winterizing valve merely bypasses the water heater, allowing water to flow around it rather than through it.
 
The water heater bypass valve is not sending water overboard.  It was the other two line valves which I have figured out however the one valve (see pic) sends water back into the heater and can only be open (in line) or over board (the other way in line) and not closed.  In the one pic all three valves are closed (not sending water overboard).  The heater bypass valve is in bypass in the other pic.  How can I stop water (antifreeze) from backfilling the heater tank?  Thanks.
 

Attachments

  • 136a.jpg
    136a.jpg
    42.1 KB · Views: 67
  • 137a.jpg
    137a.jpg
    40.7 KB · Views: 63
The only valve that should ever dump water overboard is the fresh tank drain.  The line that fills the water heater is the normal cold water line from the pump & city inlet.  I'm not familiar with your Itasca Spirit plumbing, so can't really comment on which valve is which in the first picture. We need another Itasca owner to shortcut this with some actual experience with your particular layout.

I'm curious about the circular plates under each valve. Are they attached somehow to the valves or do they provide a path for another water line? Those valves don't make much sense unless at least one of them is a tee fitting with two outlets.

You may have a bad check valve in the heater bypass (second picture).  A single valve bypass like that relies on a check valve to prevent backflow into the heater. A failed check valve wouldn't bother it in normal operation, but the bypass won't work without it.
 
First question...might you still have the owner's Manual with the written procedure and better diagrams?

Even at 800% magnification..that PDF diagram still looks like a pile of Franco American Spagetti :eek:

Another thought..process of elimination.

1. Unscrew the main water tank 1" nylon drain plug...near the burner assembly. Drain all the water out. Leave the plug out.

2. With a slower than normal city water hookup..start at the bottom of the coach near the heater..move valves until water is controlled down and out of the city water drain tube. That confirms the city water drain. Set it to 'closed'.

3. Now observe the open main tank drain. Water will probably be coming slowly out the drain as the main tank fills..

4. Turn each of the remaining valves momentarily (15-20 seconds..) and observe the out flow from the main tank drain. Alternate valve positions...still observing the outflow valve. When the correct position for the remaining valves is achieved, no water will drain out of the main tank drain...and, I believe, you have isolated-bypassed the main tank for winterization....as per Gary...if the check valves are working properly.

I'm really winging this.. ::)..but hope it helps..please post your results.

Charlie


Thanks for the replies!  Yea, that schematic is a treat.
All three valves in the first picture have a 'T' that goes downward for a drain.  I never thought about the city water line so that must explain one of them.  The other is the main tank drain and the third must be some kind of line drain?? 
Anyway, I did do the process of elimination method to determine which way the valves go to shut them off (from the drain tubes) but always had water flowing into the water heater.  The only explanation now must be a bad check valve.  Thanks for that idea.  Can anyone tell from the second pic where this check valve is?  I'm guessing it has never had to operate in 11 years due to this RV's California history.
 
The check valve will be in the hot water outlet on the water heater, the line near the top of the tank.
 
johnny340 said:
Thanks for the replies!  Yea, that schematic is a treat.
All three valves in the first picture have a 'T' that goes downward for a drain.  I never thought about the city water line so that must explain one of them.  The other is the main tank drain and the third must be some kind of line drain?? 
Anyway, I did do the process of elimination method to determine which way the valves go to shut them off (from the drain tubes) but always had water flowing into the water heater.  The only explanation now must be a bad check valve.  Thanks for that idea.  Can anyone tell from the second pic where this check valve is?  I'm guessing it has never had to operate in 11 years due to this RV's California history.

It appears to me that is your cold water entry valve..the check valve (metal) going directly into the tank..If I see your picture oriented correctly ..it is the bottom tank valve and usually easy to replace. If you elect to replace it..get one like this with all metal internal parts..http://www.shoprvparts.com/product.do?no=11487F
 
Johnny 340...if you do buy and start the replacement process for this brass valve..note the direction flow arrow etched on the brass valve and make sure you install the new one as the old one. At the top of the brass valve, there might be a small black or white rubber O ring sealer  that adds seal between the brass nipple and the nylon connecting parts. If the old brass valve has one..replace it on the new valve by taking the old rubber sealer ring to a hardware store (Home Depot) and match it to a new one. Careful, do not overtighten the brass valve to the tank...or the nylon connecting parts to the brass valve with the rubber O ring seal.

Please keep us posted.

Charlie
 
From looking at your pictures the check valve is the brass piece between the white "T" fitting and the tank in the second picture.  If you unscrew the white T fitting you should be able to look in the check valve and see if someone removed the mechanism or there is something holding it open.  As Pubtym said make sure the orientation of the valve is correct if you replace it. 
 
Winnebago usually has two check valves on the water heater. One on the inlet and one on the outlet. At first glance they don't look like check valves - more like a brass fitting. Both of mine screw right into the water heater.
 
Clay L said:
Winnebago usually has two check valves on the water heater. One on the inlet and one on the outlet. At first glance they don't look like check valves - more like a brass fitting. Both of mine screw right into the water heater.

The most common symptom of failure of the top outlet OE check valve (non gutted) is little to no hot water in service areas of the coach.

Charlie
 
Of the three valves with tees to the outside, one will be the main tank drain and the other two will be "low point" drains for emptying out water lines. One hot and one cold.  The low point drains are used if you use the "blow out" method of winterizing rather than antifreeze, or for flushing out antifreeze in the spring.

The winterizing valve is the one by the water heater itself. If water flows into the tank with that valve in either position, you have a failed check valve that is stuck open.
 
Thanks a lot for all of the responses!  I haven't pulled it/them out yet but am fairly sure that the top one has failed and will need replacing.  Thanks for the link too.  I wish I had posted here before I sent 3 gallons of antifreeze out the water heater...
 

Latest posts

Forum statistics

Threads
131,953
Posts
1,388,141
Members
137,707
Latest member
Opal6502
Back
Top Bottom