ZUNIJAYNE AND HERO COME TO TEXAS!!!

The friendliest place on the web for anyone with an RV or an interest in RVing!
If you have answers, please help by responding to the unanswered posts.
It was great to meet Jayne at Ron and Shirleys. While she was busy with Jack and Liz, Ron and I were inhaling lots of chemicals from that treatment stuff.
Shirley, on the other hand was inhaling cooked cranberries. I think I'd rather be inhaling that instead of the chemicals. Traffic was fun coming back to Weatherford- what would ya expect since Thanksgiving is tomorrow? Glad I could help. I leave Fri for Enid, Ok to work for a fellla that has a new heart.
Happy Thanksgiving- ALL
Ernie
 
Well, we got through Thanksgiving with full tummy's.  The gathering included, left to right in the photo, Chad, Jayne, Shirley, Rebecca, Ron, Liz & Jack.  Shirley in the second photo was the master chef and I believe everyone would agree.  She spent all of Wednesday and all morning on Thanksgiving making sure all the food was perfect.

We had dinner about 1:00 pm and I asked Liz to give us a Jewish Blessing.  It was very nice.  We then joined in conversations while Rebecca and Shirley cleaned up the table and kitchen.  This was followed by some nature programming on TV and the Cowboys, Saints football game.

Today is an off day, since the cold weather hit yesterday.  Only leftovers on the menu.

Hope all of you had a grand Thanksgiving Holiday.
 

Attachments

  • Arctic Fox_MG_8810-1 small.jpg
    Arctic Fox_MG_8810-1 small.jpg
    37.1 KB · Views: 93
  • Arctic Fox_MG_8801-1 small.jpg
    Arctic Fox_MG_8801-1 small.jpg
    20 KB · Views: 71
  • Arctic Fox_MG_8799-1 small.jpg
    Arctic Fox_MG_8799-1 small.jpg
    30.4 KB · Views: 75
And a truly wonderful meal ad company it was!

Here are some pics of my propane wall heater mount.  I can point it in most any direction with the piano hinge mount.  I have an extra screw in the wall behind it so I can secure it for travel by flattening it to the wall, lift it slightly, and set it back down on the slotted screw hole on the back of the heater.

I added a cordless fan above it to help distribute heat.  You could also wire a 12v muffin fan with an on/off switch to save on batteries.
 

Attachments

  • P1010001.JPG
    P1010001.JPG
    59 KB · Views: 85
  • P1010002.JPG
    P1010002.JPG
    58.1 KB · Views: 79
  • P1010003.JPG
    P1010003.JPG
    55.2 KB · Views: 78
Howdy, Framily.
Here are some photos of parking Jayne's trailer in Ron's driveway, sharing that space with a 40 ft. Bluebird Wanderlodge!!  Since Jayne's truck has a long wheel base, Ron and Jayne hooked up the Fox to Ron's Lexus for more maneuverability. 


Regards,
Liz
 

Attachments

  • BirdBackingIn (Medium).JPG
    BirdBackingIn (Medium).JPG
    88.6 KB · Views: 75
  • CLOSER (Small).JPG
    CLOSER (Small).JPG
    45.6 KB · Views: 74
  • HOOKING 2 LEXUS (Small).JPG
    HOOKING 2 LEXUS (Small).JPG
    45.4 KB · Views: 76
  • Jayne Directs.jpg
    Jayne Directs.jpg
    71.5 KB · Views: 67
  • Lexus backs Fox (Small).JPG
    Lexus backs Fox (Small).JPG
    45.6 KB · Views: 63
  • Rigs Parked (Medium).JPG
    Rigs Parked (Medium).JPG
    71.6 KB · Views: 68
  • Ron in Lexus (Medium).JPG
    Ron in Lexus (Medium).JPG
    77.5 KB · Views: 65
  • SHIRLEY_GUIDING (Small).JPG
    SHIRLEY_GUIDING (Small).JPG
    62.4 KB · Views: 69
Wow - that Lexus looks like it handled the Fox's 1000 lb hitch weight without even sagging!  Does it have a self-leveling suspension or what?
 
Lou, it does have a suspension that you can change.  The Lexus actually did sink back on its haunches some.  But Ron put it in low range and it worked like a champ.  There was just no way we could get the Fox parked with my truck's extra long wheelbase (extended cab and full 8 ft bed).

On the plus side, that long wheelbase keeps the Fox from whipping the truck around too bad.  :)  Ron said when he took the ball mount off the Lexus he swore the thing raised up six inches in the back.  ;D
 
      Saturdays progress included another new shelf in the kitchen, more sorting and weeding out stuff and finding places to put things.

      On the outside, with some assistance from Jack, Ron impregnated some resin in open cavities and drilled holes to solidify the wood some more.  A layer of resin was then applied to the exposed rotted wood and between the framing and the exterior plywood skin.  That was then clamped as shown in the photos.  Because the temperatures are pretty cool at night, I plan to leave the clamps on for another day, but will probably start building some of the wood up with the epoxy putty.  It can be applied before the resin is completely cured.  I have not worked with this product before, so I hope it works as good as they claim.

      I plan to install two doors over the original micro-wave cabinet that I found at a salvage yard yesterday.  Jayne has some leftover hardware that we will use.
 

Attachments

  • Arctic FoxCRW_2551-1 small.jpg
    Arctic FoxCRW_2551-1 small.jpg
    28.8 KB · Views: 78
  • Arctic FoxCRW_2553-1 small.jpg
    Arctic FoxCRW_2553-1 small.jpg
    35.9 KB · Views: 76
      Today, Sunday, I never made it to installing the cabinet doors, but did apply the epoxy wood putty along the bottom rail of the slide out except where a few of the clamps are located.  I have attached photos.  This was all hand shaped.  It tends to stick to the putty knife and the product I am using did not provide information on what to use to smooth the surfaces.  I will probably have to do a little refining of the putty with a new application.  Tonight, I will check their web site to see what I can learn to make it easier.  It can be sanded after it is hardened and should perform just like wood.

We are making progress.  I plan to cut the lower frame member for the wheel well tomorrow.  It had been completely destroyed.  The first photo shows the rebuilt rear vertical member what I need to attach to.  The second image is where the front of that member needs to attach.  There is little or no attachment above.


Attachments

  • Arctic FoxCRW_2557-1 small.jpg
    Arctic FoxCRW_2557-1 small.jpg
    30.6 KB · Views: 59
  • Arctic FoxCRW_2556-1 small.jpg
    Arctic FoxCRW_2556-1 small.jpg
    27.8 KB · Views: 58
  • Arctic FoxCRW_2554-1 small.jpg
    Arctic FoxCRW_2554-1 small.jpg
    24.4 KB · Views: 66
    We had some early morning showers so the ground was wet and delayed by start.  Jack assisted me in marking the 2x12 treated piece for the bottom frame at the wheel well.  I took it to a friend with a band saw for cutting the radius.  We then made some plates of 1/8" mild steel to tie the forward end of the 2x12 to the existing framing.  This shown in the third photo.  The first photo shows where I installed (2) 1/4"x5" lag screws into the rear end of the remaining part of the 2x12 also shown in photo number two.  This made the bottom of the skirt very stable.

    I removed the clamps from the outside and filled a few gaps in the bottom frame.  Not particularly pretty, but it will do the job.

    Shirley has a doctor appointment in the morning and I have a dental appointment in the afternoon.  During mid-day I plan to do some sanding of the epoxy and then install the plywood over the framing of the back side.  I need to also brush in some more resin at the bottom of the exterior skin.  I will re-clamp the entire assembly.


Attachments

  • Arctic FoxCRW_2558-1 small.jpg
    Arctic FoxCRW_2558-1 small.jpg
    20.9 KB · Views: 56
  • Arctic FoxCRW_2559-1 small.jpg
    Arctic FoxCRW_2559-1 small.jpg
    20.6 KB · Views: 53
  • Arctic FoxCRW_2560-1 small.jpg
    Arctic FoxCRW_2560-1 small.jpg
    25.2 KB · Views: 58
      Yesterday it was too cold to work outside but it warmed up today.  I sanded the framing member at the bottom of the exterior wall of the slide-out, squaring it so the plywood will lay smooth and the trim will fit properly at the bottom of the wall.  I then installed the plywood gluing and stapling the luan.  I had to cut out around the metal splicing plates.  Turned out to be a good fit. 

      Tomorrow, we will remove the windows in the front and rear as well as the slide-out so we can treat with CPES to stop the rot in those locations.  If everything progresses well I will start the fiberglas installation on the slide exterior wall below the frame.

      Some pictures are attached showing the progress.  Unfortunately, I found some more rot at the base of the front and rear walls of the slide.  That will be treated while we are working on the windows.

      We have very cold and wet weather coming this next week so  we need to try to end this job by Sunday.  I canceled a weekend rally with my Blue Bird Group to try to accomplish this.


Attachments

  • Arctic FoxCRW_2561-1 small.jpg
    Arctic FoxCRW_2561-1 small.jpg
    36.6 KB · Views: 52
  • Arctic FoxCRW_2563-1 small.jpg
    Arctic FoxCRW_2563-1 small.jpg
    31 KB · Views: 53
  • Arctic FoxCRW_2565-1 small.jpg
    Arctic FoxCRW_2565-1 small.jpg
    25.5 KB · Views: 55
    Didn't quite do everything I wanted today, but we removed all the windows, checked for rot, and only had to treat 2 frames.  We did get all of the windows back in.  It was a total of 7.  I treated part of the bottoms of the front and rear walls of the slide.  Installed trim with stainless steel screws.

    Tomorrow, I will fill a void in the floor of the slide and then begin the fiberglas treatment to the slide stem wall below the floor.  I also plan to treat the separated flitches of the plywood at the bottom.  I will post some photos of the fiberglas operation.

Ron
 
Ron is truly amazing.  He can work circles around me, and I probably couldn't keep up with him even when I was younger!!!

Liz continues to help me organize the inside of the Fox. The latest big step is redoing The Closet From Hell. I will post pictures soon.  This is the main wardrobe closet in the living room.  I have basically been stuffing a lot of things in there for the past 8 years and hoping it didn't spring back out on me every time I opened the door.  ;D  The interior of the Fox had a LOT of space to hang things, but was VERY short on closet shelving.  Thanks to Ron, we have a LOT more drawers and shelves to work with!

We still aren't done with it, but we were able to move many items to other places and Liz located a great 7-drawer Sterilite tower of plastic storage drawers to help organize the main "mass."  Jack removed the unnecessary vertical piece of wood between the doors and re-positioned it on the left door at my behest.  Now there is no pesky center post and we can use the space more effectively.  That post was NOT a structural item so we could make it work differently.  :)

I am sure that all of us will roundly curse the designers at Northwood for years to come.  And THIS was a "higher" quality trailer! I shudder to think how the "vacation-class" trailers were put together!  ::)
 
Sorry that I didn't post for the last couple of days, but I have been busy and tired.

    I finished putting on the fiberglas and coating with resin.  The following photos show the clear fiberglass resin coating, the electrical yet to be connected and the slide mechanism back in position.  We had to make a few adjustments to get the slide to come in O.K... Unfortunately, Jayne has a lot of weight permanently placed in the slide and the motor struggles to get it to rise over the rollers.  Once up on the rollers, it moves pretty easy.  I had to wrap the fiberglas cloth around the bottom and back on to the outside face of the slide.  Had more problems there than anywhere during the job.  It might not look the best but it will keep the water out.

    In the last photo you can see where I had to strip patch cuts in the weather barrier on the bottom of the slide.  These cuts were made looking for the extent of the damage.  Later today I will reinstall the wall end trim and tomorrow I will install the bottom trim and put another coat of resin on the weather barrier patches.  That should take care of the job.

    Last night we went out for a shrimp dinner and this morning I prepared blueberry pancakes for breakfast.  It is cold today.  Expected high later today is about 50 degrees.  It gets to freezing at night and will be this way for a few days.
 

Attachments

  • Arctic FoxCRW_2566-1 small.jpg
    Arctic FoxCRW_2566-1 small.jpg
    60 KB · Views: 55
  • Arctic FoxCRW_2567-1 small.jpg
    Arctic FoxCRW_2567-1 small.jpg
    19.8 KB · Views: 52
  • Arctic FoxCRW_2568- small.jpg
    Arctic FoxCRW_2568- small.jpg
    27.7 KB · Views: 60
  • Arctic FoxCRW_2569-1 small.jpg
    Arctic FoxCRW_2569-1 small.jpg
    35.1 KB · Views: 59
      We finished her up today with the possible exception of the stripped cuts in the weather barrier.  They might need another coat of resin, but they look pretty good.  We put the trim on the bottom of the exterior wall of the slide and connected the electrical.  Overall, the job looks pretty good.

      Hope someone has gotten some good out of the documentation.  I could show some photos, but you have pretty much seen everything.

 
Ron,

If you have no objection, I plan on wrapping it all up (text and photos) in a file for our forum library. This will be a great addition, and will no doubt be of help to others needing to make such repairs in the future. Thanks for sharing and documenting the project.
 
Tom, I think this thread would be a great addition to the library.  I was going to post the link to this thread over on the Arctic Fox owners' forum, but was surprised to see they have a mandatory monthly fee for posting.  I decided to pass, as I am not active on that forum.  I'll try to remember to PayPal YOU some money again. ;)

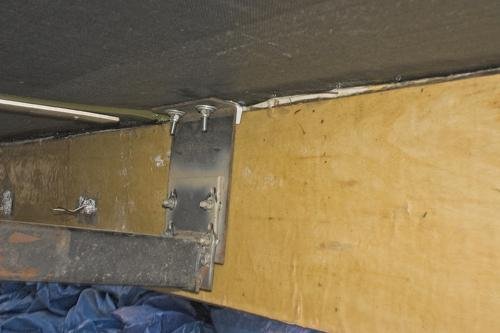
Unfortunately, when we brought the slide back in to test the reattachment of the mechanism, the slide wouldn't come in right.  There were loud popping noises coming from the header area at the top of the slide inside.  The front lower edge of the slide refused to come up over the roller.

I'd had problems getting it started before, even with the original couch, chair and free-standing dinette, but I had already moved the major weight off the slide as usual  (the recliner and filing cabinet) and it still wouldn't come in.  Ron adjusted the back wall of the slide down a bit so the front inside could tilt up more.  It was better, but still not enough.

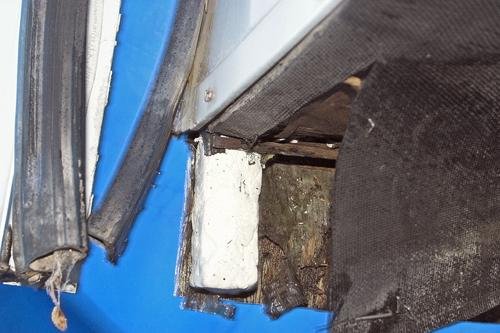
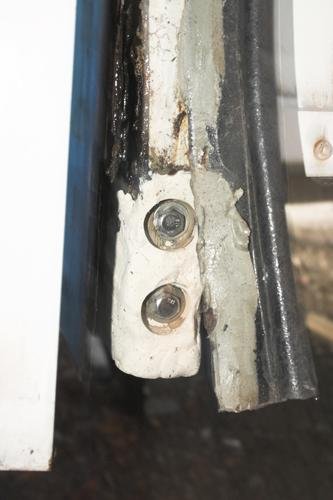
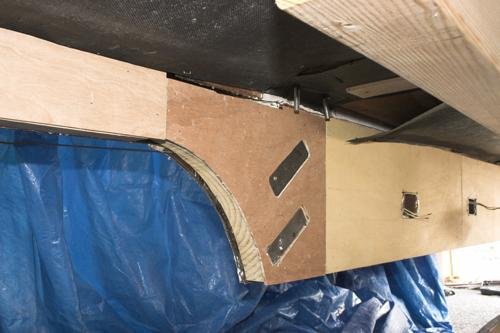
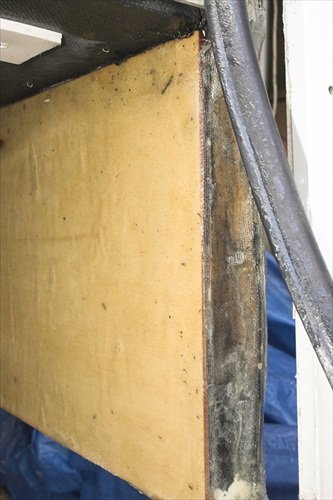
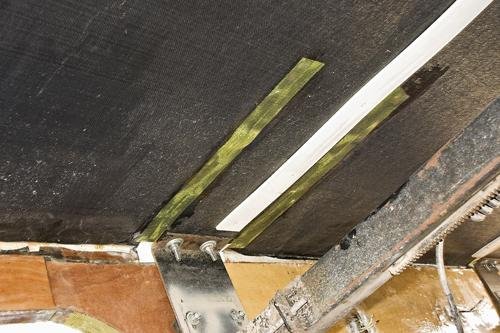
Investigation revealed that a plastic spring clamp had gotten stuck between the outer top 4" wide lip seal on the slide and the header inside.  Over time, the clamp had bent the inside of the "u" channel at the header and interfered with the slide function.

I usually check the top of the slide for obstructions before I pull it in, but I guess I missed one.  Since the clamp got caught, it was stuck behind the big 4" seal so I never saw it again.  I recalled that I had used spring clamps to fasten some shade cloth over the slideout about 3 summers ago when it was up in the 90s and I was boondocking.

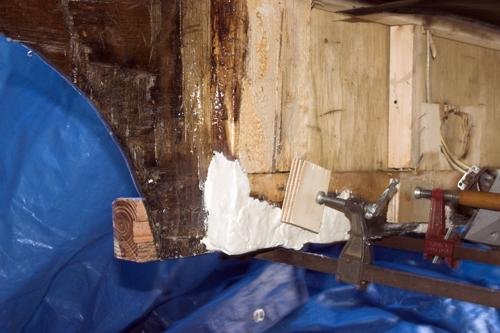
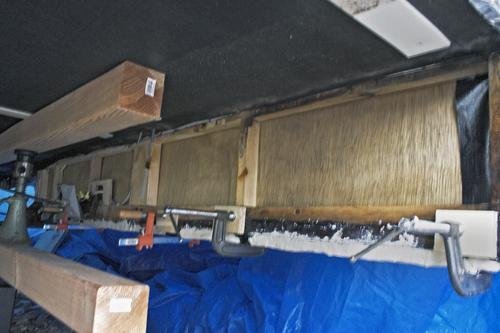
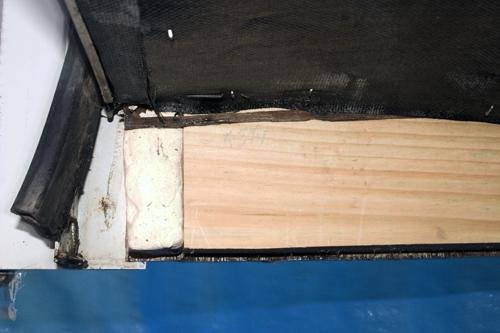
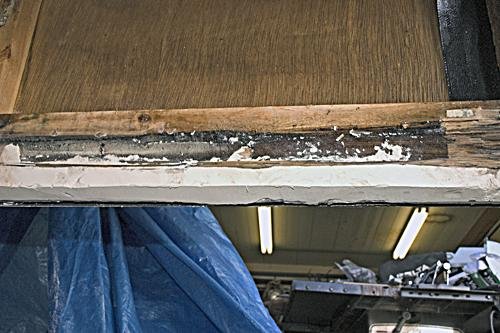
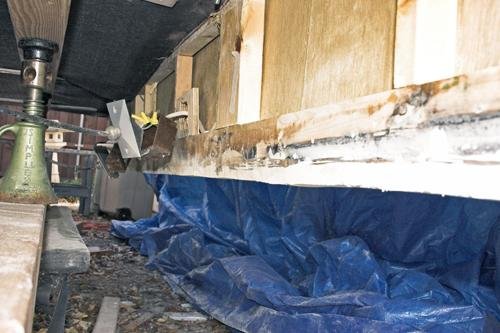
Lesson learned, I hope!  I'll start a new topic on fixing it.  I'll have to remove and replace the U channel and repair or replace the 4" by 12.5 ft long slide seal at the top.  The clamp had been caught hard against part of the header and broke thru the rubber roof material into the wood.  I'll have to treat that for rot somehow.  I discovered another crappy way that the slide seal had been mounted and not caulked right.  The wood behind the screw holes there will have to be treated as well.  I plan on documenting this and posting pictures.
 
Thanks Jayne. Agreed, it would be a great addition to our library.
 
Hey Ron, I got a complaint!  You work too fast!  Seriously I really enjoyed your reports and appreciate your work.  Thanks so much for your postings and especially the pictures.  I am sure it will be helpful to many that have a similar problem.  It will show them the impossible IS possible.

My best to you and yours down the road ahead of us all. 

 
Back
Top Bottom