Orick
Well-known member
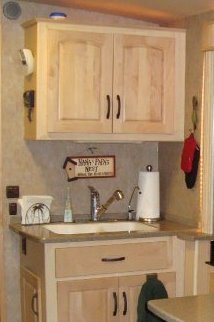
We've never been happy with the kitchen sink area in our Winnie. We're currently set up for a couple of months in Sacramento (near where we sold our home of 25 years 15 months ago) and I have the tools in our storage unit available to me and our site is flat and concrete so the conditions were right to take it on.
We felt that the sink was too small and made of that RV plastic which is so easy to stain. We didn't like the hi-glare florescent light above the sink, and I was really disappointed in Winnie for not including anything for a backsplash other than a 1.5" glued on strip of the "Corian" type countertop material. The wallpaper was already beginning to peel from getting wet.
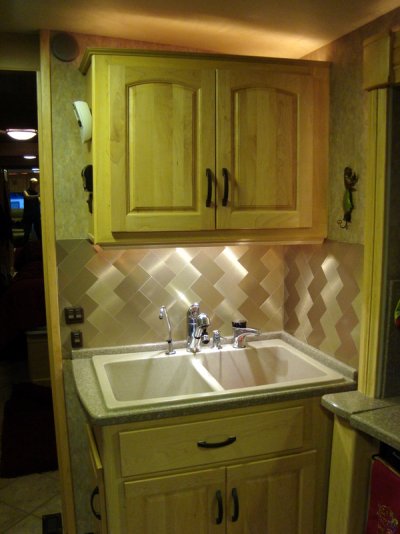
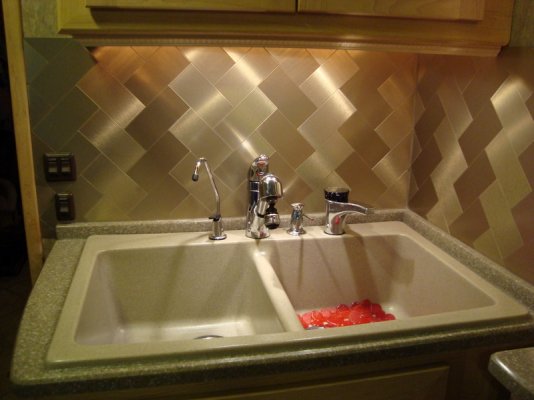
We made the following modifications: 1) replaced the sink with a residential size (33x22) granite composite sink... 2) installed a "counter to cabinet" backsplash using "Aspect Metal Tile"... 3) replaced florescent with recessed halogen puck lights... 4) added hidden accent rope light above the sink... 5) added "instant near boiling water heater/dispenser"... 6) added dish detergent dispenser... 7) retained the filtered drinking water dispenser which feeds the ice maker and now the instant hot water tank.
I still have a couple of trim pieces to take care of but it's nearly there and momma loves her new sink! We really love the Aspect Metal Tile. At $20 a sq ft is's sure not cheap. It's pretty new stuff available at HD or Lowes. We used a Herringbone pattern which required a good bit of cutting.
I used my 10" compound miter sliding chop saw with an 84 tooth Diablo blade designed for cutting non ferous metals. It worked great but I'd probably suggest building a wooden "fence" before you get started because the tiles are fairly small and it puts your fingers pretty close to the blade on those 45 degree cuts. The tile comes with self adhesive on them but I didn't trust it for a coach so used Liquid Nails constructive adhesive and it all dried solid as a rock.
Next project is to replace the bathroom sink and counter with a Vessel Sink and to use the same Aspect tile for a backsplash and "top splash" above the shower.
Rick
We felt that the sink was too small and made of that RV plastic which is so easy to stain. We didn't like the hi-glare florescent light above the sink, and I was really disappointed in Winnie for not including anything for a backsplash other than a 1.5" glued on strip of the "Corian" type countertop material. The wallpaper was already beginning to peel from getting wet.
We made the following modifications: 1) replaced the sink with a residential size (33x22) granite composite sink... 2) installed a "counter to cabinet" backsplash using "Aspect Metal Tile"... 3) replaced florescent with recessed halogen puck lights... 4) added hidden accent rope light above the sink... 5) added "instant near boiling water heater/dispenser"... 6) added dish detergent dispenser... 7) retained the filtered drinking water dispenser which feeds the ice maker and now the instant hot water tank.
I still have a couple of trim pieces to take care of but it's nearly there and momma loves her new sink! We really love the Aspect Metal Tile. At $20 a sq ft is's sure not cheap. It's pretty new stuff available at HD or Lowes. We used a Herringbone pattern which required a good bit of cutting.
I used my 10" compound miter sliding chop saw with an 84 tooth Diablo blade designed for cutting non ferous metals. It worked great but I'd probably suggest building a wooden "fence" before you get started because the tiles are fairly small and it puts your fingers pretty close to the blade on those 45 degree cuts. The tile comes with self adhesive on them but I didn't trust it for a coach so used Liquid Nails constructive adhesive and it all dried solid as a rock.
Next project is to replace the bathroom sink and counter with a Vessel Sink and to use the same Aspect tile for a backsplash and "top splash" above the shower.
Rick
")