Excited to make our RV our new home!

The friendliest place on the web for anyone with an RV or an interest in RVing!
If you have answers, please help by responding to the unanswered posts.

Wa_mermayd

Well-known member
Joined
Jul 22, 2011
Posts
108
Location
Tucson Arizona
Hi All -

I've spent the past couple of nights reading about the great remodels and experiences that are shared on this site.  My husband and I just bought a 1993 30' Mini Winnie and are excited to change it from a vehicle that sleeps 6 to 8 into our home.

LOTS OF REMODELING!!

We have an infant so are going to making the bedroom into his room.  Here is our list of things to do.  All advice, wisdom, etc WELCOME!  :)

[list type=decimal]
[*]Pull up all carpet[/list]
It's been there since the RV was born and it's showing it!  Previous owners were great but this is a used RV.  Lots of dirt and who knows what are under this carpet!
  • Yank out queen bed in back  (anybody need this?  Otherwise it's going to the dump).  The bed looks to be in great shape - but this is where the crib is going to go.
  • Pull off all the window vallance cover things.
  • Pull out sofa (anyone want?)
  • Pull out table and bench seats in dining area  (up for grabs)
  • Remove the mirrored glass cabinet fronts and replace with wood (again - these are up for grabs if anyone wants them)

We are going to lay in a new laminate floor from door through kitchen area & bathroom.  Carpet in bedroom and dining area.  I have heard a lot of good things about Allure and about Mannington Adura.  Whats the final thought on these? 

Build new enclosure for fresh water tank in bedroom

Install crib over water enclosure and bolt to floor.

Paint - get rid of that horrible wall paper.  Advice???

Lay new carpet in bedroom and dining area.

We are going to build custom bench type chairs for the new dining room table and install the table.

Move the sink from the wierd kitty corner floorplan to flush with the stove.  Since the old bench seats will be gone, doing this will give us about 2' of living space!

We have a lot to do and not a whole lot of time to do it.  About two months.  Fortunately we are both pretty handy, and my husband has experience with electrical, plumbing and construction.  I follow instructions really well.  :)

Any recommendations are welcome.  I am so glad to be a part of this forum and look forward to hearing from you all.
 
Hello and welcome to the RV Forum.  It sounds like you have a lot of work ahead of you!

We've never done a remodel so I can't help you there, but I do have a couple of "voice of experience" comments.

Carpet - I sure can understand why you want to get rid of it.  With our current motorhome we got all tile except for the bedroom.  I really got tired of cleaning carpet!  I'm thinking you might not want it in the dining area because of the baby.  They're notorious for spills (milk, applesauce, etc.) and I think you'd be better off with a hard surface there.  Removing RV carpet may entail more than you think.  Is it on the floor of closets and cabinets?  If so, the mfgr. put the carpet down and then put in the cabinets making removal and replacement more difficult.  Carpet is good for sound deadening while on the road, but it's the pits for cleaning!

Are you sure there's nothing under the bed right now?  Mfgrs. often put things under there that would preclude your idea of an extra water tank.

At this point you may think you do not want the window valances but maybe use the RV for a while before making the decision to eliminate them.  RV parks (and even Wal Marts) often have LOTS of lights that might prevent you from sleeping.  The valances serve the purpose of closing the sides, top, and bottom of the window so that when shades are pulled down you don't have light coming in around the edges.  It also provdes more privacy because no one can see in the edges.  Finding blackout shades, blinds, or whatever is important so you all can get a good night's sleep!  I've made blackout covers for our bedroom windows and we also use foam covers in our overhead vents.  These have the additional function of keeping heat out during the summer and heat in during colder weather.

That "horrible wall paper" may be permanent.  I don't recall its name but the RV mfgrs. add it to the structural sides by a heat and vacuum process during manufacture.  If you visit an RV mfgr. you'll see that it's on the walls when they put them in place.  If you look inside cupboards you'll probably find it's there as well on the visible walls because they install it on huge wall panels that eventually get covered by the cabinets.  If you live near an RV mfgr. I highly recommend a factory tour so you can see how they put our rolling homes together - it's no stick & bricks house!

For the items you're willing to give away - where are you located so people will know if it's a viable alternative for them

Good luck both in your remodel and your new life!

ArdraF
 
Thanks for the words of wisdom.  We are in the Seattle area, soon to be going to the Spokane area.

Right now - the fresh water tank is under the bed. We wouldn't be adding a new one.  Just creating a smaller enclosure around the existing one.

RE: walls - I agree.  Think we are just going to prime and paint over.  Can't stand the walls! 

RE: vallances - what do you call those wood things that are on the top of every window.  The manufacturer puts wallpaper on them and pads them a bit but they cover the top 3" of every window.  We want to keep the shades (will be cleaning them of course) but are going to get rid of those - things at the top of the windows.

RE: carpet in dining area - good idea! 

Thanks!
Paula
 
Paula,
Friends of ours just finished remodeling a 1988 Southwind.  They did a lot of what you're planning on doing, (painted the wallpaper, tore out the carpet and put in hardwood floors, removed all of the valances, but left the shades)  It turned out really nice!  She is planning on building some sort of valance and having it covered in the same leather that they had the captain and couches recovered in.  I know from watching them that it's a lot of work, but from what I've seen of theirs it can be worth it!  They too are very comfortable doing most of the work themselves and so they were able to keep their remodel to under a few thousand!

Good luck with your endeavor.  If you have before and after pictures...we love to see them!!

Mikie
 
Well, the husband has confirmed.  We will head to our remodel site on Thursday and on Friday, start pulling stuff out.  YIPPEE!  I am so excited!  I'll take some 'BEFORE' pics at that time.  And again once we pull out everything.  Once we see what kind of space we have, we'll go from there.

Basic plans are in hand, now its just time to get working!
Paula
 
Would love to grab that sofa, but were in upstate NY, so thats not gonna work. Been looking for a sofa to put in place of our dinnette set. it seems to just be a catch all in our RV but thought a second sofa would be nice.
 
Mannington Adura is a great product. You don't have to float it or have to leave large gaps around the perimiter. Very tough and easy to clean.
 
We put the Adura in our stick house and we wish we had put it in the MH when we did the redo a few years ago.  It is great stuff and very durable.
 
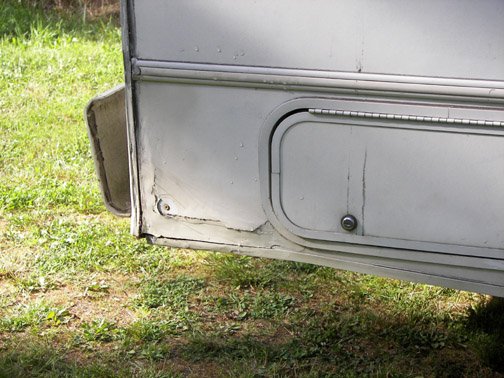
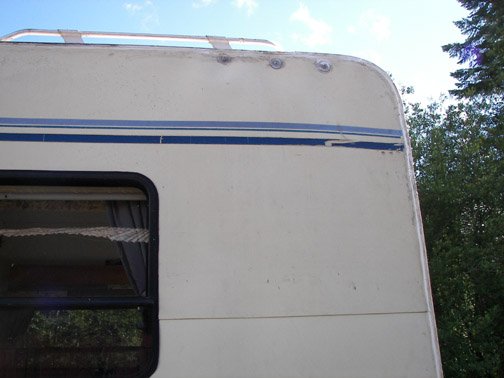
Here are some before pictures taken while we were still considering purchasing this 93 mini winnie.  At some point there was a water leak in the left rear.  They took it for repair - obviously chose the cheapest repair they could but at least it was certified to be leak free.

They ran into something while backing up - there is some damage to the structure in the rear right with cracks in the body.  It looks like they attempted to repair but - sloppy.

All around the back seams you can see the rubber or whatever was used as the covering popping out of the seam molding.  There seems to be some water damage around the base of the door, and the right side of the cab over is demonstrating some water damage.  We won't know until we get in there. 

Sky - I'd love any input you might have on this repair having just done something similar yourself!  :)  Please CHIME IN whenever!! 

Our drive to Spokane has been postponed as my husband might have a job interview on Monday.  GRR!  It's taking us forever to get East of the Mountains and start getting this work done.  On the plus side, we've just put on 4 new tires on the back, had the front brakes done, and the oil changed.  They said we had a bad battery but my husband went out when we got home, cleaned up all the contacts and re-tested - it came up good.  YAY!  No new battery needed.  So now we are safe to drive - just got to get to a place where we can start to work on it w/o it being the only roof over our head.

I will update with pics of what we find when we start tearing things apart.

Thanks!
Paula
 

Attachments

  • SIDE Damage 2 BEFORE.jpg
    SIDE Damage 2 BEFORE.jpg
    140.2 KB · Views: 169
  • Side Damage LEFT 2 BEFORE.jpg
    Side Damage LEFT 2 BEFORE.jpg
    103 KB · Views: 155
It sure sounds like you have your work cut out for you with your remodeling project. I remodeled my Dutchmen 38G a couple of years ago, so I know just how much work it can be. I pretty much gutted the entire thing, and installed new panel, carpet, linoleum, counters, and built new beds. I just thought the quality of the the materials used was insufficient for my taste. I hope to someday retire and take this thing on the road, so I want it to be as homey as possible. Good luck with yours.
 
Well, the entire back wall is gone.  It was rotting all the way through.  On the positive side, we have a great view in the back bedroom!~

We found a fantastic RV repair shop in Spokane Valley (Johnsons RV) and they were amazingly helpful.  We got the materials we needed (new skin, LED running lights for front and rear, new dump hoses and seals, etc...) so we are moving forward.

Daniel is ripping out the carpet now and the new flooring is on order.  We are going with TrafficMaster Allure for the majority of the floor and only doing carpet in the back bedroom.  My friends have some carpet scrap left over from a home remodel so we just need to get the padding and we're good to go there. 

It's a bit scary to realize there really isn't that much between you and the rest of the world.  Luan, insulation, luan and skin.  I will post pics as I get them off my husbands camera. We know there is a potential spot on the cab over, and there are some rips in the skin on the sides.  We may end up having to re-face the entire rig to repair the tears.  We'll see.

Thanks for the support and ideas!
Paula
 
Finally have more pics.  Daniel posted I think every picture taken thus far of the tear apart so there are a lot of redundant photos.  But, you get the general idea.  Stove is outside tonight, sink and kitchen apart, shower dismantled - next onto the bathroom!  I'm really hoping we can get a new toilet.  I don't think this one was cleaned that often and it's freaking me out.

Enjoy - we'll put more text info in later and of course will post more pics.

Paula

P.S.
I just reviewed the pictures and these don't show the work done today.  There is no more ceiling in the back - the metal part of the roof, taken off.  It's lying on the ground next to the rig.

Daniel wants to move the fresh water tank and place it under the shower to give us more space in the back bedroom.  Any thoughts??
 
Whoa......from a re-model to a complete re-make. :-[  Sorry for the expensive "surprise".  Good luck with the project.
 
A couple of things:
Winnebago customer service has always been very helpful when i called them. If you give them them your VIN they can cross it to the Winnebago ID number for your Minnie and tell you a lot about it.

If you go HERE you can probably download the original brochure for it.
If you go HERE you can download plumbing and wiring diagrams for it.
If you need to buy Winnebago supplied parts (trim and so forth) , Lichtsinn Motors is a Winnebago dealer a couple of miles from the factory that have always given me very good service.

If you go HERE you can download manuals for many appliances like water heaters and furnaces.

If you go to this SITE
you can download a chart that shows which Thetford and Sealand toilets replace existing toilets. It gives the dimensions of the various models and indicates which ones are direct replacements. Of course the water line might have to lengthened or shortened.

I opted for the Bravura.

Good luck with your project!


Thank you Clay for the links.  I've forwarded them onto Daniel.  Here is our update.  The existing subfloor was really spongy.  Not enough to warrant its replacement but something we wanted to shore up. So we're taking a weight hit and put in a new sub-floor on-top of the existing floor.  Daniel laid it across the existing floor to give it some more stability.  Then we will carpet the back for the baby and use the Alure flooring for the rest of the RV - from bathrooms on.

After some hot work, the entire subfloor is in, the roof has been built and is on.  We'll be ordering the skin as soon as our paycheck comes in, and then we can start sealing it back up.

Daniel's got ton's of pictures up on our blog space

We moved the fresh water tank from the back of the RV to the front right behind the drivers seat.  The weight will still be shared between the wheels as it was in the back.  We'll make a box for it and it will become one of our living space bench seats.  We looked at extending the sink area but will keep with our original idea of just making it flush to the stove. 

Daniel is good about posting pictures so keep an eye on the blog for the next few days.  The walls should be going up tomorrow.  We'll need new sinks (bathroom and kitchen), countertops (bathroom and kitchen) and a toilet.  All will be ordered this week.

HAVE FOR FREE ANYONE WANTS THEM:
We are in Spokane and have the following:
*  Table with two cup holders (nothing wrong with it - we're just going to be using one of our own.)
*  Bench seat cushions
*  Corner shower shelf

There might be more - I'll post as soon as I have a better idea of what Daniel and I are going to reuse.

Thanks!
Paula
 
Hi All -

It looks like a lot of people are looking at this list even if there aren't a lot of replies.  ;-)

I'm happy to report - the walls are going back up!  We received the skin we needed from a place in Oregon - much better prices than we were able to find anywhere locally.  Almost half!  HUGE difference!  The semi delivered earlier today.  Daniel moved the fresh water tank from the back of the rig to behind the drivers seat kinda in the middish of the front.  We'll put a bench seat over it.  The sub-floor is in, and the walls on the interior are going back up.  We wanted to do something fun with the shower but I think for right now, we'll just be happy getting everything back up and working.

New wall is up on the side, next we'll be putting up the back wall.  We are going to add cupboards on the side walls of the back bedroom for more storage and will be adjusting the drawers under the closet back there to something usable for kiddie toys.  The bedroom is where our son will sleep / play so we need usable drawer space and not those narrow things that came with the RV.

We had to loose a section of the metal roofing.  Daniel created a roof of luan/insulation/luan and we purchased enough of the new skin to cover it and extend down the back. 

We have the LED exterior lights to put up - Daniel has pulled the wiring for that and should be hooking it all up once the skins are back in place.  We're learning a lot about the RV, that is for sure.  Work is going much slower than we would like, but at least we are making progress.

See current pics on our blog

Thanks All!  Looking forward to posting in a different section about our first trip!  :)
Paula
 
Hi All -

Very exciting news!  The back wall is going on TODAY!  :)  YAYAY!  We're battling time as rain is supposed to hit possibly today or tomorrow and we don't have a dry spot for the rig.  MUST GET SKIN ON!  Daniel installed the cabinets in the back bedroom and the carpet and pad.  He's also done some cool support stuff with the frame.  I can't write about it intelligently so will let you see for yourself on our blog. 

Once we've got it closed up, we can start work on the bathroom and rest of RV.  Still to order:  Formica for counter, toilet, bathroom sink, new furnace (found out the one in the rig was toast), and a captains chair for me to sit in while rig is in motion.  Baby will be in front passenger seat in his Cadillac of car seats.  Its the safest one we could find.

More to post soon.  We should start posting some interior shots in the next week or so.  Then - who know!  We hit the road!  :-D
 
WE ARE FINALLY WATERTIGHT!  YAYAYAY!

Now we can move onto the interior.  :)

Check out our latest pics. 
Edit: Removed link - see sig line.
 
Hi All -

I don't know if people are still reading these updates but figured I'd keep posting just so you all know our progress.  ;-)

Bench seat forms are done.  Painting is almost complete throughout the interior.  Turns out KILLS primer is a great coat to put over the icky 17 year old wallpaper throughout the rig.  We've primered and painted the ceiling with a nice ceiling white paint.  And are finishing up the cab-over painting.  Not worried about getting the cab-over perfect because next summer we're going to have to repair the rot we found there.  Right now it's dry, sealed and braced but we're going to have to address it as soon as we can.

We will be laying down the Allure flooring tomorrow and installing the new toilet, bathroom linoleum, sink and faucet.  The kitchen linoleum, sink and faucet were placed today.  The linoleum is tied down but we need to finish the installation of the copper sink and faucet.  Check out the picture on our blog (link provided in by-line).  It's all coming together.

I'll be sewing like a mad woman this week to make curtains and the cushions for the new bench seats.  My 23 year old daughter is going to be living with us for about a week or two so had to re-create the twin bed that used to be there.  We're taking her down to California to start her new life.  :)  It'll be our first road trip.

Daniel rebuilt the shower, and installed LED running lights. 

It's finally starting to look like an RV again.  Soon we'll be up and running and on the road.  More pictures to come.

Thanks all!
Paula
 

Latest posts

Forum statistics

Threads
131,920
Posts
1,387,484
Members
137,673
Latest member
7199michael
Back
Top Bottom