Sequence of Roof recoat

  • Thread starter PatrioticStabilist
  • Start date
The friendliest place on the web for anyone with an RV or an interest in RVing!
If you have answers, please help by responding to the unanswered posts.
P

PatrioticStabilist

Guest
I'm not sure what the proper squence is.  I had brushed the rubber roof of the diesel pusher off good.

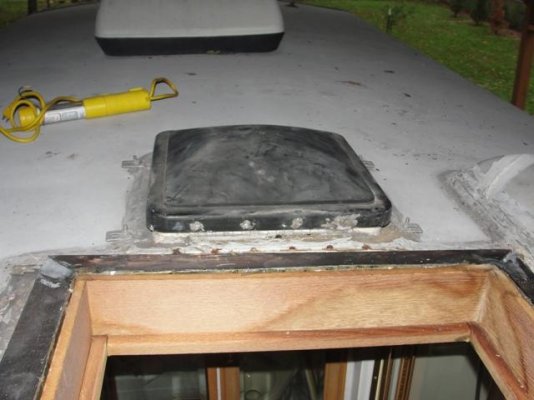
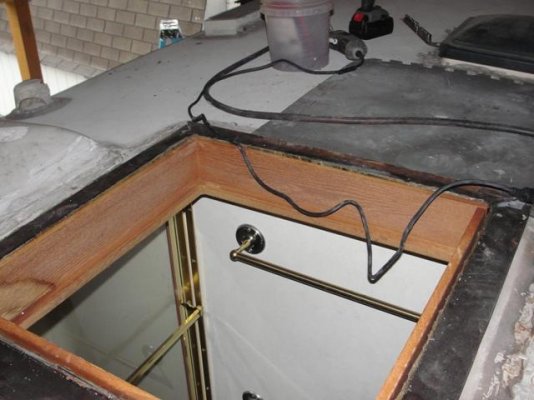
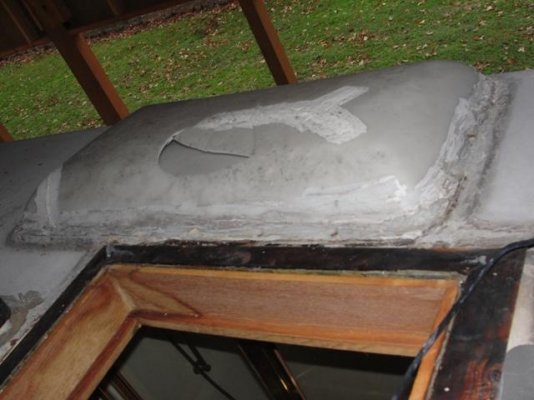
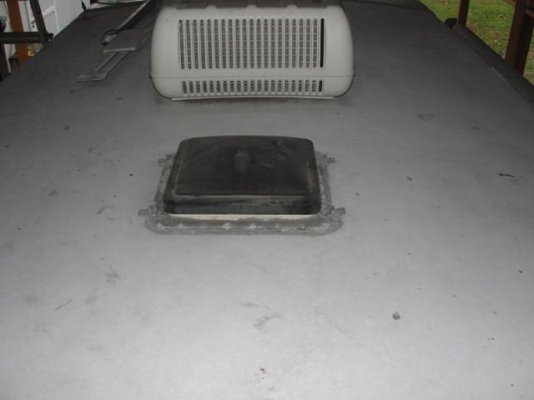
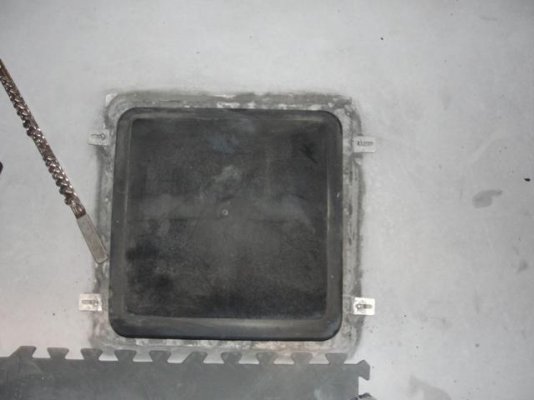
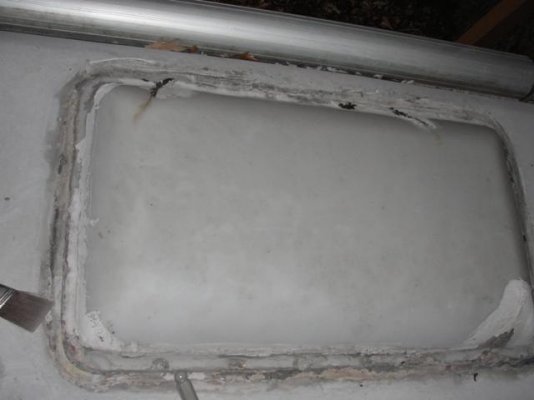
I am planning on taking off the skylights and putting new ones on, going to be quite a chore getting them off.  Then I am sealing the new with butyl tape, screwing them back down and topping with the 6 inch eternabond around the edges.  If any rubber roof is loose under there will reglue. I plan to feel all over the roof to make sure no place is loose if it is I will slit and glue then top with eternabond before we recoat.

I have read I need to use Dicor 901 BA, its a water based adhesive.  But you have to buy a gallon of the stuff and I haven't went all over the roof yet but I only saw a couple of loose places that are small so there is no way I need a gallon.  Maybe 8 ounces or less most likely.  Anyone know where I can buy a small quantity of it?

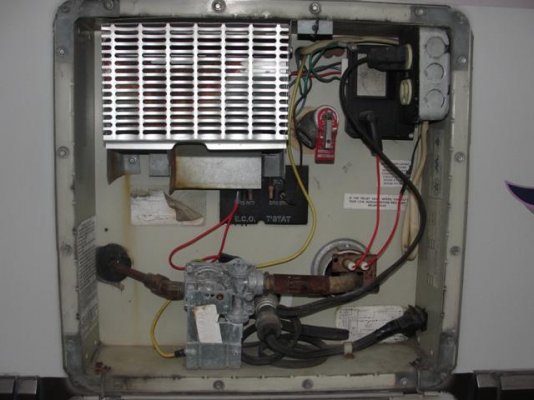
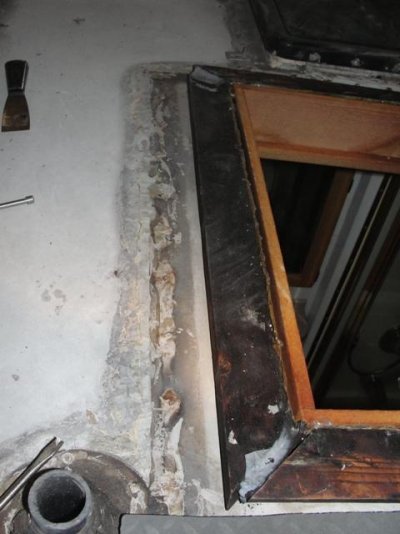
Also I will have the air conditioners removed as we want to paint the primer on and the liquid roofing stuff under them, then put on new gaskets.  But I'm planning on putting the skylights and vents back on BEFORE we coat it. 

Is there any special order that this stuff should be done?  Do I need to leave all the vents off to recoat, hubby thinks I do.  I don't know, but I don't see why I would.

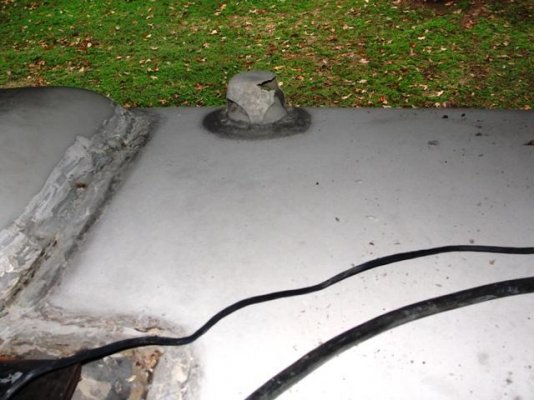
Also I have no idea what to do with the solar panel.  Need to look closer but just looking at it quickly I didn't even see any screws for the thing and I know I need to reseal or want to reseal all the way across where the front cap meets the roof and it butts up against that.
 
I cleaned around one vent cover and there is no way I'm taking that out.  There is nothing wrong other then it needs cleaned around and resealed, that one really doesn't even need sealed but I'm going to.  All 3 were under covers on the top so not exposed.  The 2nd and third one need resealed and will be. and nothing more. I will clean the caulk flat so I can do a neat job.  I could probably get by with just adding caulk but not going to do that.

I got a new Dremel tool, that is the only way I can clean that stuff off. 

I got the middle skylight out after almost 2 hours of work.  All the flanges broke off, they were rotten and a lot broken around alreadyover the bathroom.  It had a flat yellow colored piece that was cracked and the top was broken all around the flanges.  I was dreading what I would find under the flanges.  The wooden frame came up several inches out of the top, it is backed on the outside by at least a 2 inch high board and 2 inches across.  That board is very black and I thought rotted.  No its not rotted at all, which I find very surprising.  I'm starting to think its treated with some kind of waterproofing stuff.  One corner does not match but with the cover over it, it didn't matter, but its not cut quite right.

There are 10 screws down each side so I have to go back out and take out 40 screws!!  I cleaned the caulk off them so I can get a screwdriver or drill on them to take them out.  This skylight is butted against the hallway one and I bumped it and it was so rotten I cracked a piece out but its cracked on both ends anyway and someone just caulked it.  I know it let water infiltrate. The middle one is also butted up against a plumbing vent so that I'm taking out too.  I have one new one and need another they are also rotten.

I hope I can get a skylight for the middle if not I will have to have it made somewhere using what I have left as a pattern.

I will take a picture once I have the screws out and cleaned off.

Like I said I'm impressed with the construction of this.  If this had been the old class C we had it would have been rotten all over.

I think we got a nice motorhome even with the deteriorated really bad skylights. 

Like I said time will tell.

Now I have to find a wrench or driver to fit those little screws, man are my knees and shoulder sore, between crawling around up there and trying to get that stuff off there.  It would cost a fortune to have this done, hours and hours of time and way to much to spend on an old coach.

I bet it takes me another 2 days to get all 3 off and cleaned.  Hope the other 2 are as good.  I'm sure its leaked around the broken flanges, just had to.
 
I only got about half the screws out, need to get a drill instead of the little rachet I have plus I'm cleaning the caulk as I go.

Now I'm surprised, I can see where the rubber roof is cut off and ends, I would have thought it went into the holes but does not.

When people redo them I see them running them into the openings.  I'm thinking the factory cut them off before going in for a reason.  No? Yes

My hands, legs, and back are sore.  Oh woe is me.

Now I have to bake cookies for DD, I promised, last night and tonight, why do I do things like that? ???
 
Carolyn,

I'm impressed that you've tackled this job before Tom gets home!  But I am sure you'll do it right.

You remind me of a gal I worked with in the late '60s.  She had a VW Beetle and did all her own work on it.  She would go out at lunchtime to run errands and we could almost tell when she had been to the auto supply store because the steam was practically coming out her ears.  They would treat her like a dumb woman who didn't know a screw from a nail and it would make her furious.  She was a chemist and far from dumb.  ::)  But she changed her oil and made all kinds of repairs to that little bug.

ArdraF
 
I like doing stuff like that. And this is cleaning off sealants that will take hours and hours to do.  I want it to be ready so when he gets here we can get busy and coat it, that is if its warm enough, has to be above 50 degrees for about 24 hours or should be.  Also I'm going to restain the wooden casing for the 2 skylights and polyurethane it so it will stay nice.

I was roaming around in it looking today and in the closet it also has a built in hairdryer, have no idea if it works.  It also had a list on the closet door of all the paint colors, material types and colors and carpet and curtains types and colors,  for both inside and outside, interesting.

I figure its about like making a garment you just go through certain steps, my limitations are things that take brute strength.

We have one of those big long folding ladders and they are HEAVY.  I managed to get it up in the RV cover but it was tough.  I ended up walking it up and finally got it in the rafters, that was the hardest thing I did all day.

Tomorrow I need to empty out the other motorhome, going to put all the stuff in the new garage. Next week I'm having it detailed and oil changed.  Hubby wants it done at 3000 miles.  I'm not sure I'll get the tranny serviced, about 24k miles on it since we had it serviced, It's nice and pink but he kind of wanted to do it before we sold it so it would be fresh for the new owners.  I suppose I could just tell or write up it needs changed in 6000 more miles. 
 
Also on the rent house the carpenter is building out, I'm going to insulate it myself.  Its small, I've done others before.  And I'm going to stain and polyurethane the kitchen cabinets.  I put a couple of coats of stain and a couple of poly for protection.  I did at another rent house.  They come out looking really good and saves thousands of dollars buying the unfinished ones for rentals.  So I have my work cut out for me over the next couple of months. 

Then garden time.  Don't know if I will get to go anywhere in this motorhome till around June.  That will give Tom time to do anything else he wants to do to it. I don't need to can as much this year, with him gone we aren't eating it up as fast so my garden may be smaller.

I hope the gas sniffer comes this week.  The parts guy said its real easy to install.  He said just plug in the wiring harness and sounds like basically switch this out.  I'm anxious to see if the furnaces work.  It has very little propane in it, the tank says 1/4, the gauge inside says empty.  Maybe enough to light and see, it does light automatically.  Of course will only be a test, its to get in the 30's this week and with skylights out pointless to try and heat it.

I'm thinking I may have Tom change out the water heater I don't want one I have to light, I like the one with the automatic ignition, we shall see.
 
You are absolutely amazing, Carolyn.  I really enjoy reading all your postings and marvel at your stamina, energy and spirit.  :)

Mrgi
 
No, I'm not positive.  I thought that was what the manual said but I haven't opened up the door panel to look at it yet.  I will double check, I hope I don't have to and come to think of it I believe there is a switch on the panel for the water heater.  If I get a chance will check that out today.

I have 2 skylights coming, I sure hope they have the middle one, we couldn't agree on measurements the other day, for the parts guy I believe I need the inside dimensions.  That bubble was in sad shape and cracked easily.  I kept it in case I have to have one made but almost all the flanges were broken off and its cracked down the middle.  It's a smoky grey with a flat piece in the top that is yellow I'm sure to reduce sunlight coming in.

I don't like how they did this, the vent fan flange intersects with the dome flange front to back.  To the left the hallway skylight flange overlaps the middle dome skylight flange.  Then on one corner the vent pipe cover has the edge on over the flange on the middle dome.  As hubby says why would  you design something like that when TT and motothome roofs are difficult to keep from leaking anyway.  If I had a way I would seal all of them off but the bathtub one but there is no way. 

They were caulked good, incredibly good.  I haven't tackled the 2 outside ones yet.  It's so dark and dreary out I will have to use a light to work out there under the cover today.  It's raining off and on and to be 72 today, but supposed to get cold Tuesday and stay that way all week, so whatever I get done today will be it for awhile.

The way its constructed unless it was broken right on top it wouldn't leak in but if something had hit one of them while driving like hail I think they would have disintegrated. I barely put a bit of pressure on the one beside it and a chunk broke out of the top so a very poor situation with these for sure.  Soon they will all be new!! I'm just crossing my fingers I don't have to have one made, I'm sure there are dollar signs attached to that!  On the good side, there is a place here in Houston that will fabricate them if need be. 
 
And I like to keep busy, my folks were the same way.  My dad was always working on something, so does hubby.

I would be bored to death if I didn't have some project going.  I used to stay up half the night working on rent houses when we got one, I don't do that anymore.  And I also hire help if I need to anymore so I have slowed up a bit.

It's just insulating in a new build is very easy, just staple up the insulation.  And I doubted getting the unfinished cabinets would work well but after I did them in the one rent house, heck they look as good as the finished ones and about a 1/3 the price.  I didn't try it in our kitchen it had to many I would have been finishing them for a year!

I had hubby put reinforcement wood under the bottom of the cabinets at one rent house, you know how in some of these new less expensive cabinets the bottoms will sag over time, that stopped that problem.

Ok, need to get out there and work on that roof, its brightening up some.  Guess I could drive the motorhome out from under the roof, but then I have to move that heavy ladder and I hate to lean it up against the motorhome.  I could drive it out aways though and still get up on the motorhome.  Looks like the rain is done here for awhile.  It's easy to talk about getting to work, somedays I'm slow moving in that direction just like anybody else.
 
Here is a picture of some cabinets that were unfinished that I stained and polyurethaned, they came out well.

Off the subject but these do work up well if you want to redo your kitchen and not spend and arm and a leg.
 

Attachments

  • Pictures of the house May 20 006.JPG
    Pictures of the house May 20 006.JPG
    28.5 KB · Views: 80
Ok, correction.  I had a headband light on today and could see that the rubber roof does run up to the holes.  However, there is one air vent that it appears it is cut out around, its so dirty under there I can't tell yet.

I took some pictures but there is debris on the roof I haven't swept off from all this work of taking the skylights out.  Actually I need to get the blower  up there and blow it off. I have 2 screws I'm going to have to remove with plyers, for some reason the drill smoothed them out and I couldn't remove them.  I'm being careful to not dig into the roof material so I have lumps of stuff up there till I will clean more off before we put in the skylights.  But man is this slow slow going.  I have about 10 screws or so out of the next skylight and I quit for today.  Saying 2 or 3 days is a big underestimate for sure.  I think I read I'm supposed to use mineral spirits to clean this stuff off, is that correct.

I need to get a good light source, hubby says he has a couple of trouble lights but where they are beats me so I'm just getting me 2 new ones so I can see.  We are in those grey days right now.

Also I believe that the water heater does not have a pilot light afterall but direct ignition.

I will post some pictures of what I'm working on. I included one of the pretty bathroom from the roof and also one of the water heater.  When these skylights are replaced it will really be a good thing.

I told hubby I want to get them in, he wants to coat the liquid roof under them, probably would be best but for expediencies sake I'm going to put the new ones in if I can, he said if so he will just run the liquid roof up over the edges.  I think that will be fine also but not necessary really. 

For him its time constraints and the more I can do the more other things he can look over.
 

Attachments

  • Diesel pusher skylight work1.JPG
    Diesel pusher skylight work1.JPG
    38.2 KB · Views: 79
  • Diesel pusher skylight work10.JPG
    Diesel pusher skylight work10.JPG
    42.4 KB · Views: 65
  • Diesel pusher skylight work11.JPG
    Diesel pusher skylight work11.JPG
    42.5 KB · Views: 76
  • Diesel pusher skylight work2.JPG
    Diesel pusher skylight work2.JPG
    40.5 KB · Views: 55
  • Diesel pusher skylight work3.JPG
    Diesel pusher skylight work3.JPG
    36 KB · Views: 68
  • Diesel pusher skylight work4.JPG
    Diesel pusher skylight work4.JPG
    47.4 KB · Views: 60
  • Diesel pusher skylight work5.JPG
    Diesel pusher skylight work5.JPG
    39.2 KB · Views: 54
  • Diesel pusher skylight work5.JPG
    Diesel pusher skylight work5.JPG
    39.2 KB · Views: 48
  • Diesel pusher skylight work7.JPG
    Diesel pusher skylight work7.JPG
    22.9 KB · Views: 58
  • Diesel pusher skylight work8.JPG
    Diesel pusher skylight work8.JPG
    25.5 KB · Views: 55
  • Diesel pusher skylight work9.JPG
    Diesel pusher skylight work9.JPG
    25.6 KB · Views: 61
The peek inside the bathroom looks like it's in really nice condition.  Nice wood and countertop.  Someone must have given it a lot of TLC in it's pre-Carolyn days!  ::)

ArdraF
 
It is in nice condition but it would not have been with those skylights.  Hubby thinks it was likely inside or under a roof from the condition of those.  If it had been rained on the inside would have been ruined I would think.

The things that we have found wrong so far are just things that go bad over time.  I think it has been maintained but think its been sitting for fthe last 2 to 3 years.  That would coincide with the recession.

It appears the last owners had it about 11 years, they had a small remodeling or construction company, I found them on the net.  I imagine as times got bad this was not something they wanted to spend money on so they let it go.  I'm guessing but makes sense to me.

The interior front curtains are even good, they have some sun fade so I'm just switching them.  I washed them and they are heavy heavy drapery material with insulated liner.  I had to rehem the side seams as they had been glued and came loose while washing.  I see 2 hangers are missing and found a package of them above so I will just sew those in. 

There isn't anything inside broken or torn up, even the leather couches aren't worn.  I'm going to clean the leather really good or condition it with saddle soap. 

Once we get the deferred maintenance items done then we will see how it runs say on a trip to Matagorda.  Hubby said that is enough of a run to see how it will do before taking any longer trips. But it may take me forever to get these blankety blank skylights off.  What a job!!  Don't do it if you don't have too, its awful.

And I have to get my other little orphan emptied and cleaned up to get ready to go.  It looks so lonely, a wonderful little motorhome and I have abandoned it, bad me. I hope it finds a good home.
 
That is definitely an Atwood DSI gas water heater in the photo, but the electric heat element appears to be an aftermarket add-on.  The wiring and the outlet are non-standard, and the heater element is inserted where the drain plug normally resides. Without the model number I can't tell if it also has a built-in electric heater element. That would be on the back side of the heater, if there is one.
 
You can use mineral spirits to clean off caulk residue, but don't slop it on. Just dampen a cloth with it and rub. Too much mineral spirits (or any other petroleum base solvent) can loosen the adhesives that hold the rubber roof material to the wood underlayment.
 
Come to think of it I guess I did look at it.  I remember telling Tom I didn't see any drain plug, I was going to flush it.  But he was busy and we never got back to it.  Interesting, wonder why they did that?  If they added electric maybe something wrong with the gas or  maybe used to much, its a 10 gallon water heater.  But that doesn't seem like the thing to do, hummm.

Duly noted about the mineral spirits.  When I get everything apart, if possible I will wash with soap and water around all those, those microfiber cloths do a good job.  Want to get that as clean as possible before resealing everything.

Crossing my fingers I can order the middle skylight and not have to have it made.
 
I'm excited, I was able to get my middle skylight for the Eagle.  It will take 2 to 3 weeks as it has to come from the manufacturer.  We had some discussions on the sizes but finally came into agreement, so now I've gotten all 3.  That's wonderful.  But they sure weren't cheap but hubby says if you are going to have a motorhome you need to not complain about cost.
 
My 2 outside white skylights have arrived, they are just the correct size so that is good.  Now if I can get the old ones off.  It's been to cold the last few days to do anything out there and I've also been busy busy.

Got my gas sniffer panel, the primer for the roof, the window mechanism, my replacement lighted grab bar, and my 2 struts for the propane door so it will stay open.  I need to look in boxes, I have a bunch of stuff coming for the rent house so not sure where my caulk is yet.  I may have it already.  My UPS guy puts everything out in the garage for me when I'm not home.  He is a really nice guy.

I also ordered 2 new CO2 detectors, the one in the Winnie said replace in 2010 so I found the same one.  The one in the "beast" is likely the original, so I replaced them in both units, I want to be safe and keep my family safe and others that will be getting my Winnie.

I asked about screws and they said just get those from a hardward, hubby told me to get stainless ones so I will.


I will likely be waiting a couple more weeks at least maybe more to get the middle one, just thankful I could get them for something this old.  I find that rather amazing.
The skylights have recessed areas for the screws but no holes drilled, that makes sense.  Maybe they are all that way and I just don't know, never ordered any of these before.  So we are moving along.
 
It's going to get to 60 today.  Think I will drive the pusher out from under cover where it will be warmer and work on removing skylights again.  No rain in the forecast so that is not an issue since I do have one out already.

Will be at least noon though as I have to meet a delivery truck at the newest rental this AM.

Gosh I hope to get to it today again.  My right shoulder is still sore from working on it before.
 

Latest posts

Forum statistics

Threads
131,966
Posts
1,388,375
Members
137,718
Latest member
urnwholesaler
Back
Top Bottom