2 items- gasket and paint

The friendliest place on the web for anyone with an RV or an interest in RVing!
If you have answers, please help by responding to the unanswered posts.
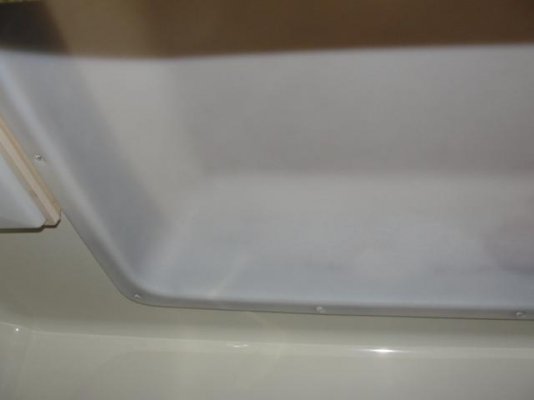
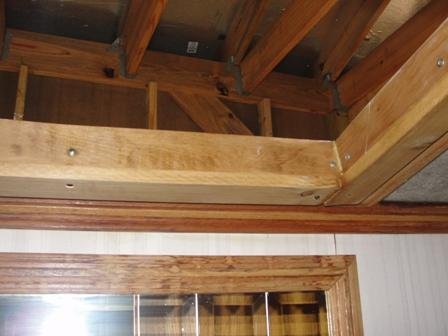
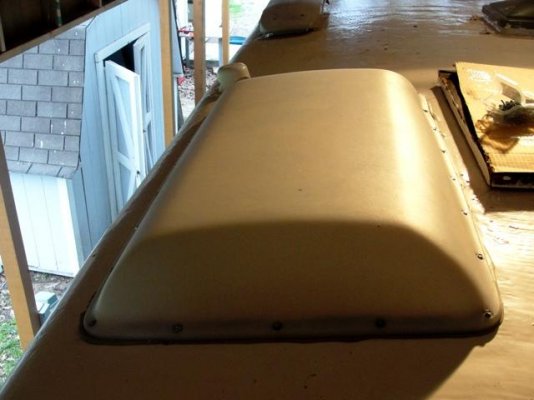
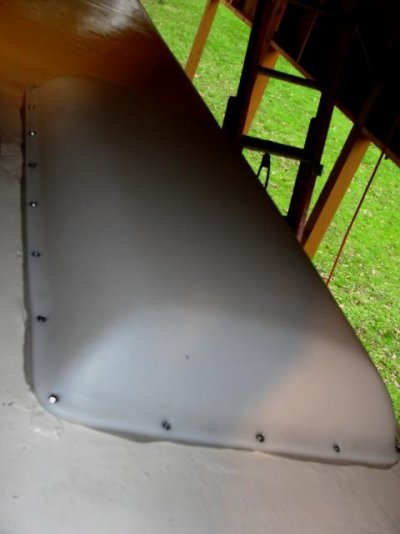
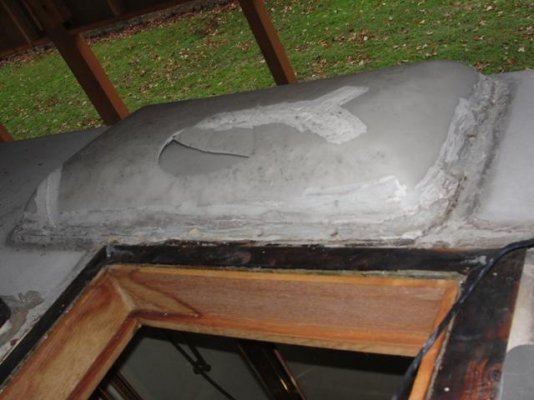
Soon as I finish taping and put the other piece in I want to start putting my skylights in.  However I'm not so sure about the hallway one.  I have a picture attached. 

Notice the bathroom one has a separate inside piece under the outside skylight.  And the one in the main part of the bathroom is smoke colored.  It has a bubble and then a flat piece of plastic that is yellow I'm sure for filtering the sun out, so its basically double.

But then the hallway one has nothing but the plastic cover, nothing else.  That just doesn't seem right.  I'm thinking in having a piece of plexiglass cut a tiny bit smaller then the hole down inside, there is a ledge there.  Then gluing it in place or caulking so it can flex some.  I just can't believe there wasn't something more there.  Anyone have an older Eagle with this skylight there and what does it have?
 

Attachments

  • Shower inside skylight.JPG
    Shower inside skylight.JPG
    12.1 KB · Views: 37
  • Hallway skylight opening.JPG
    Hallway skylight opening.JPG
    20.5 KB · Views: 37
I got the rest of the shield material in, screwed down and taped, so its done.

I cleaned most of the wood in the bedroom with Murphys oil soap, smells good.

Need to check the medicine cabinet and see if I need to do any more painting on it, it came out good.  Just a few screws hold it in. 

Hubby and I got to talking about the mattress.  It is in good shape but its 20 years old.  He said get a new one if you want.  It may be silly and I cleaned it off good but I'm not sure we want to sleep on it.
 
I was going to put in skylights today.  Considering the temp has dropped to 46 don't think that will happen.  Looks like it won't be in the 60's for a few days so it will have to wait. 
 
Got the fridge vent in and one skylight today.  I see screw number 6 looks a bit tight, going to back it out a tad.

I was killing myself trying to bear down to make the screws tap.  Luckily most of the holes were in new metal, slight difference in placement then the old ones I guess, which was a good thing.  But hubby says aren't you using one of the tiny drill bits to drill a pilot hole first? :-[  No, I forgot all about him doing that.  Honestly I figured they would all go in the old holes but didn't.

It's getting dark, didn't get started till late, so that's it for today.  Tomorrow going to put dicor self leveling caulk on fridge bolt heads and the screws in this skylight and around where it touches the roof.  I wanted to use eternabond but  hubby is afraid if we have to take it off for some reason it won't come off this roof. The skylight has 2 rows of butly tape around it.  Just inside the dome and along the edge.

There is a picture of a before on the skylight that I just fixed and the medicine cabinet.

I need to measure for a piece of plexiglass, do I get that at Home Depot or someplace like Ace Hardware, will look up on the net.  I'm putting it over the inside top of the other hole before putting on that skylight.  I think I will screw each corner down and put butyl tape  under the edge and trim it off from the top and from the inside also,  and one screw on each side.  This has to help with heat and cold, otherwise nothing but a single poly dome over it.  That can't be good.

The medicine cabinet is ready to go in.  I see the tape pulled a bit of paint off the side, it would be covered but I will give it a spray.  The mirror needs the paint cleaned off the corners.
So another little project done, the new light is on its way now, its only $16 for it.
 

Attachments

  • Same skylight other end.JPG
    Same skylight other end.JPG
    35.8 KB · Views: 39
  • New Skylight!.JPG
    New Skylight!.JPG
    27.4 KB · Views: 37
  • Medicine cabinet complete.JPG
    Medicine cabinet complete.JPG
    39.4 KB · Views: 34
  • Diesel pusher skylight work2.JPG
    Diesel pusher skylight work2.JPG
    40.5 KB · Views: 37
  • Inside of cabinety, awful.JPG
    Inside of cabinety, awful.JPG
    27.8 KB · Views: 32
Why do people that sell these motorhomes and TT's feel they have to lie?

I would have thought nothing of it.  I was looking to see where I can put the charger on to charge up my coach batteries, they are pretty much dead.  So in looking around down there I found a label stuck on the side of one, it states the batteries were purchased in 2007, that is the 2 coach ones, I'm haven't found anything yet on the chassis ones.  They are all very clean and look new so you couldn't tell by looking.

I also found another big panel down there with fuses and need to check those.  I need to get a new meter, the little one hubby has doesn't seem to work or something, to see if one of them is blown.  Of course now with the coach batteries dead it won't help even if I discover which one.  I think the tray swings out someway, hubby didn't have time to talk about it today.  He said one of the guys coming into the job hit a guy on a little scooter, guy had no lights or anything but appeared not to be hurt, but had to take him to the hospital and all.  He said there the law is that whoever has the bigger vehicle pays for whatever needs fixed no matter who is at fault.  He said the main reason is because the people that have cars or trucks are the only ones that have any money the others don't.  Interesting.  But still they have to write all that stuff up and investigate and he was on his way to a meeting next, so no time for motorhome 101 training session today. 

  The broker who sold it said the batteries were all new.  I've found some other things he lied about.  We wanted the coach and would have bought it anyway but to out and out lie about stuff is just plain wrong and that makes you wonder what else he didn't tell us about. No wonder hubby is going over everything on it, he should.  Oh well, I suppose we will find out over time.  But I just really get aggravated over things like that.  It's not like we asked the age, it was oh these batteries are all new I put them in myself.  Grrrrrrr

Hubby is insisting I replace the vent covers on the 2 fantastic fans and the one with no fan.  I have the plain vent one apart washed and clean, those pieces come out from the inside and the bar that raises it up and down is out too now.  From what I can find online it appears the lid should just slid off, but nope.  It's metal hinges on both sides its sort of like a piano hinge.  I guess I need to get a thin rod of some type and tap the pin out.  I've read where some others said it needed to be bent back 60 degrees and there is no way, as another guy said he had to break it off to do that.  I have read that they have lids even for these very old ones.  It's now called Fantastic Vent instead of Fantastic Fan though.  Anyone know before I start doing this if all I need to do is drive out the pin.  There are no screws anywhere to take off and the metal hinge is rivoted to the dome piece. 
 
Carolyn,

Fantastic Vent/Fan is a great company that stands behind its products.  Call them and they will answer questions and send parts.  We've had them in five motorhomes and love them.  http://www.fantasticvent.com/

ArdraF
 
Hubby was grumping at me yesterday, he says you won't put the skylights on right.  Then well I don't see why you can't get the covers off the vents.  Not like him at all, he must have had a bad day, he seldom grouches at me.  I told him I sent pictures of what I had done, for some reason he didn't get those either.

So today I sent them again  and he got a chance to call me back.  He said oh the skylight looks really good.  Then he says well if you can't get the covers off that's ok I just figured they needed changed.  So he is back to his old good humored self.  I was beginning to wonder.  Glad he got over what ever it was, I'm not used to him being like that, whew!  I told him I needed more of his Motorhome Repair 101 class! ;D

He told me send a picture of the battery bank, he just took a quick cursory look when home.  I told him I know the top rack swings out someway, I will look tomorrow.  There is a pin that I think gets pulled out and it swings out.  I need to recharge the coach batteries.  There are 4 big chassis batteries and 2 coach batteries I beleive.  If they won't hold need to get 2 new ones, if they are that old, but they have been fine since last October so probably just ran down.  I found the wiring diagram inside the fuse box under there that shows where the solar panel and all the rest of the stuff goes to the batteries and what part of the motorhome, need to look that over. Didn't get a chance to do so today. 

Man there is a lot of systems and stuff to know about on one of these.  I'm totally amazed of what all it takes to run a "house" on wheels.  Quite a feat if you think about it.
 
The bank of 4 batteries is probably the house (or coach) batteries and may be either 6 or 12VDC.  The 2 battery bank will be the engine starting batteries and are almost certainly 12VDC.  If you post a picture here I'm sure someone here can tell you what you have.
 
I have a little booklet from Fleetwood, that is kind of a synopsis of the other manuals.  I just found that it says I have 2 12 volt chassis batteries, those are the old 2007 ones!  And 4 6 volt batteries.  It says batteries feature a swing out rack design.  So I ran down all those batteries, humm.  Do I charge them by just hooking to one or taking them apart and charging each individually.  I have a fair sized battery charger it has 6 and 12 volt charging selection. Hubby calls about 4 so I will ask him too.

I got in touch with Fantastic Vent.  After looking at the vent covers again, one had a crack we did that and the others had cracks by the hinges, heat and age I suppose.  Not sure how, I didn't do it.  Anyway a very nice guy there named Bob Beretta GAVE me new covers since those were cracked and I just had to pay for shipping.  I kept saying are you sure? I told him I had heard nothing but good things about them.  That has to be amazing, nobody does stuff like that anymore.
 
You can treat each battery bank as a single battery and charge accordingly.  No need to separate the batteries for charging, they get charged together by the onboard charger.

The Fantastic Fan company is noted for their fantastic customer service.  We have lots of similar reports here.
 
The easiest way to charge the batteries is to plug the coach into electricity.  Make sure the battery switches are ON and let the converter do the work.  Come back in a day or so and check the battery voltage.  The house batteries will surely charge, but the converter may or may not also charge the chassis batteries.

Any source of electricity will do.  Even a long orange extension cord plugged into a house outlet, then adapted up to the RV's power plug.  Just don't turn on the air conditioner or any other large appliance if you're plugged into a small outlet.

Using a standard 10 amp battery charger will take couple of days to fill up those 4 6 volt batteries if they're heavily discharged.  Be sure to check their water levels - it should be just up to the split ring you'll see when you take the cap off.  When the water is touching the ring the surface tension makes the water take on a fisheye lens quality.
 
I am so proud of myself.

I thought my batteries were down on the coach and maybe they were.  I plugged the coach up to the 50 amp last week and all is well there.  I hit the coach button again and it won't stay on.  I called Fleetwood thinking I had a bad switch.  I tried taking the cover off and taping the button down but it would click off and on.  I located the switch that was clicking off and on in another fuse bank I found it in a bay of the coach.  There is also one at the end of the bed.

I kept thinking if it will work for awhile then quit well could it just be loose somewhere?  So I took the cover off the coach/chassis switch again and took the top screw out of the wire and screwed it back down and did the same to the bottom screw.  Well low and behold the lights have stayed on for over 20 minutes now without blinking off and on.  I told hubby maybe I just need to take an emery board and buff the connectors.  He said if you do, unplug the coach just to be on the safe side. Also he said get the can of electrical spray he has and spray them with it.

I also found that 12 volt will not shock me, did not know that.

I bought a wire stripper/crimper and put up my new vanity light in the bathroom.  I bought the little sleeve type connectors you crimp and it works, YES!  I need to screw it back up now.

I still have the lights out in the bedroom from last week from where I put the bulb in that was wrong and they all went out so that is my next project.  On my 12 volt diagram I have isolated the circuit its on.  I think it just about has to be a fuse.  Now whether its on the inside panel or possibly the outside I don't know yet but will figure it out. 

I got a meter to check the circuits but for the life of me haven't been able to use it yet, hubby said I'm just not doing it right, that I will figure it out.  He has these but I haven't a clue where to look.

So next project is getting the bedroom lights working again.

I'm waiting on my vent covers to come.  I decided to take the piece of plexiglass back to Home Depot I want to put in the hallway skylight and get one cut at the glass place so I don't have to try cutting it. 

It rained last night and has off an on all day today so a sloppy mess out there. 

Ok, wish me luck.  You just have to be methodical on this stuff.  I also need to learn more about basic electric.  Sounds like the time to buy electricity for dummies book.
 
Ok, you guys want a good laugh?  I'm telling on me.

I could not get my meter to work.  My tenant next door is an electrical and other type of guy.  He would help if I ask but I want to learn this.  But finally I said you know I can't get this meter to work, I want to test my fuses as I think one is burnt out.  He didn't laugh and I'm sure he wanted to.  He says you have to take the sleeves off the probes.  Say what????  I didn't know there were sleeves on the probes.  Then he showed me how to use it and the settings and stuff.  We found the blown fuse, BUT it is also NOT on the circuit shown on my elelctrical diagram.  Need to look that over as I'm not uncertain what goes where.  Hummmm

:-[

I should have paid attention to Tom but never figured I would need to know any of this.  But now I feel if I'm out alone I at least need to learn minimal troubleshooting.

So moving along.  Had to flip my new light bar over the medicine cabinet at the wood frame was going to interfere with the off on switch.
 
I found new swing arm lights on the net for $29 each.  The ones in the back were loose and the switches didn't work so well.  Likely could have sprayed them with electrical spray, will see, one in the front the switch sticks.

Anyway I put one up over the bed and have the other one off.  I need to get a bigger sleeve to crimp over the connection so do that tomorrow.

The 2 ceiling lights in the bathroom had never worked for me and one in the bedroom, the other did.  I used hubbies electric spray/cleaner, roughed up the base piece a bit and greased the base of the bulb with bulb grease.  Now the bedroom one works, its on a switch on the wall, so all bedroom lights now work.

The closet lights do too, but the switches on the doors do not.  I'm sure I can replace them, one does, it just needs moved forward a bit, but I'm not real comfortable they will switch off the lights so might leave them manual, will see.

In the bathroom, I checked and tested the light was not getting juice, I took the main one down and it was connected, so pulled the triple switch out.  I found the first connector not fastened to the switche that turned it off and on.  If its loose and comes loose doing travel not sure how to replace the clip as its a tight fit.  But I sprayed it good, reconnected and now the bathtub light and ceiling light works.  All my lights including closet now work in the motorhome!!

The next item light wise are my floor lights, need to look at them and see what's going on, might just be bulbs.

And I see on the diagram I have bay lights on the 12 volt system too so will check those out tomorrow if I get a chance. 

Once I get this done I will check out my 120 plugs, etc.  Some aren't working, I think its old GFCI's as they don't click back in when pushed.  There are 2, I ordered 2 replacements which I will replace anyway.

Hubby needs to put in the new lighted assist bar outside, it needs shaved down some, the old one was too.

So I'm getting back to work for a few days on it anyway.  I hope my vents come in.  Then I will finish the roof except for the AC units.

I want to fix everything I can fix.  Hubby is needed for major stuff and I think I need to learn all I can about that too.

The radio in the back is awesome, good stereo speakers.
 
All that is wrong with the floor lighting is 3 out of 4 bulbs were burnt out and the little niches are dirty.

A picture of the new light and yep the lampshades will fit.

We think the main issue with this motorhome is, it was not being used for several years.

I saw it has a water filter, I need to get the cartridge out and see if I can find one, if not will need a replacement.

Also put in a new carbon monoxide alarm, needs to be a smoke alarm too.  Come to think of it, not sure I saw one in it, need to check.
 

Attachments

  • DSC01389.JPG
    DSC01389.JPG
    35.8 KB · Views: 34
If its loose and comes loose doing travel not sure how to replace the clip as its a tight fit.

If the clip is the kind that fits over a flat metal tab, you can carefully re-bend the ears on the clip with a pair of pliers.  Leave the front end of the clip alone and press about 1/2 to 3/4 of the way to the back - this will let the tab slip in easily, then as the clip seats it will grip firmly.
 
PatrioticStabilist said:
Ok, you guys want a good laugh?  I'm telling on me.
...

Though it's tempting to laugh, instead I applaud you for asking for help. As in so many fields, what's blatantly obvious to one who's been in the field for a while may be difficult for someone new to that field. We ALL started ignorant at one time or another, and had to learn...

Judging by what you've told us here over the last months, you're jumping in to a lot of things that many fear to try, and it's wonderful to watch. Thanks for sharing all these experiences with us.
 
Thanks Lou, if it quits working once we are driving it I will know what to do. 

I notice on this motorhome they either use the sleeves and crimp them or if they use wire nuts they tape them afterwards so I did the same.  I'm sure that's so they won't vibrate loose.  Maybe they do that on all of them and I just don't know it.  We never had to take anything apart on the Winnie so couldn't say.

And thanks Larry for the kind words.

Many years ago I taught myself to finish drywall, Tom and I built a new house in the 70's and we did it all ourselves except the footers and concrete work.  Money was tight.  He knew how to do all the electric and mechanical and I did a lot of the cosmetics.  However I just couldn't do the ceilings so we put the drop ceilings in a brand new house, but hey it worked.

I taught myself to upholster, same reason to save money but have done very little of it, that's a lot of work.

Both of us like fixing and making things so being on the same page sure makes a marriage work better.  And this way we can buy items it needs and save the labor cost.  I'm sure there will be some things we may have to have done but we hope to keep it to a minimum.

Diverting some of today for other chores I have to do like working on backup for taxes.
 
PatrioticStabilist said:
...Also put in a new carbon monoxide alarm, needs to be a smoke alarm too.  Come to think of it, not sure I saw one in it, need to check.

Your smoke alarm and CO alarm need to be separate units. Smoke rises so the smoke alarm needs to be on or near the ceiling. CO is heavier than air so the CO alarm needs to be near the floor.

If you have a separate smoke alarm already, replace it anyway. They have to be replaced every five years so and , considering the age of the RV, it's highly likely an existing one is older than five years.
 
It was my sentence structure, but thanks, yes, I realize they are separate.  I put new ones in and also carry fire extinguishers.  In the other one I had one in the bedroom, in the kitchen and by the door and this will be the same.  You just never know.

Been busy today on other things but got my new domes so am putting the first one on.  The others vents are fans and will take a lot of cleaning, but intend to finish this one and put my Max Airr vent back on too.

Both fans work fine.  Need to see if I need to oil these or if they are self contained and don't need oil. 
 

Latest posts

Forum statistics

Threads
131,977
Posts
1,388,574
Members
137,726
Latest member
CampMike2270
Back
Top Bottom