One small step in my van conversion

The friendliest place on the web for anyone with an RV or an interest in RVing!
If you have answers, please help by responding to the unanswered posts.
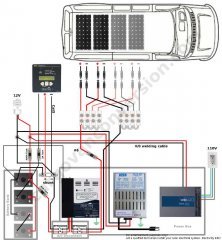
Now that the different parts of the electrical system have been established, the first thing to do is calculate the number of batteries needed to support the daily energy use. Here a lot of time goes into researching all appliances that will ultimately be installed. Adding up their amperage use, will yield our daily ?electric bill?.

More on my website.
 
After upgrading to off-grid power and power storage, this post elaborates on the available power generating tools for a small RV. The electrical calculations are comprised into a detailed schematic overview, that serves as the basis for the installation.

Follow me at:
 

Attachments

  • 400__320x240_03.jpg
    400__320x240_03.jpg
    16.1 KB · Views: 79
The introduction to off-grid power (upgrading to off-grid power, power storage and power generation) is concluded with a post about monitoring and maintenance. With all this knowledge we can finally begin with the wiring.

Follow my progress on (link in sig line).
 
While working on the multi-use cabinet, I started with some of the wiring. Before I can continue building new cabinets, the majority of the electrical wiring has to be installed.

Follow my progress on the website.
 

Attachments

  • img_3773.jpg
    img_3773.jpg
    62.3 KB · Views: 74
Continuing with the wiring of the van, gives me the opportunity to search for and order some of the materials, needed in the coming weeks. My list currently consists of wire connectors, heat shrink, 12V outlets and power inlet. I still haven?t found decent and affordable 12V LED light fixtures either.

Follow my progress on my website.
 

Attachments

  • 442__320x240_img_3826.jpg
    442__320x240_img_3826.jpg
    18.7 KB · Views: 68
Another post on wiring of the van. Two heavier wire gauges will support the appliances to be installed on the driver?s side.

Follow my progress at the website.
 

Attachments

  • img_3838.jpg
    img_3838.jpg
    41.2 KB · Views: 22
Having batteries, doesn?t automatically mean access to 12V. Thus, two access points are planned in the van. One 12V socket is located at the solar components (controller, charger, inverter, etc.) compartment, under the bed.

Follow my progress at the website.
 

Attachments

  • img_3856.jpg
    img_3856.jpg
    33.1 KB · Views: 18
The compartment under the bed that will hold the charger, controller, inverter, etc. is a small enclosure and needs some form of cooling.  I choose a 5? computer fan with thermal control, that automatically adjusts its speed as the temperature rises. Other considerations were low noise level (<18dB), high airflow volume (up to 42cfm) and low current (<0.2A).

Follow my progress at my web site - link in sig line.
 

Attachments

  • img_3920.jpg
    img_3920.jpg
    56.6 KB · Views: 15
The van is internally a 12V system fed by solar panels, with some 110V outlets powered by an inverter. Only the battery charger needs access to an exterior power source. For this, a 15A power inlet is installed next to the rear door, on the passenger side of the van.

Follow my progress at my website.
 

Attachments

  • 507__320x240_img_3955.jpg
    507__320x240_img_3955.jpg
    8.2 KB · Views: 9
The last time I worked on the bed, the pull-out, sliding shelf was installed. Now I?ll continue with a door for the toilet compartment. In deliberating the hinge options, I came across a simple wooden hinge design, that looked appropriate for this application.

Follow my progress at my website.
 

Attachments

  • index.jpeg
    index.jpeg
    52.4 KB · Views: 41
Recently a fan was installed to cool the solar components, like controller, battery charger, etc. As it is not necessary to run the fan continuously, a switch can regulate its use.

Follow my progress at my website
 

Attachments

  • 604__320x240_img_4154.jpg
    604__320x240_img_4154.jpg
    11.5 KB · Views: 19
Before continuing with the other side of the van interior, it?s time to put the wall and window above the bed, back together again.
Two issues remain: the battery cables and the solar controller cable need to be installed. The other is the decision I have to make, whether to go ahead with batting as insulation or choose a foam product.

Follow my progress at my website
 

Attachments

  • 650__320x240_img_4277.jpg
    650__320x240_img_4277.jpg
    22.4 KB · Views: 37
Between the window and the side doors is a narrow strip of wall available to house a small console. It is the future location of the battery monitor and a reading light.

Follow the building process picture by picture.
 

Attachments

  • 664__320x240_img_4334.jpg
    664__320x240_img_4334.jpg
    14.6 KB · Views: 26
Utilizing every available space is a priority; the area to the right of the rear side window is large enough to accommodate a magazine rack and is conveniently close to the bed. This will allow for some late night reading.

Follow the building process picture by picture.
 

Attachments

  • img_4283.jpg
    img_4283.jpg
    41.5 KB · Views: 24
jagnweiner said:
Hey, I'd been wondering what you were up to. I've never seen a finer looking magazine rack.  :)

I just woke up from my winter sleeping period.

And I'll add two more postings shortly with more of this magazine rack. It'll get even nicer!

Van.
 
Before continuing with the assembly, the three front pieces that are made out of Tiger Maple, need some ?popping?, that is, enhancing the visibility of the curl in the wood.

Follow the building process picture by picture at (link in signature).


Attachments

  • 01.jpg
    01.jpg
    34.7 KB · Views: 19
Back
Top Bottom