Install: ARB diff covers, Ten Factory 4340 Chromoly Alloy steel front axles

The friendliest place on the web for anyone with an RV or an interest in RVing!
If you have answers, please help by responding to the unanswered posts.

John Canfield

Site Team
Joined
Aug 8, 2006
Posts
14,122
Location
Texas Hill Country
Here's a previously documented mod I've done:

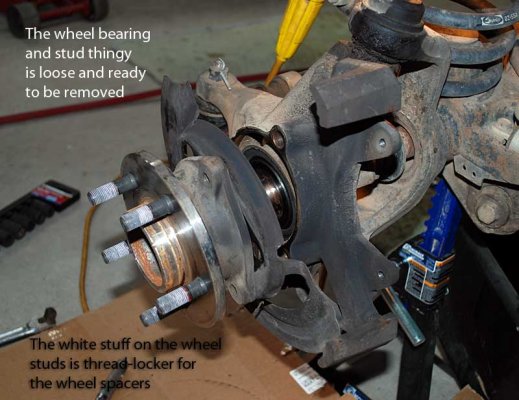
This isn't a gee-wiz write up since the objective isn't that difficult to you experienced Rubi hackers, but it's new territory for me. Maybe this will help some newbie in the future (or me when I have to pull the front axle again.  Thank goodness for ROF and Stu Olson for those moments when I need help.

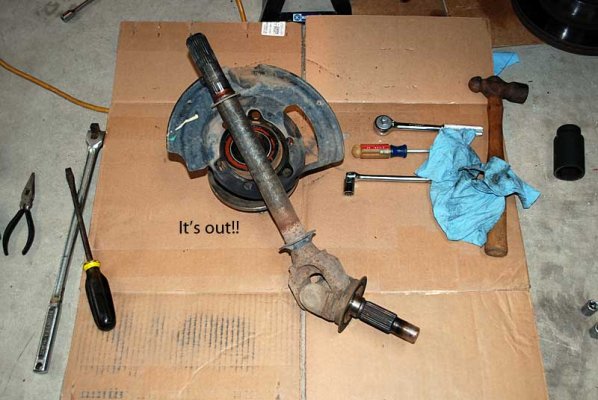
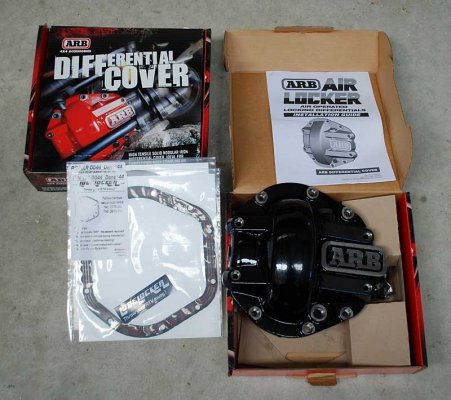
The brown Santa dropped off two fairly heavy boxes from Northridge 4x4. One box was the Ten Factory 4340 Chromoly front axles and the other box contained the black ARB diff covers. Dirk suggested I consider LubeLocker diff gaskets which sounded like a stellar idea, so I bit. No RTV for me.

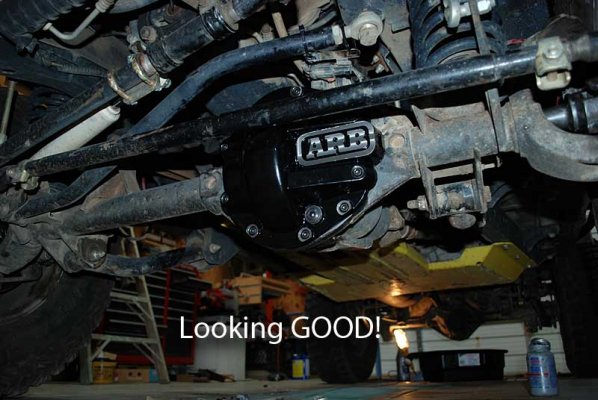
The black ARB covers are a Northridge exclusive for a year and while I'm not into bling, the deep black with the silver ARB lettering really looks sharp.
 

Attachments

  • ARBcovers.jpg
    ARBcovers.jpg
    68.2 KB · Views: 25
  • FactoryTenAxles.jpg
    FactoryTenAxles.jpg
    39.2 KB · Views: 21
The Lube Locker gasket is awesome. I have had to take apart a few difs with them and without them. You can use them over and over. Last one we pulled off was on the trails, air line came off locker. We just use a ziplock baggie to catch the oil and just stuck the whole tbaggie back in when we were done and went on. Good call.

Here is a picture of my new Atlas transfer case that I just put into my new build. I'll get more pictures up for you soon.
 

Attachments

  • loj1.jpg
    loj1.jpg
    7.1 KB · Views: 17
Drained the month old diff fluid (yes, bad planning) and got the diff cover popped off without too much trouble. A very small beater wood chisel applied in a couple of spots did the trick.

I wanted to get the axles replaced and out of the way ASAP, so I followed Stu Olson's excellent instructions and got everything removed without too much problem. Here's a list of major tools required:

-Axle nut: 36 mm socket
-Caliper assembly: 13 mm 6 or 12 point socket or wrench
-Wheel bearing assembly: 13 mm 12 point socket or wrench
-Needlenose pliers to remove axle nut cotter pin
-3/8" & 1/2" breaker bars with pipe extension for the 1/2" breaker bar for the axle nut (trail use - I used an impact wrench in the shop.)
-Your favorite ratchet

The install of the new shafts went really well. I used anti-seize compound where appropriate (everywhere!) Put everything back together, put the tires on and I was ready to move on to the ARB cover install.

Then the hammer dropped.

I started to mess around with the ARB covers and while I was looking at the table with all of the stuff I noticed this white padded envelope  :eek:
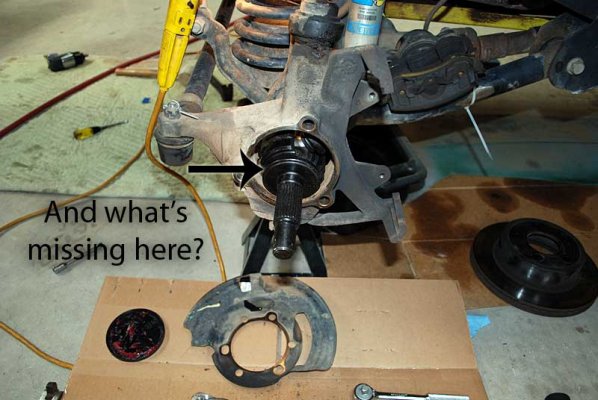
. Inside this envelope was the two axle dust shields I forgot to install. :mad: . Several inappropriate words were expressed.

Okay.

Pull the passenger side tire, remove everything I just installed, installed the MIA axle dust shield and put it all back together. Move to the driver's side. Tire is removed. Four of the five SpiderTrax wheel spacer nuts come off with a struggle (oops - too much red threadlocker) but one won't come off. Impact gun up to the highest setting - you're coming OFF!. Finally the socket starts to move and keeps moving, and moving, and moving, and moving... Many more inappropriate words expressed as I realized the pressed in wheel stud is turning.

(Note:  wheel spacers are history.  Not required now that I have Trailready beadlocker wheels with 3.5" of backspacing)

I used a chisel to remove the axle nut cotter pin, removed the axle nut, removed that entire wheel bearing & SpiderTrax assembly and I was resigned to having to replace all of that. Once I got that assembly off and after a bit of thought, I thought I could weld the wheel stud head to its mate, and so I did with great success (picture attached.) The recalcitrant SpiderTrax nut was removed :) .

It was a great relief to revive the existing parts from the dead. I was tired and really bummed out about the turning wheel stud, but all's well that ends well.

Now I am not a fan of wheel spacers - it adds a level of complexity for trail repairs (and in the shop!) - I need to ditch them and go with new wheels with appropriate backspacing.

I did do a trial fit of the new ARB cover and will install them tomorrow.


Attachments

  • WhatIsMissing.jpg
    WhatIsMissing.jpg
    55.6 KB · Views: 14
  • CaliperRemoval.jpg
    CaliperRemoval.jpg
    56.2 KB · Views: 13
  • 13mm12pointBolts.jpg
    13mm12pointBolts.jpg
    60.8 KB · Views: 10
  • RemovingAxleNut.jpg
    RemovingAxleNut.jpg
    42.6 KB · Views: 13
  • WheelBearingLoose.jpg
    WheelBearingLoose.jpg
    58 KB · Views: 12
  • WheelBearingRemoval.jpg
    WheelBearingRemoval.jpg
    44.9 KB · Views: 13
  • PulledShaft.jpg
    PulledShaft.jpg
    52.7 KB · Views: 13
Terry:  looks good - do you have a larger picture?
------------------------------------------------------------------

ALL DONE! IT WORKS! Whoo-hoo. Okay, I know it's not that exciting, but I felt good about bringing this to a successful conclusion :) .

One minor issue with fitting the covers was interference from the locker air hose retention strap. All I had to do was use a small ball peen hammer to beat the strap/keeper in about 3/8" . DOH!

I spent quite a bit of time with a file making certain the mating faces were completely smooth. The front diff housing had taken quite a beating on the lower part and it took quite a bit of time filing the lower part smooth. I also touched up the ARB covers with a file, cleaned the mating surfaces with solvent and put it together.

The covers installed easily. The LubeLocker gasket instructions want you to torque in a particular bolt sequence initially to 15 ft. lbs., and then to 35 ft. lbs.

Oh - I forgot to mention my 1/2" torque wrench only goes to 150 ft. lbs - the axle nut torque is 175 ft. lbs. I guessed the extra 25 pounds on the wrench scale.
 

Attachments

  • TabRelief.jpg
    TabRelief.jpg
    40.3 KB · Views: 12
  • AirHoseKeeper.jpg
    AirHoseKeeper.jpg
    34.3 KB · Views: 12
  • AllDone.jpg
    AllDone.jpg
    58.4 KB · Views: 14
Yes I do John. I will put more up tomorrow. I just about have the rear axle installed. I cut my frame behind the doors and raised it 1 inch and put a one in body lift up front. This Jeep is going to be real low for having 42" tires. I will be using a AEV high line hood and Genrite fenders. More pictures tomorrow. Thanks.

Yours look great too. Those are good axles shafts. My wifes Jeep has Superiors axles in the front.
 
Back
Top Bottom