Raising the Titanic

The friendliest place on the web for anyone with an RV or an interest in RVing!
If you have answers, please help by responding to the unanswered posts.

ChiefM

Well-known member
Joined
Dec 1, 2011
Posts
570
Location
Georgia
Hello all.
After getting home, settled and taking care of the stuff around the house that needed a mans touch. I finally started working on the 86 Chieftain I bought over a year ago. It seems the Motorhome needs a little more work than I was originally remember. I named her the Titanic today, Thinking it would be easier to raise the titanic than fix up this MH. I like fixing stuff and my wife says I need something to do.

The good-
She runs great, adjusted the choke and a few other adjustments and she purs like a kitten.
The electric side of the water heater works


The bad-
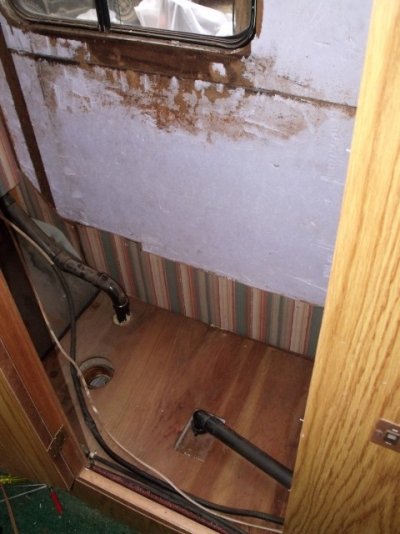
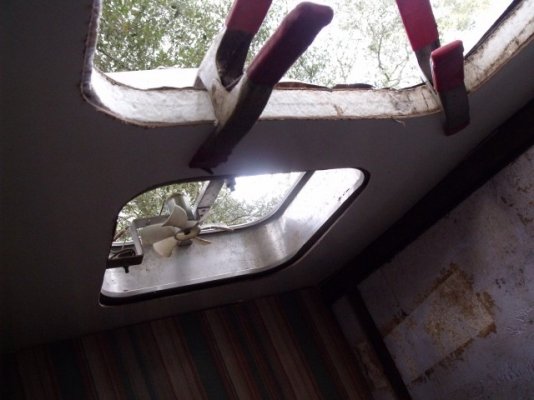
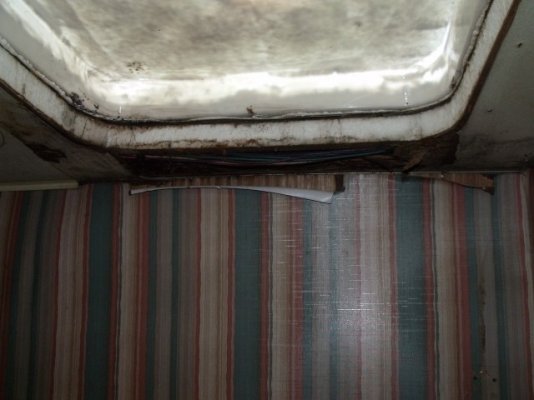
Water damage from the bathroom skylight leak- (roof and wall repair)
Small leak from vent in bedroom- (Small roof repair)
Wood is weak around side entrance door
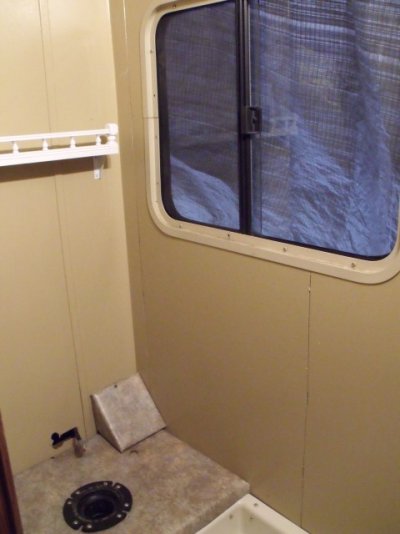
Potty needs some repair- leaks water non stop when lines have pressure
Water pressure builds up but the pump never shuts off
Both heater control valves are bad- No heat front or rear
Only one battery and the solenoid is jumped
Generator turns over but does not run
AC blower motor went out this summer.
Front air bags bad

The ugly-
Ugly Carpet
Ugly drapes

I am hoping for a promotion soon to the Atlanta area and I may need to live in her for a while if it goes thru. I know she sounds like a pile of rolling junk BUT she is not too bad and I really like the MH. I look forward to updating her and getting her back into shape. A lot of the stuff is just lack of maintenance from the previous owner. I will post pictures as I progress.

So far I have-
Sealed the roof
Cleaned and adjusted the carb
Replaced some of the ripped screens on the windows.
Removed the potty to fix and to start the repairs to the bathroom walls.

So I have started working on the Titanic !!!!!! Wish me luck


Well, I certainly wish you success with your project.  If you look at it like eating an elephant; one bite at a time, it's not so bad. 

Just fix one thing each weekend, and before you know it, you'll be looking for something else to keep you busy.
 
Well I had another exciting day working on the MH yesterday. Pulled the leaking Skylight yesterday AFTER I slipped on some acorns on the roof and put my arm thru it. There was 2  or 3 gallons of RTV around it. I did not know there was a chrome ring around it since it was covered in sealant. I removed all the bad wood on the wall and the ceiling.  I also got the new piece cut out for the ceiling. I have a little trimming to do to make it perfect then I can start on the wall.  I need some butly tape and tile from the home store. I will try and post some pics tonight.

A hard day of work has not killed me yet and I do enjoy the challange. I will take it one project at a time and get her back in shape. Thanks for the encouragement.
 
Sorry for not posting pics yet.  I went to the RV place yesterday and got the ball valve for the potty and a new grey water shut off valve. While attempting to remove the old valve last night I see where the pipe is busted at the joint. It looks like I need another new part but that should finish up the plumbing repairs. I will be gathering the stuff this week to hopefully finish the bathroom remodel this weekend.
 
I replaced the ball valve on the potty last night, so that is ready to reinstall when I finsh the bathroom. I stopped by the RV dealer last night on the way home. It seems that the 3 way connector that I needed for the grey water plumbing is no longer available. They looked at several different supply places with no luck so I started to repair the old one last night.  I am sure I can find one, maybe even used if I have too, but not a huge setback right this minute.  I will start on the bath again tomorrow morning, I swear pictures are coming.  ;)
 
A three-way connector for a gray waste line? Do you mean a Tee or a Y?  Except for the drain valves, RV drain lines use standard plumbing components, though not always stuff that is common in residential plumbing.
 
It is the Y- It is the one where you connect the drain hose too. It has a 3 inch outlet and it has a 2 inch and a 1 1/2 inch inlet.  I have a part number but not on me at work.  I am pretty sure I can fix it but will try and find a new one later.
 
Try a plumbing parts store they might have to order it but at least you can get it. There is ALWAYS some thing needing fixing. It will keep you busy but the first time you get to go camping you will forget all the bad ;D
 
The 2" line is the oddball.  Most RVs use 3" line from the black tank and 1 1/2" from the grey.

If you were to step up the 2" black tank line to 3", you could install a 3" dump valve and use a standard 3" x 1 1/2" sewer hose wye.
 
Lou-
This is simply the grey water lines. Thank goodness there seems to be no issues with the Black water holding and plumbing. I called Valterra and they said they probibly still have it. I can call them back with the part number and they can help me get it thru a distro center.

The pipe says 2 inch on it but it has a 1 1/2 inch valve. The Y has a 3 inch valve where they all come together and then 2 each 1 1/2 valves, one line goes to the galley sink and the other to the shower.

I might have found a place to get a replacement microwave knob, but I have to pull the micro to get the model number. The stock convection/micro still works real good. Hate to get a replacement just because of a bad knob.

I am running into snags/ delays finding stock replacement parts but still having fun working on the old girl. I agree it will be a distant memory as we sit under the awning on the beach watching the sun go down.
 
Ok, I have a 4 way connector, It has an inlet for the 2 Grey tanks, the Black tank and the connector for the discharge hose. I reassembled with my new valves and no leaks !!!! Got the new Luan glued to the walls and 2 coats of Kilz on the walls. Cut new wood for the potty stand and started covering it with vinyl.  The shower faucet is bad so I am going to have to replace it too, might as well replace the showerhead while I am at it.  I had removed the window to put in the new wood, I went ahead and cleaned it up and got it operating smoothly. Getting the old butly tape off was so much fun.

It's taking me longer because I went ahead and stripped the bathroom completly out, down to nothing but the 4 walls. New wood all the way from the ceiling to the floor. New ceiling is installed too. Thats pretty much it for this weekends work, going to try and knock a little out each night this week since  I have duty this weekend so no working on the old girl this weekend.
 
Worked like a mad man on sunday. I painted the walls, painted the mirror, the small shelf, the window valance and the light fixture. I used the krylon fushion white plastic paint, we will see how well it holds up. I got the potty stand recovered and reinstalled, I got the shower pan reinstalled too.

Yesterday I picked up the rest of the stuff I needed to finish the bathroom. New faucet, shower hose and head, new towel rack, toilet paper holder, new light covers and a tube of caulk. I have to order the new skylight and get some type of blind, but I have everything else. Army duty messed me up but I will try and post pictures tonight.
 
Ok, I hope this works, They are in no special order, A few before and some in progress. Went out tonight and installed the new towel rod and the new shower faucet and hose. I ordered the new Skylight today. The 3rd one down is with the new ceiling in, new walls in, primed and painted, I also have the potty stand covered in vinyl instead of the pink carpet.
 

Attachments

  • DSCF1045 (Small).JPG
    DSCF1045 (Small).JPG
    112.4 KB · Views: 461
  • DSCF1049 (Small).JPG
    DSCF1049 (Small).JPG
    101.8 KB · Views: 413
  • DSCF1050 (Small).JPG
    DSCF1050 (Small).JPG
    87.1 KB · Views: 419
  • Shower Before (Small).JPG
    Shower Before (Small).JPG
    112.4 KB · Views: 396
  • Skylight 2 (Small).JPG
    Skylight 2 (Small).JPG
    100 KB · Views: 414
ChiefM said:
I used the krylon fushion white plastic paint, we will see how well it holds up. I got the potty stand recovered and reinstalled, I got the shower pan reinstalled too.

I think you'll be pleasantly surprised at the Krylon Fusion Chief. I painted the plastic fender flares on my Jeep with it about a year and a half ago and it sits out in the sun and rain all year long. They still look really good. Great job by the way.
 
Thanks Jag and Lady,
I used tileboard for the ceiling, flat and shiney. I have the big mirror that goes above the shelf painted and installed too,  it just wasn't installed yet when I took the pictures. The shelf and the mirror were both natural wood and I wanted to try and get away from all brown in there.

Waterdog,
I had used that paint before on our lawnmower a few years back when it first came out and it held up pretty good so I am expecting the same results here too.

I am hoping to get the potty set in and hooked up and some caulking done tonight.
 
Back
Top Bottom