RubiCrawler install thread

The friendliest place on the web for anyone with an RV or an interest in RVing!
If you have answers, please help by responding to the unanswered posts.

John Canfield

Site Team
Joined
Aug 8, 2006
Posts
14,121
Location
Texas Hill Country
-->from my thread at Rubicon Owners Forum with some edits<--

I was amazed to find out the RubiCrawler is a very popular upgrade with the FMCA 4-Wheeler crowd!

From the Advance Adapters website (they make the Atlas transfer case):

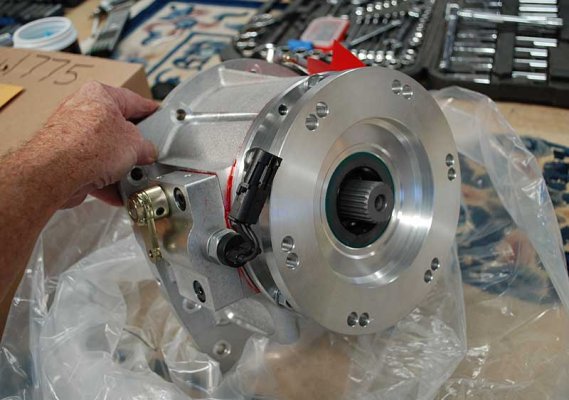
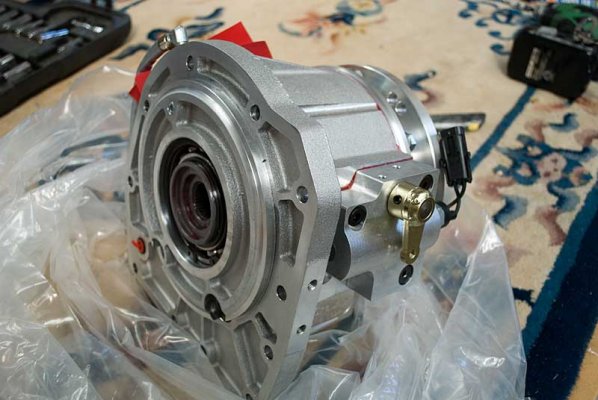
"This reduction unit replaces the stock 42RLE tailhousing with a 6 gear planetary reduction box featuring a 2.72 low range. This is a true, bolt-in doubler that couples to the stock Jeep transfer case or an existing Atlas transfer case.

Features: The RubiCrawler increases your available gear ratios. This allows you to choose the appropriate gear, depending on the terrain in which you?re wheeling. Proper gear choice will allow you more control of the vehicle. Ultimately, this contributes to a fun, and safe, offroading experience, even in extreme environments."


I wanted one of these when I realized my 4.88 gears, 35" tires did not permit very slow controlled speed rock crawling.  Every time I have a epiphany, it winds up being very expensive  :p.  An Atlas transfer case replacement would have been the ideal (four vs. two transfer case gear reductions) but it would have been twice as expensive ($4k vs. $2K.)

One unmentioned upgrade necessary for the RubiCrawler is upgraded axles - I already upgraded the fronts but along with the RubiCrawler install I also upgraded the rear axles to Ten Factory chrome-moly.  Upgraded axles are necessary due to the extreme torque when the RubiCrawler is engaged and you are in 4-Low (10.88:1.)

 
The RubiCrawler (ordered from Northridge 4x4) was extremely well packed and lived in a cocoon of that poured two-part foam stuff and everything was in perfect condition when unboxed - RubiCrawler looks like it belongs on an aircraft, darn, it's pretty. And it's fairly heavy. This will be 'fun' trying to get it into position on the end of the tranny.
 

Attachments

  • LockerBypassKit.jpg
    LockerBypassKit.jpg
    73.3 KB · Views: 30
  • PartsKit.jpg
    PartsKit.jpg
    63 KB · Views: 24
  • RubiCrawlerUnboxed1.jpg
    RubiCrawlerUnboxed1.jpg
    46 KB · Views: 29
  • RubiCrawlerUnboxed2.jpg
    RubiCrawlerUnboxed2.jpg
    48.2 KB · Views: 27
Spent the morning wrestling with the rear axle replacements and finished that up by noon. Finally got busy with the RubiCrawler install after lunch. Drop your skid plates and then disconnect the drive shafts. Depending on your skid plates (I have a Rockmen tummy tuck), you will have to support the tranny at some point since the aft end of the tranny/transfer case will be unsupported.

It took me all afternoon to drop the skid plates and disco the drive shafts - cocktail hour starts at 1600 hours local so that's when work stopped today. Tomorrow I'll start disconnecting stuff from the transfer case and then pull the transfer case. I'm hoping I can get everything prepped for the RubiCrawler install tomorrow.

I might have to make another run into town to pick up a M10-1.5 bolt to pull the spud shaft (I'm going to make a custom puller per the RubiCrawler instructions, Figure 3) so I can disco the tailshaft.

I have to disconnect the battery tomorrow so I lose all of my Pioneer programming (again  :mad: .)

Project requirements/resources:

Install instructions for a Rubicon TJ/LJ
Install instruction for a JK - go here, there are several options

You might need to buy from your Chrysler dealer (if you have to remove the transfer case yolk):

Chrysler # 04210973 - rubber yolk washer
Chrysler # 04167924 - yolk nut (the yolk nut is a one-time use nut)

Other stuff to buy:

- 1.5" square tube (2" ?) and a M10-1.5 by xx long bolt to make a custom spud shaft removal jig (I'll update this)
- Brass brush
- MEK solvent is excellent for cleaning RTV off the transmission face

Tools:

- The usual air tools, hand tools
- A ratcheting swivel 9/16 wrench, a beater 9/16" wrench to shorten
- A process well thought out to remove and lift the RubiCrawler and transfer case back into position
- Metric hex (Allen) wrench socket set
- Ball Metric hex (Allen) set


Attachments

  • Tailshaft.jpg
    Tailshaft.jpg
    60.4 KB · Views: 21
[INTRO]
All in all, a very good day today except when my 1/2" impact gun was in forward instead of reverse while removing the tailshaft bolts (to remove the tailshaft from the tranny.) I spun two bolt heads off before I realized what a dufus I was :eek: . Weird. I removed two bolts on a torque setting of two (out of four) and then the forward/reverse setting got reversed. It takes a forward setting of three for about 30 seconds to spin off the bolt head  ::) . Sigh. However... NO PROBLEM. I easily removed the 'brand new' studs and discovered the old bolts will not be used. Yea!
[/INTRO]

The work schedule today was to disconnect everything connected to the transfer case, drop the transfer case and tailshaft. On the transfer case there is a shift linkage to be popped loose, a breather hose to pull off, transfer case position sensor (on top of the case) and vehicle speed sensor connectors to be pulled apart. Also, the wire cable looms are attached to the transfer case in two or three spots with those push in plastic keeper thingys.

I had to make a run into town to buy a M10x1.5 bolt (bolts actually - I bought different lengths) to use in a custom puller (to be made) to pull the spud shaft. It took three versions of my spud puller before I got it right - You will need a 1/2" impact gun when screwing in the M10 bolt. My spud shaft was hard to remove, but V2.1 of the remover worked great.

After I got the various umbilical cords to the transfer case discoed, I dropped it. WOW, that dude is heavy!

Then it's time to remove the spud shaft (where do these names originate) and then remove the tailshaft. There is nothing (no wires or hoses) attached to the tailshaft, so remove the six bolts and use a beater wood chisel to pop the case loose from the tranny. Have a catch pan ready - two to four quarts of ATF will drain out the joint.

Then COMPLETELY clean the old RTF from the mating face of the tranny. I used a brass brush, rag and MEK solvent to clean the old RTF - it worked great.

I had some time to work on the interior of the cabin. Driver's seat removed, center console removed, old transfer shift lever removed, etc.

Tomorrow I'll install the shifters, shift cables and the RubiCrawler. Thinking about spending some time to fab up a jig to lift the transfer case with my floor jack- the case is asymmetrical and as soon as I pulled the last nuts (bolts - I forgot) it went into a controlled crash even though I had my floor jack on what I thought was its center of mass.
 

Attachments

  • TransFaceCleanedUp.jpg
    TransFaceCleanedUp.jpg
    56.8 KB · Views: 24
  • TransferCase.jpg
    TransferCase.jpg
    60.9 KB · Views: 19
  • TransferCaseLinkRemove.jpg
    TransferCaseLinkRemove.jpg
    47.8 KB · Views: 17
  • TransferCasePositionSwitch.jpg
    TransferCasePositionSwitch.jpg
    33.2 KB · Views: 17
  • TransferCaseRemoval.jpg
    TransferCaseRemoval.jpg
    55.6 KB · Views: 19
  • SpeedSensorRemoval.jpg
    SpeedSensorRemoval.jpg
    55.3 KB · Views: 18
  • SpudShaftPullerV1.jpg
    SpudShaftPullerV1.jpg
    57 KB · Views: 20
  • SpudShaftPullers.jpg
    SpudShaftPullers.jpg
    50.7 KB · Views: 20
  • PullingSpudShaft.jpg
    PullingSpudShaft.jpg
    47.7 KB · Views: 21
  • BreatherHoseXferCase.jpg
    BreatherHoseXferCase.jpg
    37.9 KB · Views: 20
  • SupportBracketRemoval.jpg
    SupportBracketRemoval.jpg
    51.5 KB · Views: 20
  • Wrenches.jpg
    Wrenches.jpg
    29.2 KB · Views: 19
Spent the morning in town running errands and didn't get started until just before lunch with the install. After I 'found' the missing instruction pages I could proceed with assembling the shifter assembly.

You do some assembly of the shifter assembly on the workbench, position the other cable (one gets connected to the shift box on the workbench) that connects to the RubiCrawler around the transmission and then install the shifter assembly into the previously vacated transfer case shifter space.

Then you thread the previously positioned loose cable into the short barrel, make some adjustments and put the cover plate on.

Next step is a test fit of the RubiCrawler box and hopefully installing it and the transfer case tomorrow.
 

Attachments

  • BarrelRetainer.jpg
    BarrelRetainer.jpg
    38.2 KB · Views: 18
  • CoverRTV.jpg
    CoverRTV.jpg
    31.1 KB · Views: 20
  • IgusBushings.jpg
    IgusBushings.jpg
    29.3 KB · Views: 18
  • NewShifterLevers.jpg
    NewShifterLevers.jpg
    47.8 KB · Views: 16
  • PivotPinMounts.jpg
    PivotPinMounts.jpg
    33.2 KB · Views: 16
  • PositioningRubiCrawlerCable.jpg
    PositioningRubiCrawlerCable.jpg
    48 KB · Views: 17
  • RubiCrawlerHeimJoint.jpg
    RubiCrawlerHeimJoint.jpg
    72.1 KB · Views: 17
  • RubiCrawlerOnLift.jpg
    RubiCrawlerOnLift.jpg
    60.8 KB · Views: 20
  • ShiftBoxCover.jpg
    ShiftBoxCover.jpg
    46.6 KB · Views: 19
  • ShifterCaseProgression.jpg
    ShifterCaseProgression.jpg
    32.4 KB · Views: 16
  • ShiftLeverPrep.jpg
    ShiftLeverPrep.jpg
    33.4 KB · Views: 22
  • ThreadCableBarrel.jpg
    ThreadCableBarrel.jpg
    65.5 KB · Views: 19
It was 90 minutes of frustration while I figured out how to lift the RubiCrawler (RC) housing into place to where I could worry it on for a test fit (do NOT neglect a test/trial fit - you need to get your process worked out before you apply the RTV sealant to the RC face due to limited working time of the RTV.) At my age I don't have enough upper body strength to bench press it up and in position (as I discovered to my dismay  ::) ) so I used the new transmission lift. I had to add two 2x4s to the tranny jack platform to provide enough reach (essentially an extension) due to a floor jack on the bottom of the transmission pan being in the way.

After making certain the trial fit was good, I lowered the RC housing, cleaned it and the transmission face with MEK solvent. Be certain and pull the red plug on the mating surface of the RC housing to expose the O ring and orifice before bolting the parts together!

Use the supplied RTV sealant and spread on the mating face of the RC housing according to the instructions. Raise the housing into position and work it around until it mates up. (Note - to rotate the RC shaft you might have to shift the RC lever one way or another.)

Start a few bolts in opposite directions to pull the faces together, screw more in and tighten a bit at a time until you have all the bolts in and tighten then in a criss-cross pattern like a tire. Final torque setting is 40 ft. lbs. Note that you will not be able to use a hex socket and ratchet on the two bolts by the shift lever housing. That top bolt will be easiest with a long ball head hex Allen wrench and the lower one (a "button" bolt) can be tightened with the short arm of an Allen wrench. When you think you have tightened all of the bolts up, go back over all of them again with the torque wrench!! You might find some not at 40 ft. lbs.

Then it's time to install the RC shift cable and the bracket for the transfer cable and then mount the transfer cable shift lever in the bottom hole. The attached pictures (and the factory instructions) will make this more clear.

The last picture in this set is removing the stock mounting studs from the transfer case, the stock studs are 3/16" too long so you can either grind them down a bit (while keeping chips out of the innards) or unscrew the old studs and install new ones included in the RC kit. I chose to replace the studs.
 

Attachments

  • BallAllenWrench.jpg
    BallAllenWrench.jpg
    50.8 KB · Views: 20
  • ExhaustStrappedOver.jpg
    ExhaustStrappedOver.jpg
    49.9 KB · Views: 17
  • InstallingCableToRubiCrawlerShiftArm.jpg
    InstallingCableToRubiCrawlerShiftArm.jpg
    57.9 KB · Views: 17
  • RCcableInstalledAndXferCaseBracket.jpg
    RCcableInstalledAndXferCaseBracket.jpg
    60.5 KB · Views: 20
  • RubiCrawlerBoltedUp.jpg
    RubiCrawlerBoltedUp.jpg
    51.1 KB · Views: 21
  • TestFit.jpg
    TestFit.jpg
    42.7 KB · Views: 16
  • TrannyOutputShaftGroove.jpg
    TrannyOutputShaftGroove.jpg
    48.9 KB · Views: 20
  • TransferCaseShiftLeverInstalled.jpg
    TransferCaseShiftLeverInstalled.jpg
    55.9 KB · Views: 16
  • TransferCaseStudRemove.jpg
    TransferCaseStudRemove.jpg
    58.7 KB · Views: 18
Today I removed the old transfer case shift lever and replaced it with the new one from the kit. Heat the T40 Torx bolt up for about 60-90 seconds and see if you can't remove it with Vise Grips. If that won't work for you, then you need to remove the Yoke to get it out of the way so you can get to the T40 bolt.

I was really miffed to find out that I was missing another bolt - the M8-1.25x14 hex head bolt for the new transfer lever.  :mad: A 50 mile round trip to town for a $1 bolt (I bought a couple) and about $15 for diesel for the truck. I also discovered I got shorted a locknut in the RubiCrawler Electronic Module (for the lockers) kit. Not a big deal but Advance Adapters needs to tighten up their product packaging process.

Also, today was the day to fight with mating the transfer case to the RubiCrawler (RC) box. At least I thought it was going to be a fight, to my utter surprise I was able to roll the transfer case attached to my new transmission jack under the frame rails after I removed the two layers of cardboard on the floor. :D

Oh, if you decide to replace the OEM transfer case studs with the new slightly shorter ones, be sure and screw them into the case as far as you can go (don't go crazy with an impact gun, I limited myself to about 50 ft. lbs.) - I only had maybe two thread ridges showing at the most at the base of the studs. If I would have left more thread exposed, there was a chance the stud would contact the RC flange and the two faces not completely meet.

You need to lube the lip seal on the back of the RC with ATF+4 and use an adjustable wrench to put the transfer case in something other than neutral so you can turn the shaft to align splines when you're mating the boxes together.

I only spent a few minutes positioning the adjustable bed on the transmission jack and raising/scooting it around before I got 'er done. Whoo-hoo! I was blown away with how little drama was involved thanks to the lift, that dude paid for itself many times over!

I found out I need to spend more time adjusting the shift cables - even though I followed the installation directions meticulously, my shift handles are a bit too close together in their closest setting (4-low and the RubiCrawler in High). I'll make another run at adjusting those in the morning and finish up the RubiCrawler Electronic Module install.

No word on where my new front drive shaft is - I'll be ready to button things up in a couple of days and I need my DS!
 

Attachments

  • CustomOpenEndStubby.jpg
    CustomOpenEndStubby.jpg
    32.8 KB · Views: 17
  • FrameRailClearance.jpg
    FrameRailClearance.jpg
    64.1 KB · Views: 22
  • GettingClose.jpg
    GettingClose.jpg
    58.1 KB · Views: 19
  • HandlesTooClose.jpg
    HandlesTooClose.jpg
    47.4 KB · Views: 19
  • ShiftLeverTorque.jpg
    ShiftLeverTorque.jpg
    56.3 KB · Views: 20
  • TransferCasePartial.jpg
    TransferCasePartial.jpg
    49.2 KB · Views: 19
  • TryingToRemoveOldShiftLever.jpg
    TryingToRemoveOldShiftLever.jpg
    55.3 KB · Views: 17
  • YolkNutTorque.jpg
    YolkNutTorque.jpg
    55.7 KB · Views: 17
  • YolkPulling.jpg
    YolkPulling.jpg
    43 KB · Views: 17
  • YolkRemoved.jpg
    YolkRemoved.jpg
    58.6 KB · Views: 17
  • YolkRubberWasher.jpg
    YolkRubberWasher.jpg
    37.4 KB · Views: 19
Not a lot of progress today since I spent almost the entire day fiddling with the shift lever adjustments. I didn't mind spending as much time as necessary to get it right since both levers need to be set correctly. When I quit yesterday, the transfer case and RubiCrawler knob were too close together when the transfer case was in 4-low and the RubiCrawler in high.

After a fruitless morning with the levers I called Advance Adapters and kicked the situation around with them. After some dialog I discovered one issue was I didn't fully seat the RubiCrawler heim on the cable's threaded rod, this was during the initial assembly of the transfer case box. Unfortunately the instructions don't mention how far to screw the heims onto the threaded rods until later in the instructions  ::) .

For those who follow with their RC install - screw the heims fully on all of the threaded cable rods! (And use medium strength threadlocker on the bolts through the heim eyes.)

To fully seat the heim in question, I had to access the inside of the transfer case box. Fortunately you can unbolt the box from the floor console and pull it up just enough to work on it (thanks to Advance Adapters for this priceless tip.)

When properly adjusted (for my install anyway) the transfer case lever is very close to the the dash console when in 2-H. If you take up the slack on the knob, you will measure about 1 1/8" between the knob and dash console. To make things a little easier, try to position the RubiCrawler knob farther aft (toward the cup holder) if possible. Mine was as far back as possible - the barrel was screwed in as far as possible, so that setting was where it had to live.

An important tip here: the cable barrels on the transfer box end of the cables adjust the LEVER POSITION - that is how far forward of back they will be at the end of travel. The other end of the cable is adjusted with the two nuts, you loosen the nuts and position the cable housing in or out to adjust the cable THROW. This must be set properly or there won't be enough cable throw to fully operate the levers on the RubiCrawler and transfer cases.

After what seemed like forever, I finally got those adjusted to my liking. I checked and double checked the cable throw - you unscrew the bolt through the heim eye and manually operate the levers at each end of their travel and then operate the levers and make certain you have a tad more cable travel at each extreme. To restate, the cable needs to push or pull the levers fully in each direction.

Then I had a little time left to plug in the transfer case speed and position sensor plugs, breather hose and tidy up the wiring. Got the RubiCrawler electronic module wiring tided up and installed the mounting 'foot' at the base of the RubiCrawler box.

Unfortunately the new front drive shaft won't be delivered until Thursday, so that's going to hold up completing the project  :mad: . Tomorrow I can install the rear drive shaft and front seat and then I'll be in a holding pattern.
 

Attachments

  • 2-lowPosition.jpg
    2-lowPosition.jpg
    35.4 KB · Views: 25
  • BothShiftKnobs.jpg
    BothShiftKnobs.jpg
    39.5 KB · Views: 23
  • PullTransferCaseBox.jpg
    PullTransferCaseBox.jpg
    67.4 KB · Views: 25
Real-time follow up.

The RubiCrawler is amazing.  When running easy trails where 4-high is too high and 4-low is too low, engaging the RubiCrawler makes the gearing just PERFECT!  When in 4-low, you have very slow and controlled rock crawling.  Very impressed with my investment.
 
Great write up John. That must be like driving a tractor in 4 low low. Your only limitation now is probably gravity.... ;) ;)
 
Betty Brewer said:
So where are you now?  Where did you test your newest investment?

Sure did Betty, used it a bunch at Kingman and mostly in 4-high.  It was a perfect ratio for running easy trails.  I'm going slowly with it since it is basically a paradigm shift for my rock crawling technique.

SargeW said:
Awesome write up John! Do you hire out?

Maybe but not for a RubCrawler install  :D - I lived under my Jeep for three days and it wasn't a lot of fun.  Now if I can buy that two post lift I'm looking at, then who knows.
 

Latest posts

Forum statistics

Threads
131,964
Posts
1,388,328
Members
137,718
Latest member
urnwholesaler
Back
Top Bottom