Water Damage/Delamination/Wall Separation

The friendliest place on the web for anyone with an RV or an interest in RVing!
If you have answers, please help by responding to the unanswered posts.

DownbytheRiver

Well-known member
Joined
Jan 14, 2013
Posts
54
I have been fulltiming for about 3 months in a 1991 Mallard Sprinter class C.  I bought the RV for $6000 and saw that there was some wear and tear, but after our recent storm Sandy, I now think I have a bigger problem than previously anticipated.

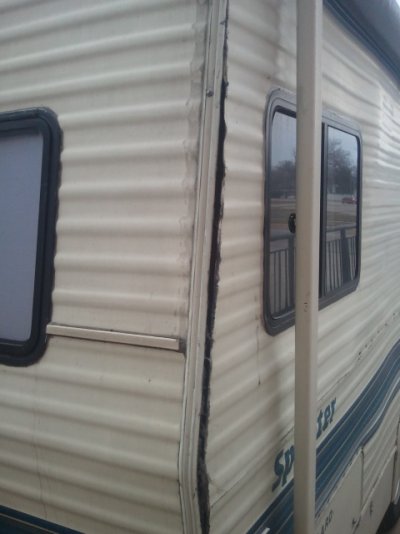
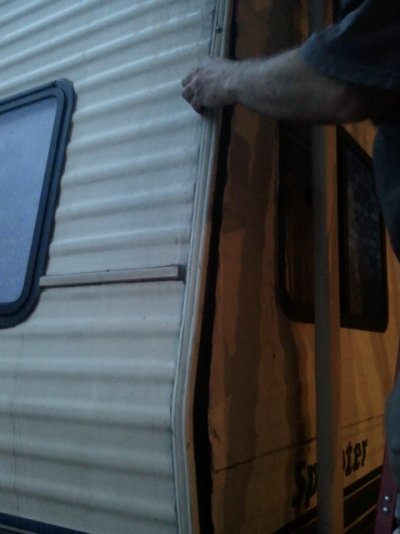
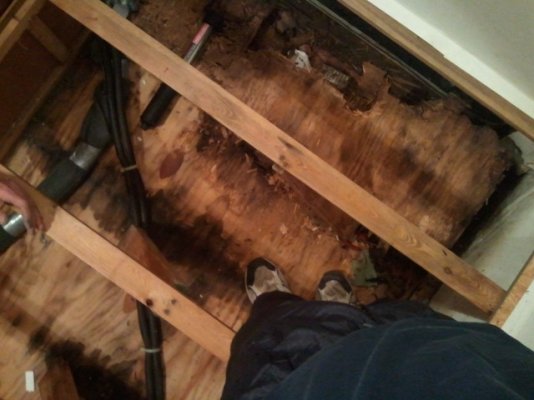
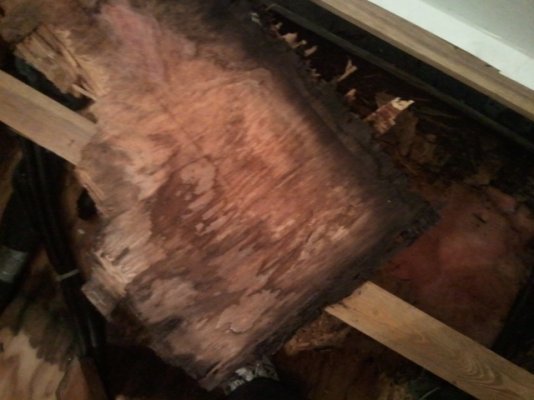
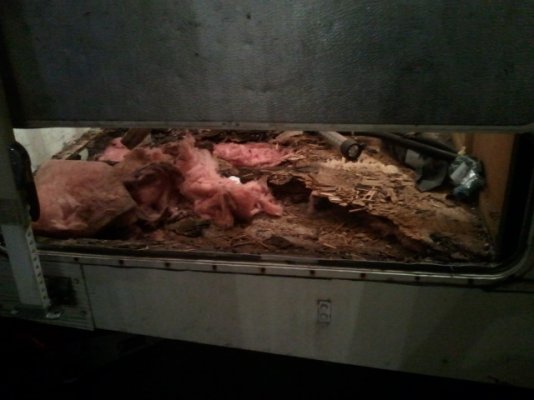
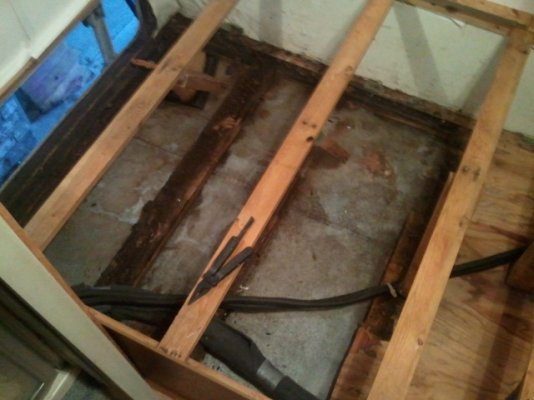
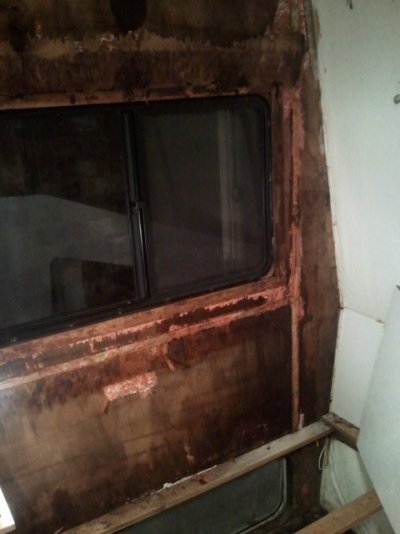
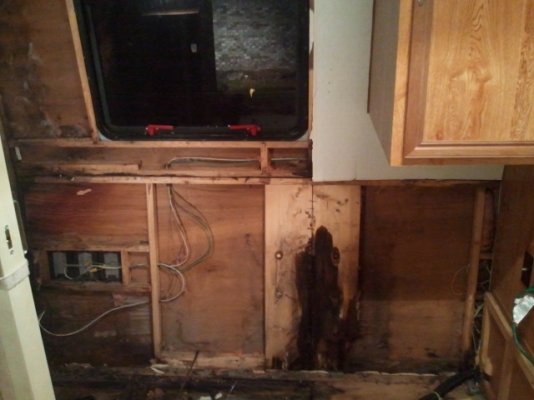
The wall connection between my rear wall and passenger side wall are become separated.  I tried to seal it with silicone and it seemed to hold fine, but the other day I noticed the crack increasing in size.  After the most recent storm, it is considerably worse. 

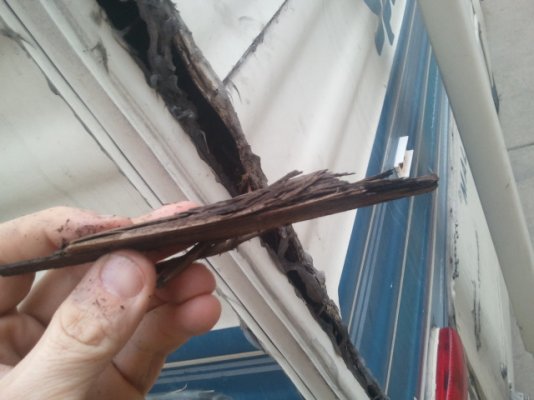
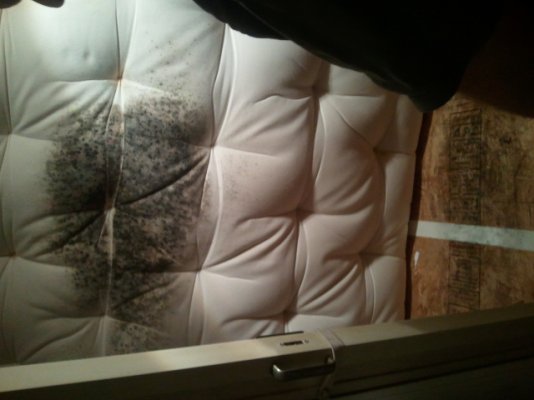
The wood within appears to be rotted to a fair extent.  My research on delamination is that I won?t be able to repair this myself.  The problem is I am recently divorced, homeless otherwise, and my budget it tight.  I?m trying to finish my doctorate and travel for what freelance work I have.  It keeps me moving and I need to keep moving.

I have some pics here.  How bad is this?  Can I do a patch job until I save more money?  Is the vehicle structurally unsound at this point?  Are my dreams of living fulltime crushed?

Any advice on how to survive this one would be greatly appreciated.


Attachments

  • wall delam 1.jpg
    wall delam 1.jpg
    99.2 KB · Views: 156
  • wall delam 2.jpg
    wall delam 2.jpg
    99.8 KB · Views: 139
  • wall delam 3.jpg
    wall delam 3.jpg
    96 KB · Views: 131
You have a couple of problems. The first is that there is a leak somewhere above, allowing water to run down through that wall and rot the wooden structure. The second, of course, is the rot that has already taken place. Last is a means of re-attaching the siding.

The proper repair is to open up that wall, replace the wood structure, seal up the original leak, and re-attach the side. I can't think of any inexpensive way to do that if you cannot do it yourself. A repair shop is going to charge $100/hour or more and there are a lot of hours of labor invoved even though it is not technically challenging work.  The best I can suggest is to find a local handyman who might be willing to do it for $50/hour.

If you don't care about the cosmetic aspect, maybe a piece of 2" aluminum angle could be used to cover that corner and hold the side in and to the back with numerous sheet metal screws and a lot of caulk. Would still have to find and fix the original leak somewhere near the top, though.
 
Chances are, you have a leak on top, likely where the end cab meets the roofing.  You need to immediately get that repaired even it temporarily.  If all you can afford to do at this time is patch it, then I think Eternabond tape could be your friend.  It's not cheap, but can do a good job sealing and binding things together.  I'd remove the corner trim and run some 4" wide Eternabond all along the corner joint.  The tape should do a decent job repairing the leak on top as well.

As for structural integrity, it's difficult to say.  If you don't move the vehicle much, it's probably safe enough.  As for driving safety, there is little stress in that area so it shouldn't be a safety issue.  However, driving will only exacerbate the problem.
 
Thanks Gary and Molaker,

  I have sealed the roof twice and recently purchased a gallon of Plas-T-Cote rubber roof paint that I will apply as soon as we get both 50 degrees AND no rain.  Hopefully this week.  I would be willing to try to repair the wall myself, but feel that I would need at least a few days of dry weather before I pull the side off.  I would fear having to leave it open overnight.  Being my first attempt at such a fix, I imagine I would hit snags and it would be time-consuming.  It looks like my schedule and weather won't cooperate with that until later this week.  Can I wait that long?  If not can I patch with the 2" aluminum and then do the major repair later?

On my way to Lowes to get a spool of Eternabond.  Thanks for the tip.

lastly, any particular kind of caulk?  I purchased a premium waterproof silicone for window/attic/door/basement by GE.  Any other suggestions?

Thanks for your help.  I must solve this and I won't give up easily!


Okay, it sounds like you are not planning on moving the MH any time soon.  You might be able to access much of the area needing repair from the inside.  This would allow you to start on it regardless of weather.  Since the area is so rotten, I suspect the inside corner has water damage as well and will have to come apart anyway.  What is in that rear corner?  Is there any cabinetry there.  If so, it will have to be removed.  Get a good look inside for damage and that may tell you what to do next.
 
I suggest a polymer caulk such as Geocel Proflex RV for the sidewalls. A urethane caulk would also work well.

Your roof is probably EPDM rubber, so any caulk used at the roof joints should be EPDM compatible. Dicor Lap Sealant is an excellent choice.

RV stores will have both products or something equivalent.

Eternabond is difficult to apply to a corrugated surface like your RV side panels. Hard to remove if used for temporary repairs, too. Mineral spirits will help loosen it or remove residue.
 
Update: 

I have decided to take the plunge and re-build the wall.  I am skipping the Eternabond step.  I have half of the RV under a tall awning and I jacked up the side so water runs off the opposite side.  That will have to do until the rain stops.  It's all I have and it seems to be working albeit temporarily.  I have scraped off all of the caulking and sealant that was previously applied to the corner. 

There is a local RV repair shop and I plan on asking them for advice, but anything you can help me with in terms of materials I will need (types of wood, should I use lag screws to re-attach the sides, etc.)  would be of great help.  I also know I will need to remove EVERYTHING on the side (light fixtures, the awning, removal of the window) so any suggestions on that will be greatly appreciated.

I'm taking tonight to research, tomorrow to buy materials, and then however long it takes to fix this. 

Wish me luck.  Thanks for your help!
 
I'd work from the inside out.  Take down the wallboard in that corner and see what's underneath.  Replace rotted framing as required until you have a sturdy frame underneath.  Then worry about reattaching the outer skin to the good framing.
 
Thanks Lou,
  Working from inside.  As always with old RV's, once you start digging around, all you get is dirty.  It's like Pandora's box in there.  The floor has considerable water damage and rot.  It even looks like a previous repair job did not solve the problem like Gary suggests (leak probably on the roof or side of roof) or the roof was not maintained....for a while.

Are there any opinions about using treated wood versus untreated wood?  I think I can get some treated 2 x 4's for free but will stick with untreated if anyone has any major objections.  My biggest fear is discovering more problems that I will have to address.  Pics attached.  Please let me know if I am missing anything or if there are certain pics I should post!

pic 1- the rear corner and side joint coming apart
pic 2- as I removed the mattress I had put in, I found a nice surprise underneath
pic 3- a view straight down.  It almost looks like water (condensation?) is particularly gravitating to the cross beams (joists?)  Is that normal?
pic 4- a sample of the plywood I pulled out
pic 5- just a day in the life...

Thanks all for your insight and support!  I'm finishing my 4th graduate degree soon, but I swear I've learned just as much in 3 months of full-timing than 12 years of college!


Attachments

  • water damage 1.jpg
    water damage 1.jpg
    98 KB · Views: 96
  • water damage 3.jpg
    water damage 3.jpg
    91 KB · Views: 111
  • water damage 5.jpg
    water damage 5.jpg
    100.7 KB · Views: 117
  • water damage 7.jpg
    water damage 7.jpg
    97.6 KB · Views: 97
  • water damage 8.jpg
    water damage 8.jpg
    94.5 KB · Views: 102
You can use pressure-treated wood if you like, but it is a bit harder to sink screws or file/sand to fit. The original was not treated wood, but that was probably just for cost reasons.
 
Thanks Gary,
     
I appreciate the help!  Quick question regarding the best way to use the forum.  It seems as if people are reading this thread, so I am interested in continuing to post pics and questions as they arise.  Is it better to start new threads with specifics?  For example:

Types of Wood Treatment:

I have seen/heard of people using pressure-treated wood for beams, using Killz on the beams, and/or using fiberglass resin on the beams. 

Does anyone want to weigh in on which is better?  Should methods be combined (e.g. spraying killz on pressure-treated wood)?  What are the cost-benefit pro's and con's


First question is obviously the wood, but additionally should I start a new thread with each subject?  Whatever is better for the forum is what I'd rather do, just looking for advice.  Thanks!
 
I think that pressure treated wood would outlast you and the trailer.  I would be reluctant to put something on wood with moisture still in it (especially treated) that might seal it and not allow the wood to completely dry.  Besides, putting those things on pressure treated might not provide for good adhesion.
 
Good point COMer,

Since I have pressure treated wood available, I think I'm going to go with it.  I may have to deal with increased challenge of cutting/fitting but gain the long-lasting shelf life. 

I updated pics posted of my work today.  Pics of the rear of the vehicle (inside).  I have some work ahead of me!  Any observations that jump out as red flags  (something I am missing not previously discussed?) is always appreciated.

A few questions:

There are two metal bands or strips running horizontally across the side of the vehicle.  What are they for?  I assume they act like strips on an old keg barrel, but they don't seem to be attached with any kind of vigor.  I assume they should be?

The Styrofoam will have to come out as some of it is soaked.  Any opinions between foam vs. insulation?  I have heard insulation expands and gets a better R value, but one could also use spray foam insulator to fill in the cracks with foam pieces.  I am  a fulltimer in the midwest so I am leaning towards heating efficiency.  Any thoughts between the two methods?

I have seen blogs that include a "vapor barrier" in a repair like this, which was essentially a plastic sheet that was put in between (for example) floor boards and the insulation.  Is this necessary?  Beneficial? Detrimental?

Many of the screws that I am pulling out from the areas of the water damage are rusted.  Is there a particular type of screw that can withstand a little better?  Galvanized?  Titanium?  Something from Krypton?  Just wondering what the best to get is.

I really appreciate everyone's help.  This is a big undertaking and my first of this kind!


Attachments

  • water damage 10.jpg
    water damage 10.jpg
    94.2 KB · Views: 86
  • water damage 11.jpg
    water damage 11.jpg
    106 KB · Views: 89
  • water damage 15.jpg
    water damage 15.jpg
    95.5 KB · Views: 91
I'm having some trouble getting the perspective in these photos. E.G are we looking at sidewall, rear cap, floor, etc. in each of them. A broader photo of the whole work area would help.

The metal bands are a new one on me. Barrel hoops are held in place by the outward pressure of the staves, but there is no equivalent pressure here. If they aren't rigidly attached, they might be tying two things together at the end points, to keep them from pulling apart.

Insulation works by trapping air in a dead space. It is limited by the space available between the walls. It doesn't do any good to pack 3.5" pink "wool" into a 1.5" space cause you squeeze all the insulating air space out anyway. Choose whatever type of insulation you can find that matches the available size, but its probably going to be rigid foam for that small size (I'm guessing 1.0-1.5" max). Rigid foam is easy to work with too, and you can shoot expanding urethane foam into the odd places.
 
Thanks for the reply Gary,

of the recent pics,  the first pic is of a shot looking down at the bed area in the rear corner of the vehicle, passenger side.  The bed runs perpendicular to the vehicle, width-wise in the back.  The blue hue is through the storage door that sits on the side of the vehicle all the way towards the back on the passenger side.  The second pic is the passenger side of the vehicle in the rear.  You can see the storage door now closed at the bottom, same storage door as in the first pic.  Third pic is the rear wall of the vehicle.  I'll try to take some pics with a broader perspective today.
 
As for your screws, you can use stainless steel but regular screws will be fine as long as the leak is stopped and stays that way.
 
If the pressure treated wood is really dry maybe I would use it otherwise no. Remember that you will be using wood with a lot of unpleasant chemicals into a very confined space.
 
Home Depot or Lowes will have coated screws for exterior use. They are usually tan or dark gray in color. They hold up nearly as well as stainless and cost quite a bit less. Grip-Rite is one common brand and they call their coated screws "Primeguard".
 
Thanks Gary, Steve, and Wizard.  I appreciate the support and knowledge.

I am still tearing out flooring and may have to remove a cabinet to reach the end of the rot.  I'm also taking the shower out and going about this thoroughly.  I'm the cheapest labor I know and I don't want to have to do this again.  Might as well get it now while it's all in pieces.

A Few Questions

I am going to try to use the current fiberglass skin and purchase new Luan paneling, Styrofoam, and paneling for the inside.  As far as I know, that is what the wall "sandwich" is usually made out of.  My Questions are: 

What type of adhesive do I need to keep these pieces together?

I assume I will add screws to the outside skin to try to get it flush with the inside structure.  I know I will need to seal these holes with silicone.  Is there some such thing as too many screws down the side?  What If I did every 6 inches to make sure there is a firm connection?  Can I compromise the structural integrity of the skins by adding too many holes?

There is a metal sheet that lies under the frame on the floor.  It's very thin and sits between the metal frame of the vehicle and the 2 x 4's that make up the frame.  It has light oxidation and in some corners has some rusted holes that are pretty small.  Should I worry about laying some more sheet metal down?


That's all for now.  More pics and update later.  I am grateful for your support and advice.  I am learning a great deal and it feels empowering to take on such a new challenge.  I hope I can pay it forward someday.
 
Back
Top Bottom