Looking at purchasing a 1995 Winnebago Vectra 34'

The friendliest place on the web for anyone with an RV or an interest in RVing!
If you have answers, please help by responding to the unanswered posts.
I just had a little closer look at the finish on that Vectra..... It's about the same as mine. You may find that is why it hasn't sold yet.

Most dealers will have a coat of clear-coat sprayed on the coach if the paint is half-way salvageable. The fact that they didn't may be a warning. For me... I couldn't care less. I plan to seal the paint and make it look as good as possible and try to stop further damage but "Shiny" isn't as important to me as it is to most.

I have a feeling that a long face at the "Shiny" aspect may give you a lot of bargaining power. Every dealer knows that "Shiny" sells....... if it don't shine, it will sit.
If you could get them down to $19K, that would go a long ways toward a new paint job (if that's your thing).

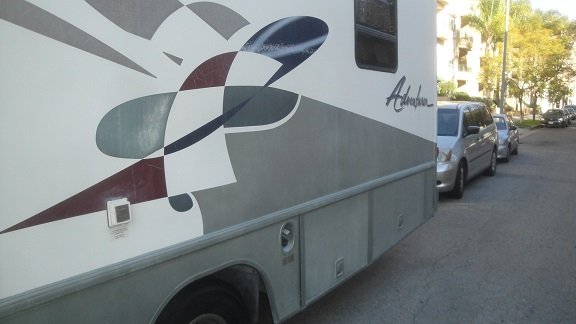
The attached pic shows the condition of our finish. Some of that is oxidation that can be removed but some of it is Sun damaged paint. I can get the color more even by removing the oxidation and get some shine back but it will never look really good (without a new paint job). You may find the same thing with that Vectra.
 

Attachments

  • DSC08013a.jpg
    DSC08013a.jpg
    67.5 KB · Views: 24
I'm a chevy guy thru and thru, and wouldn't consider buying a coach ford powered. The Chevys have exhaust manifold problems too, but they don't tend to break the head. The exhaust manifold bolts can be a bear, and some do break off. The Chevys manifolds warp causing a slight ticking sound.  That is usually caused by pushing too hard and getting them too hot.  My buddy bought a 96 Storm last fall for a good price but it needed some TLC. Among that, was warped exhaust manifolds, the infamous tick. He repaired it him self, but if taken to the garage for this repair it would have been several hundred dollars. Every GM class A chassis I've looked at had at least a 5000 lb tow rating hitch, not saying they all do, but the ones I've looked at did. I have reinforced all of the coachs I've owned, before  towing. Well all but my first one, it was a C class and I broke the frame on it. I tow a race car and golf car on the trailer several weekends during racing season. I've looked at a few Vectras, but the ones I've looked at were out of my price range. Looks like this one has had some up grades. Good luck!!
 
@ waverly - I will be making a very very long face at how disappointed I am with the not so shiny RV.  The shininess is not really a factor for me.  It is a 1997 RV, I won't be spending $10K on a paint job...that is approx half of what I spent on the RV!

I will try and get the DOT on the tires, but sometimes it's hidden...or so they tell me.  I have a list of questions as well as a mobile RV guy that will come out and inspect the RV for me.  Sure hope I get a good RV!

Thanks guys!
 
lientrac said:
@ waverly - I will be making a very very long face at how disappointed I am with the not so shiny RV.  The shininess is not really a factor for me.  It is a 1997 RV, I won't be spending $10K on a paint job...that is approx half of what I spent on the RV!

I will try and get the DOT on the tires, but sometimes it's hidden...or so they tell me.  I have a list of questions as well as a mobile RV guy that will come out and inspect the RV for me.  Sure hope I get a good RV!

Thanks guys!
Bring a flashlight. You will be able to find the DOT code if you're willing to crawl under the coach. It's especially important to get the code off of the inner rears. That seems to be the tires most often to be the oldest. Also check the spare. The spare on mine had never been on the road but it was rotten.

You may want to print this and take it with you so that you can decipher the DOT code:
http://www.tirerack.com/tires/tiretech/techpage.jsp?techid=11

Again, these things shouldn't be a deterrent..... It's just very important to be aware and if any tire is 10+ years old, it could be very dangerous. I would replace any tires over 6-years-old before I drove the coach home.
 
"Hidden" conveys the wrong idea re DOT codes. They are typically stamped on only one side of the tire, and that may be the back side (and 'back' depends on how the tire was mounted in the first place).  For the inner dual, it is even possible the code is between the two tires.
 
Hi Gary - you are right, hidden can be interpreted to mean hide by devious means.  In many instances, the DOT has been hidden and I have been unable to determine its age.  My assumption would then be that they are all the same age - which I am learning is the wrong assumption.  The correct assumption is that I will need to replace those tires.

My other big concern is adding seatbelts after the fact.  I initially thought I could take it to any RV centre and they could add the seatbelts.  However after calling around, that is NOT the case.  No one will do it!  Something to do with liability apparently.  I found one company that would do, if it wasn't on a slide.

This leaves me a with a dilemma.  I have 7 passengers and 5 seatbelts.  I have to add it to the dinette, as it has none.  The other thing is that the seatbelts are on the slide.  From my research, this indicates that there is nothing solid to bolt the seatbelts to.  So the question is then how are the seatbelts bolted to the frame in the couch which is also in the slide?  :-\  There must be some structural support right?  I have emailed Winnebago regarding this - to see if there is something I can bolt the seatbelts to.  I'll update once I get a response.

Thanks.
 
The seat belts on the couch are likely bolted to the couches metal frame which is subsequently fastened to the slide out floor. The dinette may not have such a sturdy frame and is not fastened to the slide out floor the same way, but likely just enough to stop it moving about. Hence the problem...

Any substantial fasteners and large washers that would be required for seat belts would likely protrude below the slide and could potentially damage the floor when the slide is retracted. The space available under there could be  quite restricted. For the couch, possibly much smaller bolts were used and more of them to spread the load.
 
Gary RV Roamer said:
"Hidden" conveys the wrong idea re DOT codes. They are typically stamped on only one side of the tire, and that may be the back side (and 'back' depends on how the tire was mounted in the first place).  For the inner dual, it is even possible the code is between the two tires.
The DOT code on my outer rears was in between the tires. I was still able to read them with a flashlight and patience. It wasn't easy but it was important to me.

In retrospect, the inner rear tires were so old and cracked that they HAD to be replaced anyway and the outers had to come off to do it.

I ended up putting 4 new tires on the rear. I put 2 of the 3-year-old tires on the front, 1 on the spare and threw the other one away. In 3 or 4 years, I'll replace the fronts and spare. It's a lot easier on the old budget to buy 3 or 4 tires at a time then to buy 7.
 
lientrac said:
This leaves me a with a dilemma.  I have 7 passengers and 5 seatbelts.  I have to add it to the dinette, as it has none.  The other thing is that the seatbelts are on the slide.  From my research, this indicates that there is nothing solid to bolt the seatbelts to.  So the question is then how are the seatbelts bolted to the frame in the couch which is also in the slide?  :-\  There must be some structural support right?  I have emailed Winnebago regarding this - to see if there is something I can bolt the seatbelts to.  I'll update once I get a response.

Thanks.
My seat belts are on the jackknife sofa that is located on our slide.

When I go out to the coach tomorrow, I can take pics of the installation if you want me to.
 
I had seat belts in the forward facing side of the dinette which is on the slide of our 1999 Brave 35C. Something to consider is what would happen in a motor home accident. There are a lot of things that would start flying around inside the motor home. I removed the dinette from motor home and went with credenza against wall, original table mounted to credenza and chairs. I cut quite a bit off the slide to make room for the chairs. The slide is constructed of fairly heavy metal and there is quite a bit of clearance under it. I don't remember how the seat belts were fastened down, but I believe they were just bolted onto the dinette.
 
:D 
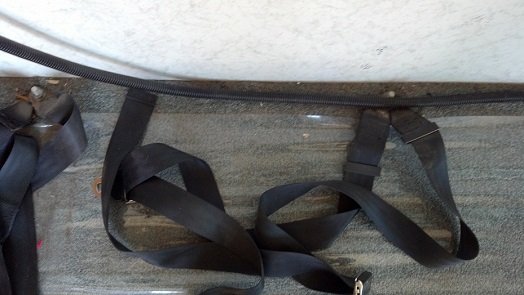
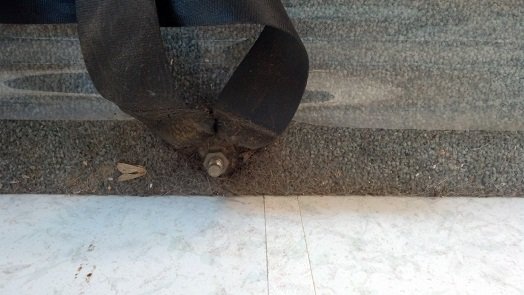
Thanks Wavery!  That would be highly appreciated!  It would be interesting to see how the seatbelts are fastened in the Winnebago. 

@ John Hilley?  Really, do you think that it was just bolted to the dinette frame?  I have been reading that its not that secure and it wouldn't hold the force of a 50lb child in an accident!  Had me really worried about installing the seatbelts myself!

I was already planning to remove the table when the RV is in motion to reduce the risk of them banging into the table and hurting themselves in the event of a sudden stop or accident.  If it was simply bolted to the dinette, then definitely something to think about!

Does anyone else out there have a Winnebago Vectra with factory installed seatbelts that can share their knowledge of how seatbelts are secured in a dinette?

Thanks guys!

;D

 
By law and inspection, factory installed seatbelts are always attached to the frame through the floor.

I once was an RV Purchasing Manager for Starcraft and then a Marketing Manager for Coachman. It costs more, but please make sure they are attached to heavy metal.
 
Your best solutiomn may well be to install a bench seat or love seat where the chair is behind the passenger seat. In our 99 Brave, that is where the wheel chair tie downs are mounted for our son's wheel chair. You have access through the front basement compartment door. The restraints are bolted through the floor with a metal bar on the bottom against frame members. The slide on the Vectra is identical to the slide on our Brave. We have the couch removed and I will take pictures of the seat belt mounts on the slide under where the couch goes. We are replacing the jack knife sofa with a hide a bed. This is where my wife and I sleep as the bedroom now has a hospital bed and Hoyer lift.
 
Pictures of seat belts and seat belt bolt on slide under couch.


Attachments

  • Seatbelts on Slide.jpg
    Seatbelts on Slide.jpg
    62.6 KB · Views: 23
  • Seatbelt Bolt.jpg
    Seatbelt Bolt.jpg
    66.1 KB · Views: 20
I note with interest that the bolt comes up from underneath so that only the bolt head and perhaps a large washer are on the underside. In my previous comment I was ass_u_ming the opposite, bolt head on top remaining bolt length, nut and washer underneath. This method certainly minimizes any danger of damaging the floor when the slide comes in....

Looks like something that a DYIer could accomplish without too much effort if the area is easily accessible keeping in mind that any stress on the underside has to be spread over as big an area as possible, high strength bolts are needed etc. (Some slide-out floors may be thick but hollow between two or more layers of plywood,  as they are (somewhat) in my 5thW.)

Is that darker area next to the wall a metal bar John??
 
No there isn't a metal bar against the wall. There is a split loom with wiring in it. I looked under the dinette area and under the couch and the area is readily accessible through the basement compartment door.
 
John Hilley said:
Pictures of seat belts and seat belt bolt on slide under couch.
I won't be able to post pics of mine until Monday. The coach is parked on the street right now and I dare not open the slide-out.

We are taking the coach down to Fallbrook tomorrow to park it in the orchard for a few months. I will take pics then (if I remember  ::) ).
 
The Winnebago "Store More" slide moves the basement compartments out with the slide and allows access to the slide floor from below.
 
There is a gap between the slide-out steel floor and the top of the storage bays. I think it's about 2 1/2" (from memory).
 

Attachments

  • SlideSide a.jpg
    SlideSide a.jpg
    11.7 KB · Views: 14
Back
Top Bottom