You are using an out of date browser. It may not display this or other websites correctly.
You should upgrade or use an alternative browser.
You should upgrade or use an alternative browser.
Questions about repairing / replacing foam wall panels
- Thread starter HotTommy
- Start date
The friendliest place on the web for anyone with an RV or an interest in RVing!
If you have answers, please help by responding to the unanswered posts.
If you have answers, please help by responding to the unanswered posts.
Gregg
Well-known member
The structural integrity of the wall is the sandwiching of the lauan and the rigid foam. I would be concerned that area behind the aluminum is soft and would delaminate and you may see it from the outside after you go through all of that work. I would see what you can do to maybe remove that area if it is also deteriorating. At the very least, I would saturate that wood with some epoxy adhesive from West System or some other manufacturer to hopefully hold the wood fibers together. It is surprising how that stuff soaks into wood. I personally used a Fein Multimaster with a flat scraper blade to remove the damaged wood on mine. Took it down without gouging the Filon. If the wood is solid and not delaminated, I would leave it on and just use some of the Epoxy to attach the new foam. Not an expert but that is what worked for me.
NickB
Well-known member
Yeah, like Gregg said, the delamination will probably be noticeable from outside, but there's probably nothing you can do to fix that.
I'd remove anything that's loose and let the rest dry out completely.
Use XPS foam (not styrofoam) because you're going to need its rigidity and it needs to go in tight, no gaps.
You'll need to stage something from outside & inside to press the foam board into the adhesive. Same goes once you install the wallboard inside.
I'd also recommend epoxy for this, though you can possibly use construction adhesive or a foam board compatible contact adhesive.
This wall will never be like factory, but you should get some years out of it.
thanks so much for the advice! This is really helping me wrap my head around what has to be done and hopefully I can plan it out ahead of time.
Greg, you are correct the luan between the aluminum frame and filon is also damaged. I am going to get out as much as I can then fill in the space between the aluminum and filon with something (not sure what).
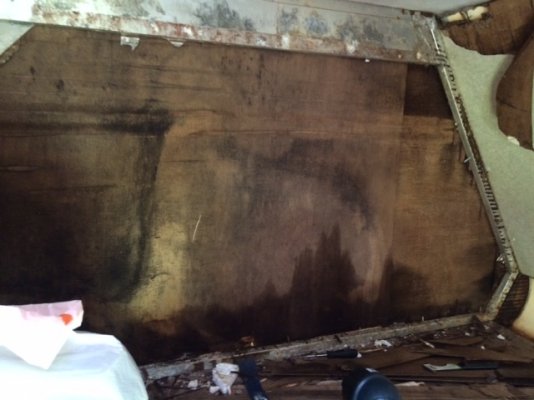
Next step will be to rebuild the wall layers. What you see in the picture is the last thin layer of luan that is stuck to the filon. The luan actually delaminated from itself. Rather that scrape it off, I think I may just leave it. It is obviously stuck on there very well since I cant scrape it off. Do you think I need to spray something on that discolored section (mold?) to kill it first?
Once the area between the aluminum and filon is filled in and the mold killed, I plan on rebuilding the wall by using an epoxy from West Marine. after reading a lot, it seems this is the best to use. What I'd like to do is put a layer of epoxy on the inside of the filon (well, actually the thin layer of luan that is left) put new luan, layer of epoxy then the XPS board, another layer of epoxy then the final (inside) layer of luan (actually may use a thin paneling that will look nice).
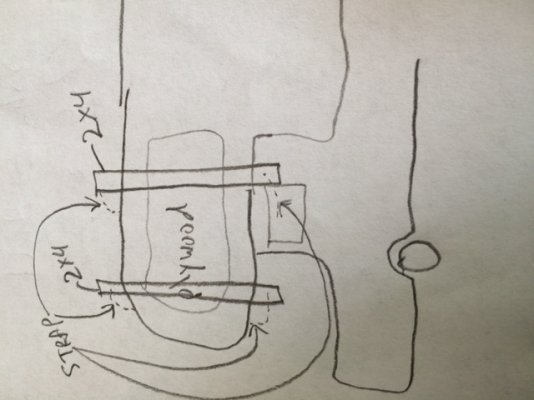
When the layers are all put together I will clamp the entire section of the wall together. How? well I am thinking about 2 or 3 2x4s on the outside holding a sheet of plywood in place. Then run long ratcheting straps from the top of the 2x4, around the roof and under the cabover to the bottom of the 2x4. On the inside of the RV I will put plywood against the newly rebuilt wall and brace it against the wall opposite it in the cabover. I'll need something adjustable so I can get it nice and tight. Maybe 5 or 6 shower curtain rods? Of course I will put plywood on the opposite wall so the shower curatin rods dont poke a hole in the luan on that side.
I drew a really terrible sketch of how it will look from outside the damaged side (drivers).
This is by far the biggest projuect I've taken on, so I appreciate any advice or critique.
Thanks
John
Greg, you are correct the luan between the aluminum frame and filon is also damaged. I am going to get out as much as I can then fill in the space between the aluminum and filon with something (not sure what).
Next step will be to rebuild the wall layers. What you see in the picture is the last thin layer of luan that is stuck to the filon. The luan actually delaminated from itself. Rather that scrape it off, I think I may just leave it. It is obviously stuck on there very well since I cant scrape it off. Do you think I need to spray something on that discolored section (mold?) to kill it first?
Once the area between the aluminum and filon is filled in and the mold killed, I plan on rebuilding the wall by using an epoxy from West Marine. after reading a lot, it seems this is the best to use. What I'd like to do is put a layer of epoxy on the inside of the filon (well, actually the thin layer of luan that is left) put new luan, layer of epoxy then the XPS board, another layer of epoxy then the final (inside) layer of luan (actually may use a thin paneling that will look nice).
When the layers are all put together I will clamp the entire section of the wall together. How? well I am thinking about 2 or 3 2x4s on the outside holding a sheet of plywood in place. Then run long ratcheting straps from the top of the 2x4, around the roof and under the cabover to the bottom of the 2x4. On the inside of the RV I will put plywood against the newly rebuilt wall and brace it against the wall opposite it in the cabover. I'll need something adjustable so I can get it nice and tight. Maybe 5 or 6 shower curtain rods? Of course I will put plywood on the opposite wall so the shower curatin rods dont poke a hole in the luan on that side.
I drew a really terrible sketch of how it will look from outside the damaged side (drivers).
This is by far the biggest projuect I've taken on, so I appreciate any advice or critique.
Thanks
John
Attachments
NickB
Well-known member
I think you're on the right track, John. We've never used straps like that. Our rebuild guy just stages up a few deadmen and some plywood. He goes to opposite walls or furniture from the inside and whatever he can brace against on the other (usually another trailer). He just wedges them in place to give a bit of pressure.
Gregg
Well-known member
If you want to dig out the wood between, is it possible to slip new luan behind? Maybe stagger the joints so it would be stronger. Will try and draw something and attach. The dotted lines on the drawing will represent smaller pieces of Luan so you can maneuver them behind the metal studs. Guess this suggestion would depend on how much play there is between the metal studs and the Filon. If it is not loose, then I would try and use the Expoxy to solidify the fibers and just leave well enough alone. That is essentially what is going on when people are injecting the Epoxy in a delaminated area without actually opening anything up from the inside. Maybe NickB can share if he has seen anything similar done where he works, but that would be my approach based on my limited dealings with this type of issue. At this point, would it be easier to just remove the Filon so you could apply the luan from the outside? Not sure how large of an area you are dealing with based on the pictures.
As far as the mold is concerned, I think I would use some of the Concrobium MoldControl stuff available at the Orange Big Box Store. That is what a water remediation company recommended when I talked to them.
As far as the mold is concerned, I think I would use some of the Concrobium MoldControl stuff available at the Orange Big Box Store. That is what a water remediation company recommended when I talked to them.
Attachments
NickB
Well-known member
If you truly need to replace the luan, it should be done from outside, pulling all moldings, etc. Even then, you're going to have a heck of a time getting it off of the fiberglass.
Your pics don't look that bad to me. Just remove what's actually loose and let it dry out. If you have voids between some of the alum studs and the filon, fill them with construction adhesive or epoxy and press them in place like we talked about. The luan was there as a substrate to glue the fiberglass to in order to keep it flat. You're basically going to be gluing/epoxying everything together instead. It won't be perfect, but it should be functional.
Your pics don't look that bad to me. Just remove what's actually loose and let it dry out. If you have voids between some of the alum studs and the filon, fill them with construction adhesive or epoxy and press them in place like we talked about. The luan was there as a substrate to glue the fiberglass to in order to keep it flat. You're basically going to be gluing/epoxying everything together instead. It won't be perfect, but it should be functional.
Gregg
Well-known member
Jangelj. How much of the original luan is actually left? I know when I repaired an area, it looked very similar to your picture and that was after the luan was actually removed. Kind of like an image of the luan was left on the Filon but no structural material left if that makes sense. If there is wood there, totally agree with NickB do not remove but keep in mind it needs to be solid enough to keep the filon adhered to the wall otherwise you will end up with a large delaminated area. You have gone to this level to repair, removing the Filon may actually be a time saver along with the proper way of replacing the luan, but only if it is actually structurally damaged.
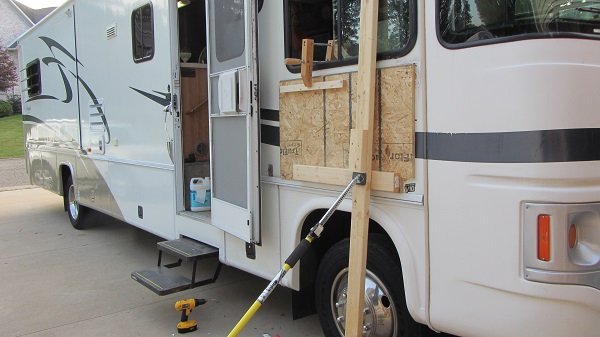
If have added a photo of how I braced mine during the repair that I did.
If have added a photo of how I braced mine during the repair that I did.
Attachments
Thanks again, guys. The Luan is almost completely removed (other than what is behind the aluminum). What you see in the pics is a paper thin layer of luan that is adhesed to the filon. It is so stuck on and so thin that I am going to leave it. I can not get all the crumbling Luan behind the aluminum because there is a wide piece of aluminum then a slide out. I really don't want to mess with the slide out wall since it is not damaged.
I really don't want to remove the filon for lots of reasons. Mostly I'm scared.") . Also, I just recaulked and eternabonded the roof to fix the leak and I don't want to undo it all. I called west marine and they have some sort of adhesive filler that I will try in that space. Then I can rebuild the rest of the wall with 1/8 inch panel board http://m.homedepot.com/p/Unbranded-Utility-Panel-Common-1-8-In-x-4-Ft-x-8-Ft-Actual-0-106-in-x-48-in-x-96-in-833096/100535208 from HD and 1 inch XPS then a layer of paneling.
. Also, I just recaulked and eternabonded the roof to fix the leak and I don't want to undo it all. I called west marine and they have some sort of adhesive filler that I will try in that space. Then I can rebuild the rest of the wall with 1/8 inch panel board http://m.homedepot.com/p/Unbranded-Utility-Panel-Common-1-8-In-x-4-Ft-x-8-Ft-Actual-0-106-in-x-48-in-x-96-in-833096/100535208 from HD and 1 inch XPS then a layer of paneling.
I'll post more pics and update next week when I continue the work.
I really don't want to remove the filon for lots of reasons. Mostly I'm scared.
. Also, I just recaulked and eternabonded the roof to fix the leak and I don't want to undo it all. I called west marine and they have some sort of adhesive filler that I will try in that space. Then I can rebuild the rest of the wall with 1/8 inch panel board http://m.homedepot.com/p/Unbranded-Utility-Panel-Common-1-8-In-x-4-Ft-x-8-Ft-Actual-0-106-in-x-48-in-x-96-in-833096/100535208 from HD and 1 inch XPS then a layer of paneling. I'll post more pics and update next week when I continue the work.
Gregg
Well-known member
I do not know what experience you may already have doing this kind of work so just passing along some food for thought. Once you take the luan from behind the aluminum, you will need to maintain that spacing. You need to maintain that uniformity or you will see it from the outside when you are done. That was the reason I was suggesting using narrower pieces of luan and sliding it behind. I would not start the actual assembly until I had a piece of plywood on the outside to hold the proper spacing and help maintain a flat working surface. One area that I did some work on I was not able to remove the luan. A year later that area has now delaminated because it has broken down. I will now have to repair that area from the outside since the inside is all new. Fortunately it is really cosmetic in that particular area.
The West System Epoxy is great stuff. There was an area above one of my wheel wells that I replaced. The Epoxy itself is almost like a paint and can be rolled on. Although I used a piece of Marine Plywood, I still used it to totally seal the underside and ends of the wood. It soaked in and the surface of the wood is now water proof. The filler that West Marine was mentioning actually comes in two thicknesses. The Epoxy by itself is really thin and it will just run down a wall. Don't ask but found that out the hard way. :-[ The filler material is like a thickening agent and helps hold everything together. I believe they stated it also reduces some of the brittleness. Used it to glue the foam to the luan and worked great. Just remember if you clamp something, do not make it so tight that it squeezes all of the epoxy out. Keep us posted on how things work out.
The West System Epoxy is great stuff. There was an area above one of my wheel wells that I replaced. The Epoxy itself is almost like a paint and can be rolled on. Although I used a piece of Marine Plywood, I still used it to totally seal the underside and ends of the wood. It soaked in and the surface of the wood is now water proof. The filler that West Marine was mentioning actually comes in two thicknesses. The Epoxy by itself is really thin and it will just run down a wall. Don't ask but found that out the hard way. :-[ The filler material is like a thickening agent and helps hold everything together. I believe they stated it also reduces some of the brittleness. Used it to glue the foam to the luan and worked great. Just remember if you clamp something, do not make it so tight that it squeezes all of the epoxy out. Keep us posted on how things work out.
Gregg, I have no experience with this kind of work. But I look forward to learning on the fly. I understand what you mean about the spacing between the aluminum and the filon. I plan on digging out as much of the old Luan as possible. Unfortunately I believe I'll only be able to get about half of it out, and it won't be pretty. I think that behind the aluminum is where the damaged is less significant so the Luan is less damaged and therefore difficult to remove. That is why I thought using the filler material from West Marine would work. Do you think it is thick enough to fill in that space? It is about 4 inches wide and maybe 3 feet tall (and of course needs to be 1\8" thick).
Also, I understand the importance of cutting the xps to be a tight fit. If there is any gap, before I epoxy it all together, I was thinking a little Great Stuff would fill the gap left by the xps board.
Also, I understand the importance of cutting the xps to be a tight fit. If there is any gap, before I epoxy it all together, I was thinking a little Great Stuff would fill the gap left by the xps board.
Gregg
Well-known member
OK that helps. When digging the luan out, sounds like you will have voids then maybe some solid material. I think I would get some caulk putty that is in a rope 1/4" or 1/2" diameter. Place that along the sides of the aluminum channel to use as a form, then use the Epoxy and filler to replace the bad luan. Order some of those fillable caulk gun tubes from Amazon or where ever to help force the stuff into the areas. Once you add the epoxy filler it will not pour. Do this in stages and remove the rope putty after the epoxy sets up. Word of caution, do not force it in too much that it separates the Filon from the remaining luan or pushes out the Filon. That is why I suggested to place the plywood on the outside prior to any assembly. Also use plywood and not chip board. It will stay flatter and less movement. I used the chip board and just caused some headaches.Jangelj said:I plan on digging out as much of the old Luan as possible. Unfortunately I believe I'll only be able to get about half of it out, and it won't be pretty. I think that behind the aluminum is where the damaged is less significant so the Luan is less damaged and therefore difficult to remove.
Cut my foam boards with a table saw and it cut clean and was able to get it close enough that it press fitted into the space. Expandable foam is a good idea but will delay the project a day while it dries. Definitely not rocket science but is very labor intensive. Take your time and do not get in a hurry. Make sure you keep up posted on what works or did not work for you.
Gregg
Well-known member
Another good idea. To get the proper thickness, you could just run it through a planner or turn it the other way and rip it to the proper thickness on a table saw.Jangelj said:TC Tom, I thought about doing that, but a 2x4 is 1.5" thick. The Luan,xps,Luan will be 1.25". Not a huge difference but enough the it may cause future delamination.