2005 Trail-Lite Trail-Cruis Hybrid with rotten floor beneath Fridge and Cabinets

The friendliest place on the web for anyone with an RV or an interest in RVing!
If you have answers, please help by responding to the unanswered posts.

heygreene

Member
Joined
Feb 8, 2015
Posts
15
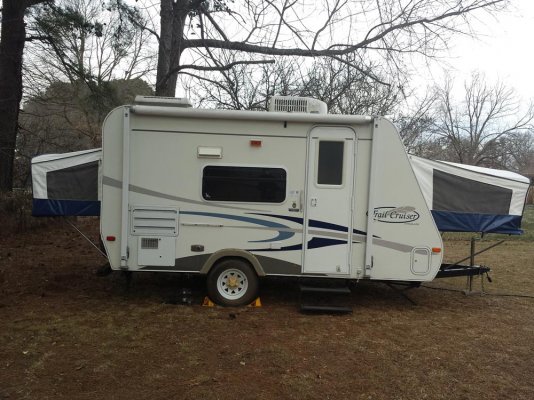
Hey everybody, I'm new here and just posted in the newcomers forum.  ;D  First off, I knew when I was buying this camper that there was a problem with it.  However, I got a great deal on it, so as long as I can do the work myself, I hope to come out with a sweet new camper for not much more money than I had in my old pop-up. 

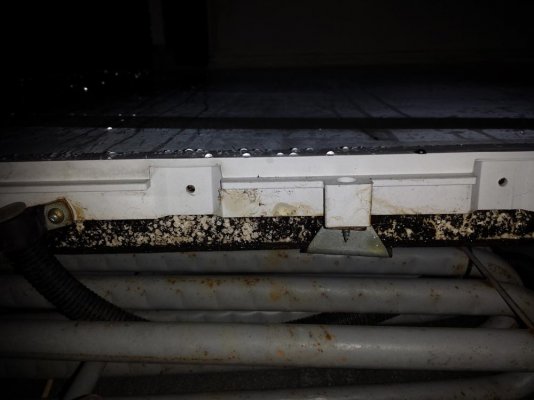
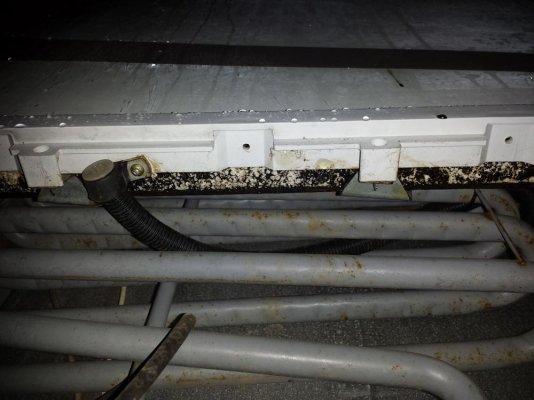
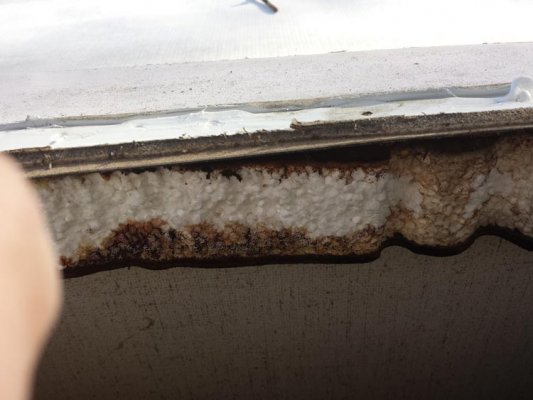
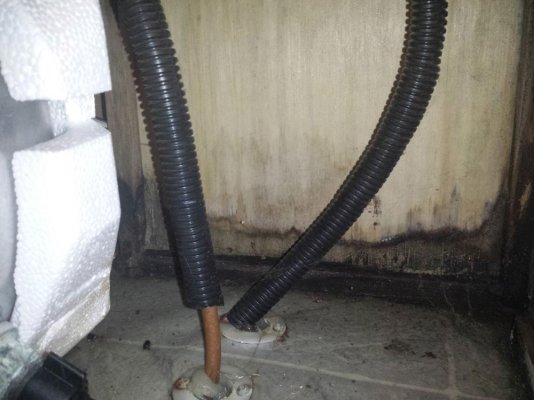
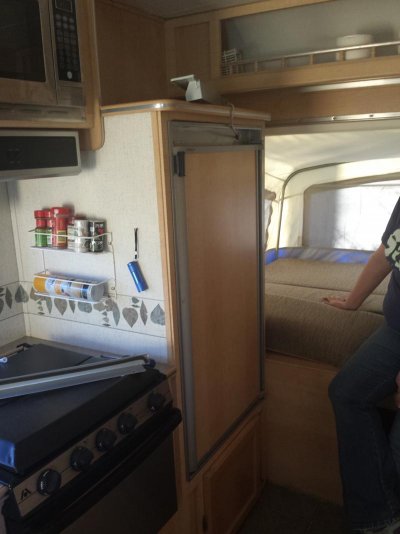
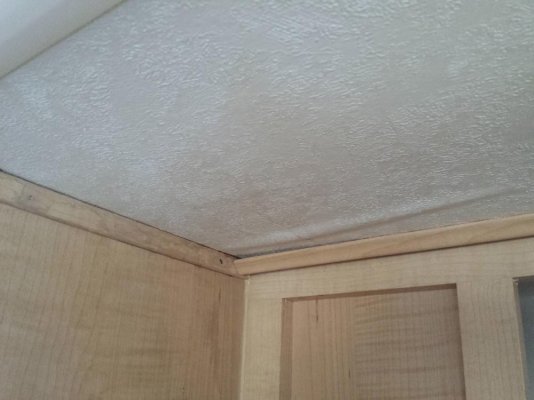
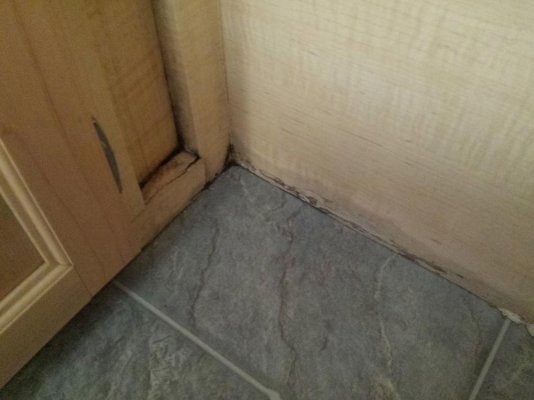
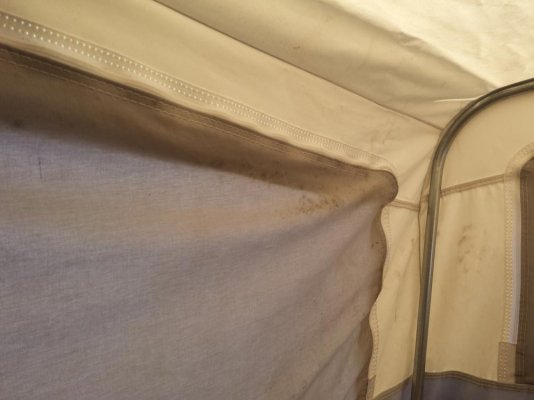
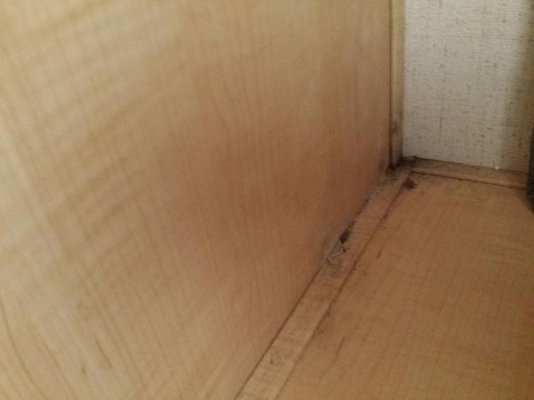
The person selling the camper told me that when he went to pop out the beds to sell it, he smelled mildew, felt a soft spot in the floor, and saw a small spot on the ceiling, wall and floor.  I confirmed that the ceiling is not soft at all, and neither is the top of the camper.  I have also verified during a hard rain that there are not any more leaks now (not sure if he patched it or not, but assuming so).  The old leak came from a leaking roof vent (the owner said due to him parking it for months completely level, as opposed to having it pitched forward to help rain run off of it (no clue how true that is).  Anyway, I took off the access panel below the fridge today and was shocked at just how bad the floor and walls are underneath there.  There is a decent amount of mildew and mold, but nothing feels wet at this time.  Therefore, my game plan is to remove the fridge, remove the cabinets attached to it, then replace the floor and wall in this area.  I have a few questions:

How the heck do I get this refrigerator out?  I see a few screws, which I've taken out, but I'm assuming everything in the access door needs to be removed as well.  However, I'm not exactly sure what.  I "think" it's just the power, gas and electrical wires.

I am planning to replace the floor in about 1/3 of the trailer (the area that is soft), but should I really get into the area underneath the fridge to replace the wood that is rotten, or should I just clean it and paint it with a mildew killer, then focus on the floor that will actually be walked on?

How do I go about getting the cabinets out without damaging them?  They seem to be glued together, and then screwed down.

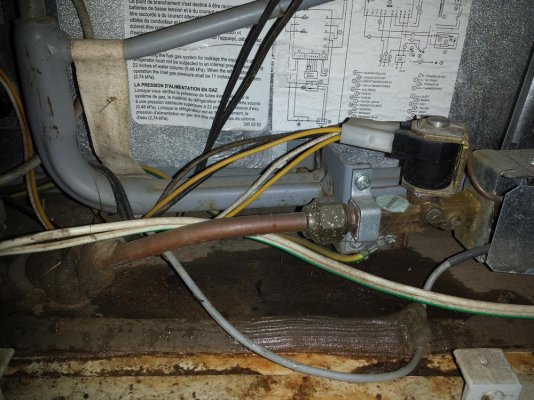
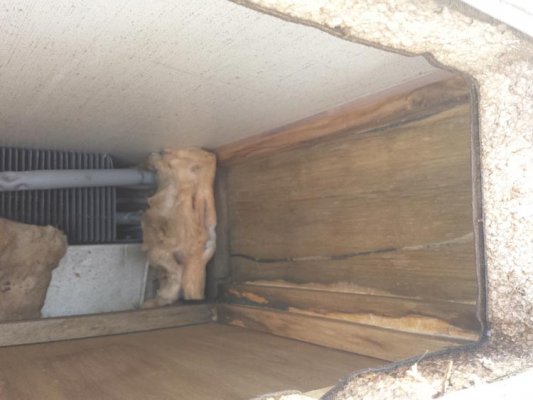
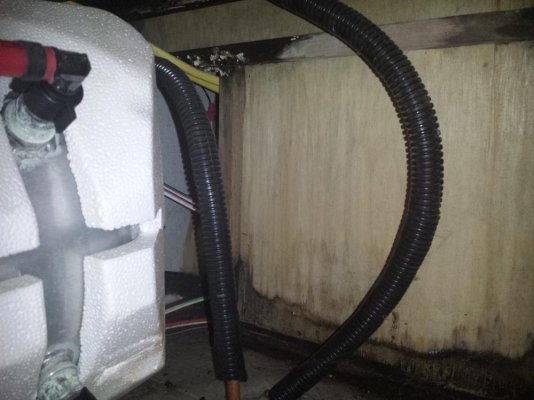
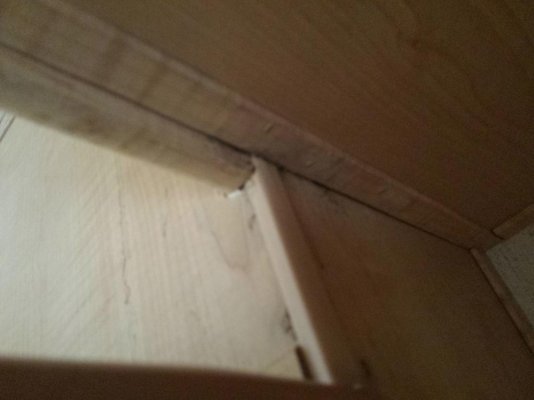
What the heck is this thing wrapped in styrofoam with water hoses running out of it in picture "163720"?  I wonder if that could have been leaking too, since the camper does not look like it leaked that long up top.

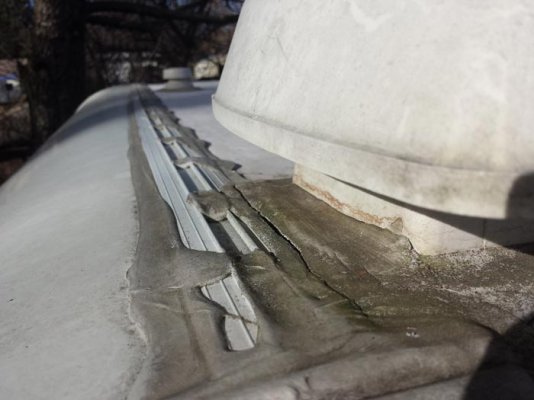
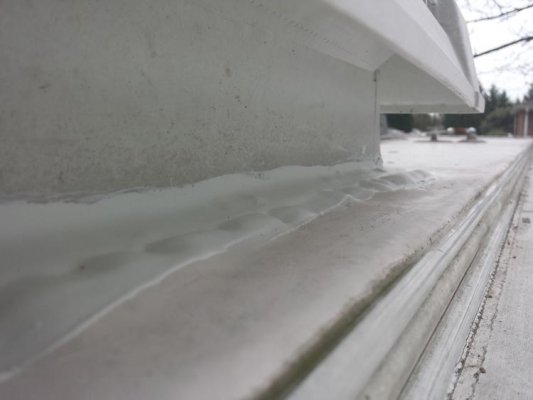
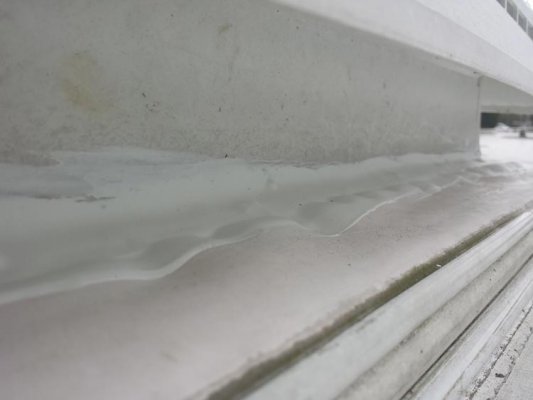
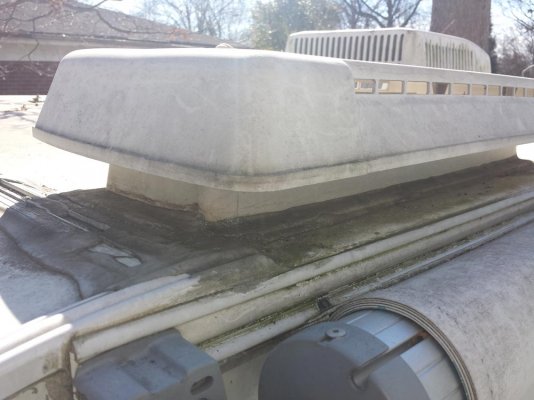
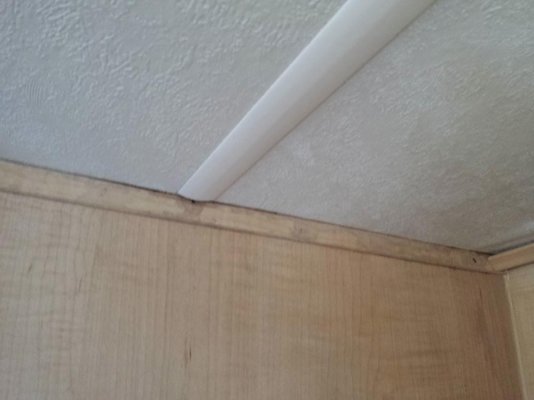
The picture of the top of the roof was to show the vent that was leaking.

Thanks,
Kenneth
 

Attachments

  • 20150131_171508.jpg
    20150131_171508.jpg
    175.3 KB · Views: 70
  • 20150131_113039.jpg
    20150131_113039.jpg
    86.3 KB · Views: 63
  • 20150208_163731.jpg
    20150208_163731.jpg
    86.2 KB · Views: 70
  • 20150208_163720.jpg
    20150208_163720.jpg
    85.3 KB · Views: 57
  • 20150208_170028.jpg
    20150208_170028.jpg
    75.2 KB · Views: 54
  • 20150131_112218.jpg
    20150131_112218.jpg
    70.5 KB · Views: 44
  • 20150131_112236.jpg
    20150131_112236.jpg
    67.2 KB · Views: 39
  • 20150131_112542.jpg
    20150131_112542.jpg
    56.1 KB · Views: 39
  • 20150131_112315.jpg
    20150131_112315.jpg
    52.7 KB · Views: 36
  • 20150131_112222.jpg
    20150131_112222.jpg
    50.5 KB · Views: 38
  • 20150131_112325.jpg
    20150131_112325.jpg
    49.7 KB · Views: 39
Looking at the outside from top to bottom:  The vent looking thing is the reefer vent.  Next is the outside access
panel for the reefer and below that the outside access for the water heater.
Somebody else will have to chime in on how to remove it all.  I'd be suspect of the reefer vent and maybe even the seal on the back drop down panel.  Water moves in mysterious ways.  I'd try to verify the source of the leak before tearing into anything.
 
mypursuit, I think you might be onto something.  It rained all day today and I went inside the camper and it is bone dry, even the "moldy" spot where it was previously wet in the hot water heater area.  I went outside and opened the top refrigerator access panel and saw a very small pool of water there.  I then looked up and noticed that there was water on the top part of it, where the fiberglass side and the styrofoam come together.  I have no idea how water would have even gotten there.  What's even scarier is I actually have my awning up right now, so this should NOT be getting much rain on it, if any at all.  It also hasn't really rained that hard all day.  I've attached some pics.  Thanks!
 

Attachments

  • 20150209_201848.jpg
    20150209_201848.jpg
    67.3 KB · Views: 57
  • 20150209_201924.jpg
    20150209_201924.jpg
    89.5 KB · Views: 47
  • 20150209_201830.jpg
    20150209_201830.jpg
    166.2 KB · Views: 52
Was anybody able to check out the latest pics I uploaded?  I'll take advice or opinions as to whether this area should be wet at all, or not.  Thanks!
 
Welcome to The RV Forum, Kenneth!

No, it should not be wet behind the refrigerator at all.

Looking at the second picture in the first set (the refrigerator vent) it looks like you have a caulking problem around the vent itself.  Specifically, the gaps in the caulking where the roof transitions to the rear cap behind the vent, and the crease or crack on the side of the vent where the roof meets the side wall.

The refrigerator vent lid should pop off to allow access to these areas, then carefully scrape off as much of the old caulk as you can.  Be careful though - you don't want to damage the EDPM rubber roof membrane underneath the caulk.

At the least, clean off the mold and dirt using a scrub brush and soap and water so the new caulk has a clean surface to adhere to.

Then get a tube of self leveling caulk for EDPM roofs - probably from an RV parts place - and re-do the area around the refrigerator vent, paying particular attention to the areas where you have cracks, etc. now.

To remove the refrigerator, look at the trim around the front door - there should be several screws holding the refrigerator to the front of the cabinet.

Then open the rear access door and look at the refrigerator's bottom frame members - you may find a couple more screws holding the base in place.

Disconnect the gas line (make sure the tank valve is turned off first!), disconnect the 12 volt and 120 volt electric lines (if you have an electric mode the 120 volt power should just plug into an outlet behind the fridge) and it should slide out the front of the cabinet.
 
Lou, thanks for the information.  As soon as the ice thaws out here, I plan to get up on the roof and check this out.  I'll let you know how it turns out.  Thanks again!
 
IMO it looks like your roof caulking needs work too.  If your refrigerator vent is anything like the ones on every class A I've worked on you will have to remove some sealant from the top of the vent cover in order to remove some screws that hold the cover on.  On warm dry day remove all loose sealant and clean the good areas with acetone. Then use a good self leveling lapsealant.  I usually use dicor self leveling lap sealant.  Once you get the unit sealed up you will be able to fix your floor and mold problem once and for all.  Checking the roof should be done a couple times a season and the seams redone at least every other season.  Good luck and happy camping.


\Mike 
 
Everybody, thanks for the info.  I just removed the refrigerator roof vent, cleaned it all and then (maybe incorrectly) put Dicor down, then installed the roof vent, then put Dicor around the top.  I did NOT put Butyl tape down.  Did I just screw up and am I going to have to do it all again?  I feel good about the job I did, but I want to make sure it sticks and I get no leaks.  Now I'm worried I messed it up, but I did caulk the crap out of it with Dicor.  Lesson learned, do my research FIRST!  Thanks.
 
I guess I misunderstood what everyone had posted earlier.  For clarification:  I removed the vent entirely, scraped all old caulk off (that was a JOB!), cleaned the area and the vent with mineral spirits, then caulked the rubber roof and the vent.  I put the vent back in, and screwed it back down (made sure caulk squeezed out the sides everywhere), then caulked all around the entire top of the vent, covering the screw holes and creating somewhat of a transition to the roof.  On second thought, I'm not sure that the butyl tape would have worked anyway, since it would have required some pressure/down force to pull the putty into the cracks and secure it.  The roof, from all of the water seeping in, was somewhat soft, and no matter what size or type of screw I tried to use, it never fully screwed down tight into the roof.  I can take some pictures of the finished product tomorrow, but I ran out of light today.  I'd welcome any advice here... I want this thing to be done and not leak any more.  Thanks!
 

Attachments

  • 20150308_172631.jpg
    20150308_172631.jpg
    43.3 KB · Views: 28
  • 20150308_175256.jpg
    20150308_175256.jpg
    53.6 KB · Views: 26
  • 20150308_175312.jpg
    20150308_175312.jpg
    48.9 KB · Views: 29
OK me one more time.  So I checked the roof today and the Dicor looks fine for the most part, although a little thin in a few places.  I can fix that this weekend by putting another coat on the top of it.  However, what has me concerned is the rubber roof now looks "wavy" around the vent, which is causing the Dicor to wave, as well.  It seems sealed fine, but will this go away?  I found one mention of this somewhere else, and the person said it would go away "with time"... whatever that means.  Sorry for so many posts on this, but I'm getting worried that I may have done more damage than good.  Thanks!
 

Attachments

  • 20150309_180834.jpg
    20150309_180834.jpg
    29.4 KB · Views: 28
  • 20150309_180826.jpg
    20150309_180826.jpg
    26.5 KB · Views: 23
Well, I contacted Dicor since I never got a response here, and here is the conversation that we had:

Me:  Hi, I used Dicor lap sealant on the top of my travel trailer to seal my refrigerator vent yesterday. I have a rubber roof, and I applied the Dicor directly to the roof, then put down the vent. My roof is now "wavy" and bowed up where the Dicor came in contact with it. Is this normal, and will it go "back down" with time? Thank you!

Dicor:  If you put the vent on top of the lap sealant, you have the solvents in the lap sealant trapped.  It will take time, but the solvents will evaporate and release the rubber.  The membrane will eventually lay flat again.  This could take up to 30 days (depending on how heavy you applied the lap sealant).

Me: One more question:  Can Dicor function as a replacement for butyl tape, in the way that I used it?  Meaning, can I put it directly onto the rubber roof, create a "gasket" of sorts with the Dicor, and then apply the vent on top of it, or am I just asking for trouble by not using the butyl tape in combination with Dicor?

Dicor:  You need to use the butyl tape.  It is actually the primary seal.  The lap sealant is ?added? protection.


End of Conversation. 

I did as Dicor said and pulled the roof vent back off. I cleaned it, put down the butyl tape, resealed it with Dicor and life is good now.  No more leaks, and the roof "waves" settled down and look fine now (took a couple of weeks).  Hope this helps somebody else.  Thanks.
 

Latest posts

Forum statistics

Threads
131,915
Posts
1,387,344
Members
137,667
Latest member
awiltzius
Back
Top Bottom