thoughtsfromjules
Member
I am excited to be embarking on this journey. I have been wanting to redo a trailer for quite some time! We have had a couple newer travel trailers in the past we sold our last trailer about 7 years ago to get debt-free and we became a wall tent camping family. While we enjoyed the wall tent, and we have a great customized set up, we noticed we didn't go camping near as much because of the effort to pack/unpack/set everything!
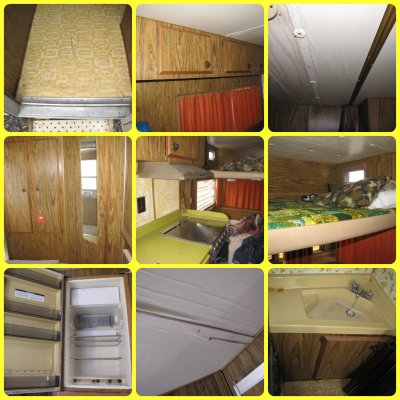
We purposefully went with an older trailer so we could learn about redoing them in a small project first, and I didn't want the performance pressure of a true "vintage era" unit that I would feel bad if I didn't keep it true to it's age or style. We purchased this unit for $500 cash. It is a 1974 Terry 21' travel trailer.
We are a pretty handy family. We have completely/extensively remodeled 2 homes. We love woodworking and DIY projects. I think we are going to love his project! We mostly camp with no hook-ups in the mountains rather than RV parks etc. Once in a while, we take a vacation to the Oregon Coast and we have a Yellowstone trip planned for late summer as well that will include established camp grounds.
That was a lengthy intro (sorry)....now for the things about our trailer we like.....
Things we like:
* It has a pressurized water tank, however I am not sure how long pressure lasts and the compressor needs work....we have a portable air compressor, but we may have to abandon this and go with a 12v pump (like a more modern trailer). I like the "idea" of it not drawing battery every time we need to use the water. The tank holds air pressure great so far, we can run the shower full open for 6 mins before the pressure diminishes. I imagine if we were careful and shut off the nozzle during part of our shower we could stretch that to a 10 min shower easily.
* It has a radiant style heater rather than a forced air furnace. In our past trailers, we always ran out of battery at 2 a.m. and FROZE the rest of the night because of the furnace fan took so much battery power to operate. I like that it only runs on gas and doesn't draw down the battery. I am not sure how warm it will keep us when the temps drop in fall hunting seasons though. It does fire up and heat comes out well on the test lighting.
* It is 21' so we can pull it with our 1/2 ton suburban. We will need to be careful about how much weight we add to it in the remodeling process. It will be a tight fit for all 6 of us, but we wanted something smaller on purpose and two people can sleep comfortably in the back of our suburban or the boys like tent camping if the nights are warm enough (we also have a large wall tent with wood stove we use as a mess hall for longer camping trips or when we have a crowd for hunting seasons etc).
* It has a bathroom! It is even big enough to move around in a little! I also LOVE that the toilet is brand new! Us girls are just excited to have running water at all! It has been a loooong 7 years with the wall tent camping scenario with only a very basic outhouse set up. I kinda like the yellow sink and shower too.
* It has a LOT of storage space for such a small unit. Although, I think we will have to do a back bumper extension to carry our generator (if we need one), water jugs, extra cooler (no way a family of 6 can eat out of a tiny RV frig for very long lol), fuel jugs, a bike or two etc.
* Almost everything we have tested works so far! Frig works (on gas at least), oven and stove burners work, heater works, plumbing is good (we fixed one split 90 fitting real quick and if we have any more issues DH wants to redo it all in PEX because we are huge fans of it and we have some parts and pieces already.), water tank is good, it has a new black tank and new toilet, the fixtures are all nice and functional, things seem to be well built. The only things I am not 100% sure on are the range hood (haven't hooked up a battery yet), we were told that the compressor to pressurize the tank doesn't work very well, and I am really not sure about the water heater. It doesn't have a plug in it right now, so I am wondering if that is missing or I just need to find it in the trailer etc). I have confidence it will be a simple fix. It is a gas only water heater. If it is not an easy fix we have a great RV service place in town and I would be happy to pay someone to fix it for us or to replace it if it came to that.
* The foam cushions are all in good condition, not smelly, and very comfortable! Yay! I was worried about that!
* I actually like the exterior quite a bit, but if after resealing the leaks and after we finish redoing the inside we feel like the outside needs a once over, we will repaint it as well. For sure we will sand the visible frame and entry step and repaint those.
The things I want to do to it in the remodel (or things we don't like):
* The first thing we are going to do is install Carbon Monoxide and Smoke alarms. It doesn't have any! So that is #1 because the kids are dying to sleep out there, and I don't want them dying.
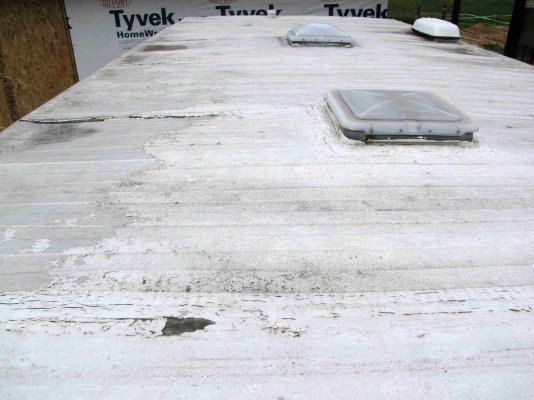
* Seal it up! The roof is aluminum and the crimped seams leak about 2 hours after it stops raining, it comes out right by the skylight vent, but it isn't actually the vent leaking I don't think. It is traveling from both sides on the underside of the roofing and finally dripping by the vent and out. We need to seal the seams on the roof with Eternabond tape after we remove the old sealing material and coating they put on the ceiling and decide if we just want to seal the seams and reseal under the trim pieces on exterior etc or if we want to recoat the entire roof with a coating to help keep it cool etc. Something I plan to ask all of you in future posts. We will probably remove windows and reseal those with the putty tape just to be sure we are water tight. There is also a leak either near the entry door or the rear storage compartment (or both) because the floor is soft in that section.
* The ceiling panels have some rippling effects where the white wallpaper type facing has wrinkled from the moisture, but we don't detect any mold or mildew yet. We predict there will be some bleaching involved to kill the possible mildew or mold issues, and Kilz oil base paint on the framing if we do find some as we look deeper. We fully expect to find more issues as we go along. I took one ceiling panel section down to see where it was leaking when it was actively dripping after a thunderstorm recently. The wood is solid, but there is a few water marks (we live in a fairly dry area so that helps).
* After the leaks are sealed...we will need to replace the coating on the ceiling boards at the very least (textured paintable wallpaper maybe?) and or replace the ceiling completely. I also want to add rigid foam insulation to the ceiling, probably the walls too if we have to tear into those for any reason. I am considering adding a couple more roof joists directly underneath those seams in the roofing that have a very slight arch shape for better run off and support of the seams as well. All the seems seem to have sagged lower on the roof and water pools in all the wrong places!
* New subfloor section by entry door (at least a 1/2 of a 4x8 sheet area will be needed) the softness is right by the door where you step into the trailer...in fact you can't use the step to get in because the subfloor is rotted and the bolts for the step aren't holding into anything). This means I will need to take out the closet area to be able to replace a section to make sure it is solid. We will probably also need to replace the door frame all around in case there was a leak around the door causing the issue in the first place, then reinstall the door with new sealant.
* New flooring (because we have to replace some subfloor and because I don't the 1970's yellow pattern going on right now). haha Will probably go with some sort of peel n stick tile or wood look plank. If we have to gut the trailer for some reason we might do a sheet laminate but I would rather not deal with intricate cuts around all the furniture....no thanks! I would rather do that one piece at a time with peel n stick type flooring.
* Paint the interior....there is a lot of wood paneling on the interior that screams 1970 and it just has a dingy hue to it. So we plan to freshen up and brighten up the look inside. I would love to go with a patriotic color scheme (walls off white, and maybe the kitchen base cabinet section blue) or a fun cabin theme depending on what materials I find when the time comes.
* Add some character to the interior! We want to paint the frig with chalkboard paint, repaint the bright avocado green countertops with a granite stone looking spray paint and seal with 2 part epoxy. Make new curtains and reupholster the cushions (I love to sew, and enjoy a challenge). I am particularly looking forward to redoing that 3 fold goucho sofa cushion (I can't find tutorials on how to do it so I am going to try to make one). I also thought it might be fun to make a rustic door to look like an outhouse with a moon shape accent etc. Repaint the light fixture bases that are brassy looking with flat black, replace the knobs for the cabinets (flat black simple knobs), possibly a fun blacksplash wallpaper or peel n stick tile look. Add baskets and decors on the walls for creative storage etc.
* My hubby will repack the bearings, check the springs, inspect the frame, and we will likely replace the tires as well. We will replace the RV battery as well. We are also expecting the propane tanks to be the older style that they will no longer refill....hope not, but at least we are aware this might be an issue we will have to address.
Can you tell this really has been a long time dream to take on a project like this? Haha. I love to take photos and share them as we go along and tell the story of what we are doing etc. So hopefully this will be a place I can do this.
I will have a lot of questions and some dilemmas as we go along, and I am hoping this will be a great place to glean wisdom from those that have gone through this particular process before us. We know there is a lot to learn, and we will have to be very careful not to overbuild this thing. Trailer framing is soooo different than what we are used to.
I will edit photos and try to upload some in my next post.
Hope everyone is having a great day and making some fun plans with your RVs for the summer! I can't wait to get to know some of you on here and follow along on your adventures and projects as well.
We purposefully went with an older trailer so we could learn about redoing them in a small project first, and I didn't want the performance pressure of a true "vintage era" unit that I would feel bad if I didn't keep it true to it's age or style. We purchased this unit for $500 cash. It is a 1974 Terry 21' travel trailer.
We are a pretty handy family. We have completely/extensively remodeled 2 homes. We love woodworking and DIY projects. I think we are going to love his project! We mostly camp with no hook-ups in the mountains rather than RV parks etc. Once in a while, we take a vacation to the Oregon Coast and we have a Yellowstone trip planned for late summer as well that will include established camp grounds.
That was a lengthy intro (sorry)....now for the things about our trailer we like.....
Things we like:
* It has a pressurized water tank, however I am not sure how long pressure lasts and the compressor needs work....we have a portable air compressor, but we may have to abandon this and go with a 12v pump (like a more modern trailer). I like the "idea" of it not drawing battery every time we need to use the water. The tank holds air pressure great so far, we can run the shower full open for 6 mins before the pressure diminishes. I imagine if we were careful and shut off the nozzle during part of our shower we could stretch that to a 10 min shower easily.
* It has a radiant style heater rather than a forced air furnace. In our past trailers, we always ran out of battery at 2 a.m. and FROZE the rest of the night because of the furnace fan took so much battery power to operate.
I like that it only runs on gas and doesn't draw down the battery. I am not sure how warm it will keep us when the temps drop in fall hunting seasons though. It does fire up and heat comes out well on the test lighting.* It is 21' so we can pull it with our 1/2 ton suburban. We will need to be careful about how much weight we add to it in the remodeling process. It will be a tight fit for all 6 of us, but we wanted something smaller on purpose and two people can sleep comfortably in the back of our suburban or the boys like tent camping if the nights are warm enough (we also have a large wall tent with wood stove we use as a mess hall for longer camping trips or when we have a crowd for hunting seasons etc).
* It has a bathroom! It is even big enough to move around in a little! I also LOVE that the toilet is brand new! Us girls are just excited to have running water at all! It has been a loooong 7 years with the wall tent camping scenario with only a very basic outhouse set up. I kinda like the yellow sink and shower too.
* It has a LOT of storage space for such a small unit. Although, I think we will have to do a back bumper extension to carry our generator (if we need one), water jugs, extra cooler (no way a family of 6 can eat out of a tiny RV frig for very long lol), fuel jugs, a bike or two etc.
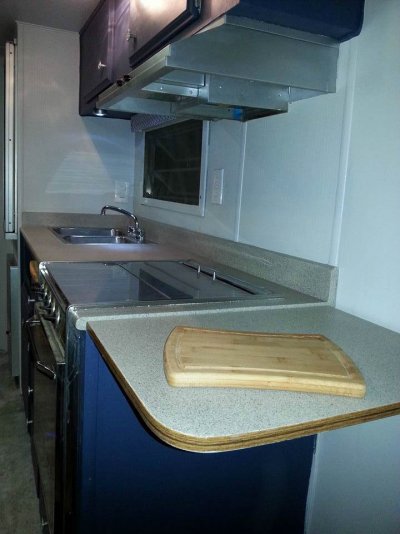
* Almost everything we have tested works so far! Frig works (on gas at least), oven and stove burners work, heater works, plumbing is good (we fixed one split 90 fitting real quick and if we have any more issues DH wants to redo it all in PEX because we are huge fans of it and we have some parts and pieces already.), water tank is good, it has a new black tank and new toilet, the fixtures are all nice and functional, things seem to be well built. The only things I am not 100% sure on are the range hood (haven't hooked up a battery yet), we were told that the compressor to pressurize the tank doesn't work very well, and I am really not sure about the water heater. It doesn't have a plug in it right now, so I am wondering if that is missing or I just need to find it in the trailer etc). I have confidence it will be a simple fix. It is a gas only water heater. If it is not an easy fix we have a great RV service place in town and I would be happy to pay someone to fix it for us or to replace it if it came to that.
* The foam cushions are all in good condition, not smelly, and very comfortable! Yay! I was worried about that!
* I actually like the exterior quite a bit, but if after resealing the leaks and after we finish redoing the inside we feel like the outside needs a once over, we will repaint it as well. For sure we will sand the visible frame and entry step and repaint those.
The things I want to do to it in the remodel (or things we don't like):
* The first thing we are going to do is install Carbon Monoxide and Smoke alarms. It doesn't have any! So that is #1 because the kids are dying to sleep out there, and I don't want them dying.
* Seal it up! The roof is aluminum and the crimped seams leak about 2 hours after it stops raining, it comes out right by the skylight vent, but it isn't actually the vent leaking I don't think. It is traveling from both sides on the underside of the roofing and finally dripping by the vent and out. We need to seal the seams on the roof with Eternabond tape after we remove the old sealing material and coating they put on the ceiling and decide if we just want to seal the seams and reseal under the trim pieces on exterior etc or if we want to recoat the entire roof with a coating to help keep it cool etc. Something I plan to ask all of you in future posts.
We will probably remove windows and reseal those with the putty tape just to be sure we are water tight. There is also a leak either near the entry door or the rear storage compartment (or both) because the floor is soft in that section.* The ceiling panels have some rippling effects where the white wallpaper type facing has wrinkled from the moisture, but we don't detect any mold or mildew yet. We predict there will be some bleaching involved to kill the possible mildew or mold issues, and Kilz oil base paint on the framing if we do find some as we look deeper. We fully expect to find more issues as we go along. I took one ceiling panel section down to see where it was leaking when it was actively dripping after a thunderstorm recently. The wood is solid, but there is a few water marks (we live in a fairly dry area so that helps).
* After the leaks are sealed...we will need to replace the coating on the ceiling boards at the very least (textured paintable wallpaper maybe?) and or replace the ceiling completely. I also want to add rigid foam insulation to the ceiling, probably the walls too if we have to tear into those for any reason. I am considering adding a couple more roof joists directly underneath those seams in the roofing that have a very slight arch shape for better run off and support of the seams as well. All the seems seem to have sagged lower on the roof and water pools in all the wrong places!
* New subfloor section by entry door (at least a 1/2 of a 4x8 sheet area will be needed) the softness is right by the door where you step into the trailer...in fact you can't use the step to get in because the subfloor is rotted and the bolts for the step aren't holding into anything). This means I will need to take out the closet area to be able to replace a section to make sure it is solid. We will probably also need to replace the door frame all around in case there was a leak around the door causing the issue in the first place, then reinstall the door with new sealant.
* New flooring (because we have to replace some subfloor and because I don't
the 1970's yellow pattern going on right now). haha Will probably go with some sort of peel n stick tile or wood look plank. If we have to gut the trailer for some reason we might do a sheet laminate but I would rather not deal with intricate cuts around all the furniture....no thanks! I would rather do that one piece at a time with peel n stick type flooring.* Paint the interior....there is a lot of wood paneling on the interior that screams 1970 and it just has a dingy hue to it. So we plan to freshen up and brighten up the look inside. I would love to go with a patriotic color scheme (walls off white, and maybe the kitchen base cabinet section blue) or a fun cabin theme depending on what materials I find when the time comes.
* Add some character to the interior! We want to paint the frig with chalkboard paint, repaint the bright avocado green countertops with a granite stone looking spray paint and seal with 2 part epoxy. Make new curtains and reupholster the cushions (I love to sew, and enjoy a challenge). I am particularly looking forward to redoing that 3 fold goucho sofa cushion (I can't find tutorials on how to do it so I am going to try to make one).
I also thought it might be fun to make a rustic door to look like an outhouse with a moon shape accent etc. Repaint the light fixture bases that are brassy looking with flat black, replace the knobs for the cabinets (flat black simple knobs), possibly a fun blacksplash wallpaper or peel n stick tile look. Add baskets and decors on the walls for creative storage etc.* My hubby will repack the bearings, check the springs, inspect the frame, and we will likely replace the tires as well. We will replace the RV battery as well. We are also expecting the propane tanks to be the older style that they will no longer refill....hope not, but at least we are aware this might be an issue we will have to address.
Can you tell this really has been a long time dream to take on a project like this? Haha. I love to take photos and share them as we go along and tell the story of what we are doing etc. So hopefully this will be a place I can do this.
I will have a lot of questions and some dilemmas as we go along, and I am hoping this will be a great place to glean wisdom from those that have gone through this particular process before us. We know there is a lot to learn, and we will have to be very careful not to overbuild this thing. Trailer framing is soooo different than what we are used to.
I will edit photos and try to upload some in my next post.
Hope everyone is having a great day and making some fun plans with your RVs for the summer! I can't wait to get to know some of you on here and follow along on your adventures and projects as well.