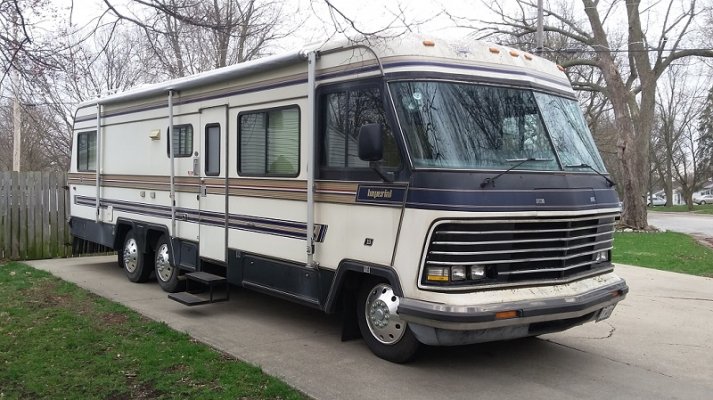
My first RV. I paid $5,500 for the rig from a car dealer my nephew is a mechanic at. Under 32k miles. Every piece of documentation for the RV was kept in a large binder since this was new. All replacement item docs were dated and added to the binder. Water damage was minimal but the most recent roof/seam coating was black on a white roof.
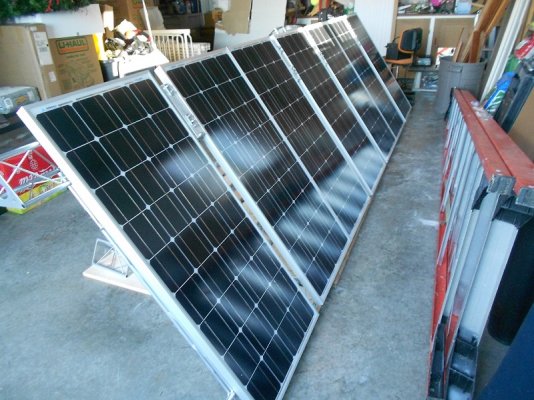
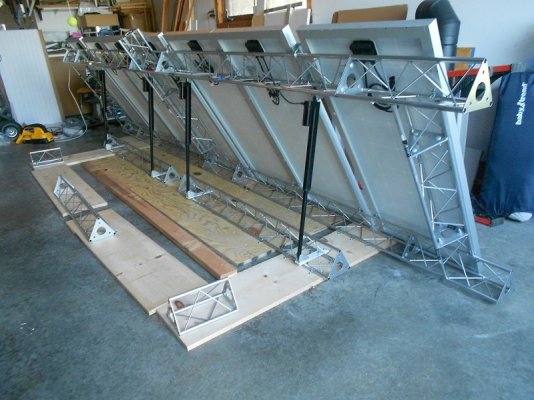
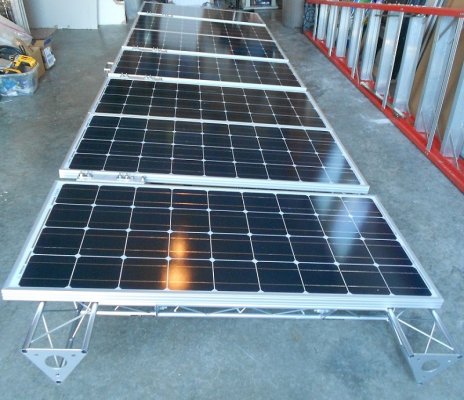
So far I have dumped about 4 times the amount I bought it for into this with some thousands more to go. The biggest chunk is going into the solar which is currently around $8,000. Six 100 watts panels, six 220ah 6v Crown AGM, 4/0 battery & inverter cables, 2/0 to old fuse center, 4ga from roof, 4ga to sound system, dual fused solar disconnect (in/out), wireless remote tilt w/ four 12? linear actuators. Magnum 2,000 Pure Sine Inverter with ME-ARC remote, Tri-Star 60 PWM controller with remote, Trimetric battery monitor, 500a shunt.
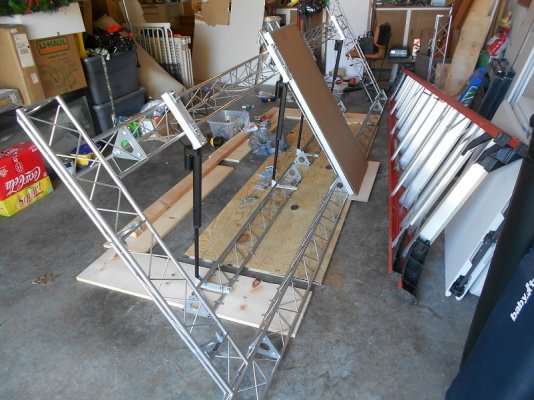
The solar tilt added about $1,000 to the cost of the electrical system. The frame is built from 6? steel triangular truss. Total weight of solar panels plus frame is under 250lbs spread out over a distance of about 14? x 4?. My background is in designing/installing commercial sound and special effect lighting systems. The solar truss is a smaller version of what I used to hang over dancefloors to mount the lights on.
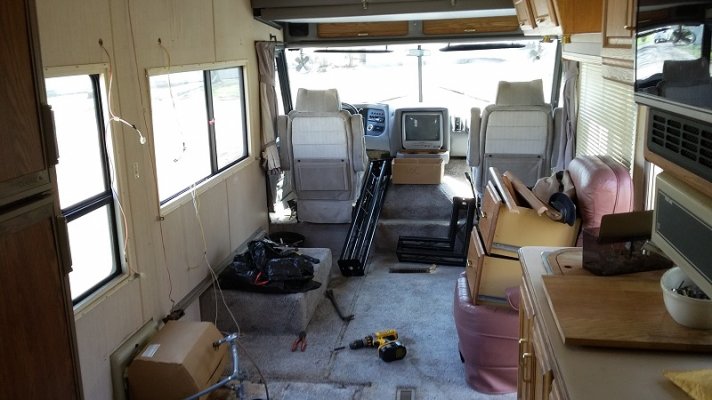
I gutted about half of the rig the day after I bought it. I removed two overhead cabinets, the dinette, sofa, two chairs and a side table up front. In the back I took out two twin beds and center night stand.
The couch I am building is made from steel 6? box truss with 3/8? rope being used to create a sling for a queen sized futon mattress. $1,000.00 in parts.
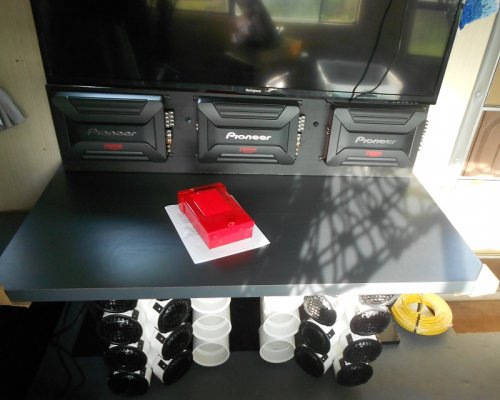
Being that my last career was as a sound designer the sound system for the rig is a bit on the extreme side. $3,000.00 in parts. Thirty drivers in total. A 30 band graphic equalizer, three 4 channel power amps, 2 active 2-way crossovers, 4 passive 3-way crossovers, twenty-four 4? woofers, two 10? subwoofers, four horn loaded tweeters. The eight bass speakers with two 4? woofers in each are made from 4? PVC and fittings. It is a bit on the heavy side but it weighs less than what I removed from that area. The sound system will have its own battery disconnect and fused power distribution system.
I will be fulltiming and mostly boondocking. This first rig is what I am using as a learning experience. Pulling apart so much of it lets me learn the materials and construction methods used. I am used to working construction on nightclubs and houses but this is a bit different.
In a few years I will upgrade to a better rig and transfer all of my major systems over to the newer rig. The next major purchases are new lp/elec fridge, front roof AC(if I can?t fix it) & 8 new tires. There are a million things that I have to work on and it can get to be a little overwhelming at times.
The only timeline I have is to be South before it freezes in Illinois.
Right now I am getting ready to install the solar frame on the roof after having first assembled & tested it on the floor in the garage. I don?t trust that the roof sheeting won?t buckle under the stress of the tilt so I am putting ?? exterior grade CDX under the hinge point and push off point for the actuators. I used two coats of Dicor on the plywood underside with three coats on the top and sides. I am waiting on another gallon of the roofing sealer and the Dicor tape as I will be sealing three sides of the plywood to the roof leaving the lowest edge open for drainage just in case water should get under the plywood. I don?t want any water sealed under there. 1 ?? self-drilling sheet metal screws will be used to hold down the plywood and solar frame to the aluminum roof frame. There is ?? thick styrofoam between the roof frame and the roof sheeting.
I did have to move the grey water roof vent over 3? to make my solar frame position correctly but I was resealing everything up there anyways so moving the vent wasn?t that big of a deal.
I have very little idea of what I am doing so I figure out everything as I get to it. I finally figured out how to stow a 48? flat screen with an articulated arm. A 9 ?? deep black closed cell foam lined shadow box with a cutback in the center of the two sides for a strap to hold the tv into the box pushing it into the foam lining. I also have to come up with something padded and secured to hold my oversized computer gaming case. It needs 30? front to back including 6? rear clearance, 24? tall and 12? wide.
I have been taking pics from the start so I can post lots of them. I am going for an industrial look using greys, black, white & red for the paint. I?d prefer that all of the wood look goes away completely but that will probably wait until I get the next rig. I live outside of the box, no pun intended, so pretty much anything that I do on this rig won?t be seen as normal. Eventually I will have a computer controlled pixel LED light show inside and possibly a little on the outside. I have about 90,000 LED?s. They are from a larger lighting project that I had planned on doing. I won?t be using all of them in/on the rig.
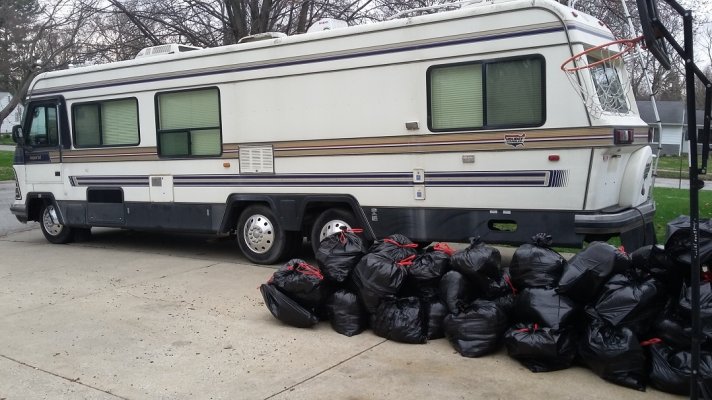
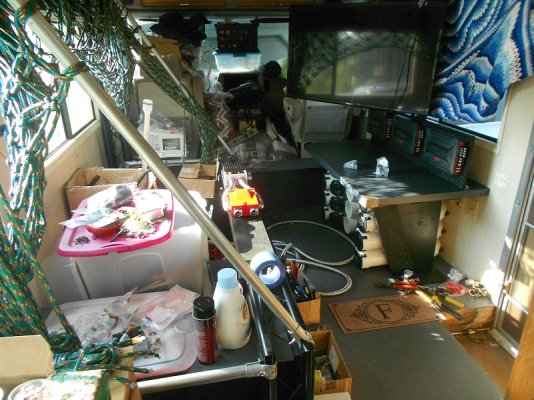
The second pic shows how much I took out of this. An employee of the car dealer and his wife used to own this. When she passed away he left the RV as it was from the last time they used it. I told the dealer to leave it as is when I said that I would take it unseen. It was 90 miles from me at the time. The contents turned out to not have any value so I spent the first day emptying out every last stuffed full storage space in it.
So far I have dumped about 4 times the amount I bought it for into this with some thousands more to go. The biggest chunk is going into the solar which is currently around $8,000. Six 100 watts panels, six 220ah 6v Crown AGM, 4/0 battery & inverter cables, 2/0 to old fuse center, 4ga from roof, 4ga to sound system, dual fused solar disconnect (in/out), wireless remote tilt w/ four 12? linear actuators. Magnum 2,000 Pure Sine Inverter with ME-ARC remote, Tri-Star 60 PWM controller with remote, Trimetric battery monitor, 500a shunt.
The solar tilt added about $1,000 to the cost of the electrical system. The frame is built from 6? steel triangular truss. Total weight of solar panels plus frame is under 250lbs spread out over a distance of about 14? x 4?. My background is in designing/installing commercial sound and special effect lighting systems. The solar truss is a smaller version of what I used to hang over dancefloors to mount the lights on.
I gutted about half of the rig the day after I bought it. I removed two overhead cabinets, the dinette, sofa, two chairs and a side table up front. In the back I took out two twin beds and center night stand.
The couch I am building is made from steel 6? box truss with 3/8? rope being used to create a sling for a queen sized futon mattress. $1,000.00 in parts.
Being that my last career was as a sound designer the sound system for the rig is a bit on the extreme side. $3,000.00 in parts. Thirty drivers in total. A 30 band graphic equalizer, three 4 channel power amps, 2 active 2-way crossovers, 4 passive 3-way crossovers, twenty-four 4? woofers, two 10? subwoofers, four horn loaded tweeters. The eight bass speakers with two 4? woofers in each are made from 4? PVC and fittings. It is a bit on the heavy side but it weighs less than what I removed from that area. The sound system will have its own battery disconnect and fused power distribution system.
I will be fulltiming and mostly boondocking. This first rig is what I am using as a learning experience. Pulling apart so much of it lets me learn the materials and construction methods used. I am used to working construction on nightclubs and houses but this is a bit different.
In a few years I will upgrade to a better rig and transfer all of my major systems over to the newer rig. The next major purchases are new lp/elec fridge, front roof AC(if I can?t fix it) & 8 new tires. There are a million things that I have to work on and it can get to be a little overwhelming at times.
The only timeline I have is to be South before it freezes in Illinois.
Right now I am getting ready to install the solar frame on the roof after having first assembled & tested it on the floor in the garage. I don?t trust that the roof sheeting won?t buckle under the stress of the tilt so I am putting ?? exterior grade CDX under the hinge point and push off point for the actuators. I used two coats of Dicor on the plywood underside with three coats on the top and sides. I am waiting on another gallon of the roofing sealer and the Dicor tape as I will be sealing three sides of the plywood to the roof leaving the lowest edge open for drainage just in case water should get under the plywood. I don?t want any water sealed under there. 1 ?? self-drilling sheet metal screws will be used to hold down the plywood and solar frame to the aluminum roof frame. There is ?? thick styrofoam between the roof frame and the roof sheeting.
I did have to move the grey water roof vent over 3? to make my solar frame position correctly but I was resealing everything up there anyways so moving the vent wasn?t that big of a deal.
I have very little idea of what I am doing so I figure out everything as I get to it. I finally figured out how to stow a 48? flat screen with an articulated arm. A 9 ?? deep black closed cell foam lined shadow box with a cutback in the center of the two sides for a strap to hold the tv into the box pushing it into the foam lining. I also have to come up with something padded and secured to hold my oversized computer gaming case. It needs 30? front to back including 6? rear clearance, 24? tall and 12? wide.
I have been taking pics from the start so I can post lots of them. I am going for an industrial look using greys, black, white & red for the paint. I?d prefer that all of the wood look goes away completely but that will probably wait until I get the next rig. I live outside of the box, no pun intended, so pretty much anything that I do on this rig won?t be seen as normal. Eventually I will have a computer controlled pixel LED light show inside and possibly a little on the outside. I have about 90,000 LED?s. They are from a larger lighting project that I had planned on doing. I won?t be using all of them in/on the rig.
The second pic shows how much I took out of this. An employee of the car dealer and his wife used to own this. When she passed away he left the RV as it was from the last time they used it. I told the dealer to leave it as is when I said that I would take it unseen. It was 90 miles from me at the time. The contents turned out to not have any value so I spent the first day emptying out every last stuffed full storage space in it.
")