Water heater plumbing

The friendliest place on the web for anyone with an RV or an interest in RVing!
If you have answers, please help by responding to the unanswered posts.

jrclen

Well-known member
Joined
Jul 8, 2019
Posts
62
Location
Central Wisconsin
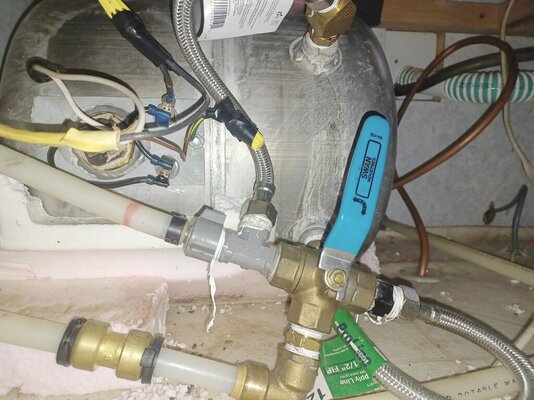
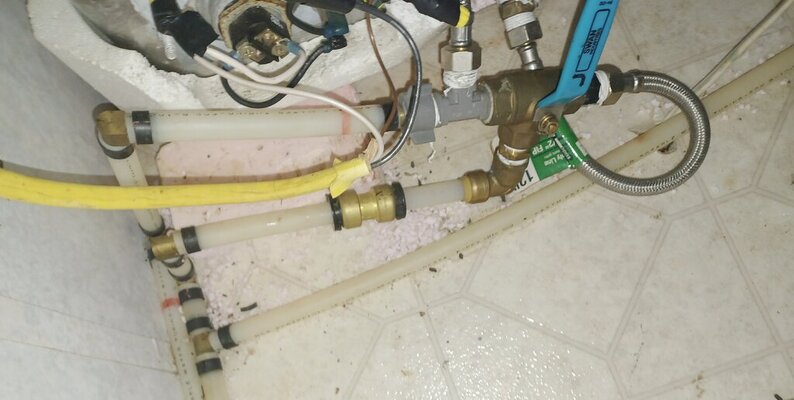
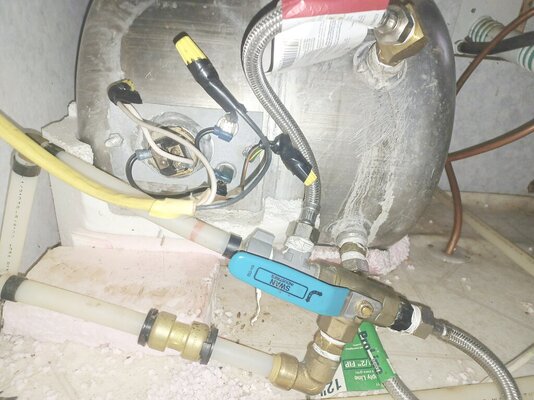
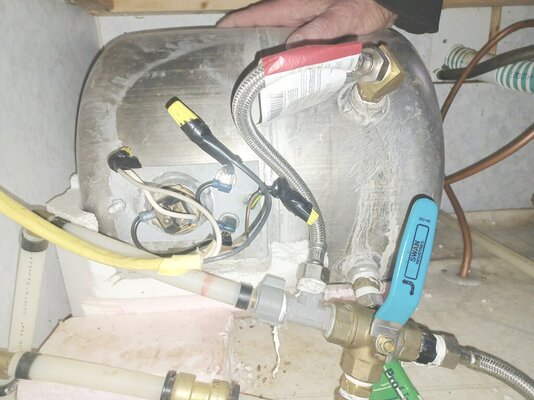
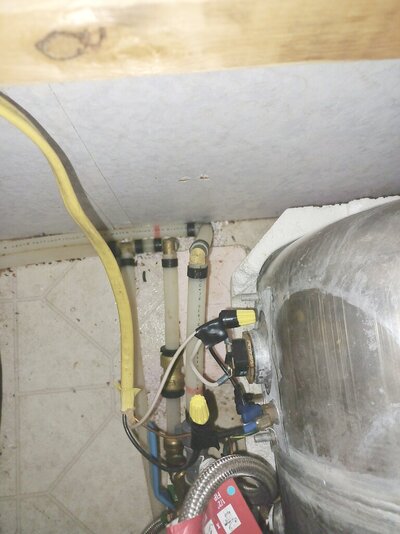
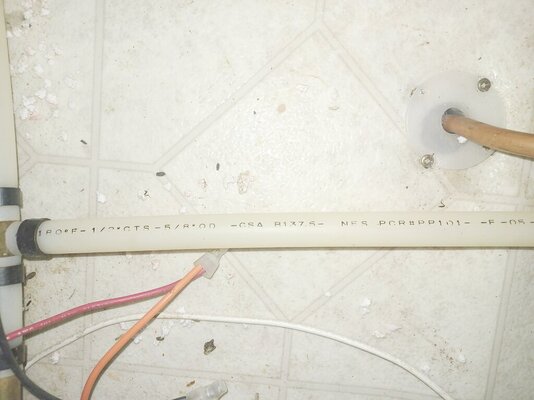
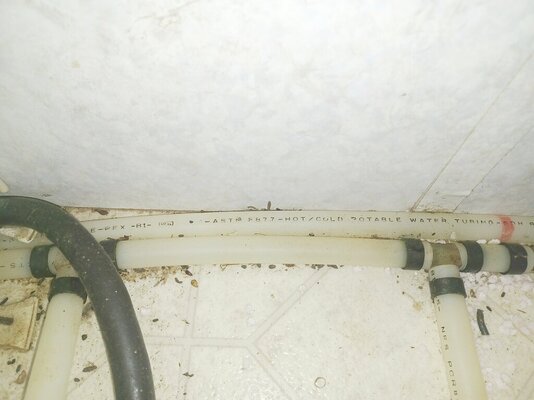
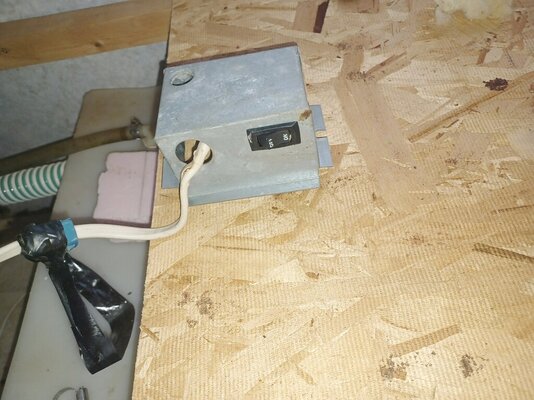
I searched and read through all the threads I could find. I still have a question. This 1998 Fleetwood Terry 31G is new to me, bought in late fall last year. As you can see in the photo, the previous owner did some work on the water heater. I tried to winterize it with antifreeze but wasn't able to keep the anti freeze out of the water heater. I don't see a check valve where I would expect one to be. So I used air to blow out the lines to get me through the winter. My question, is my 1/2" pex crimper, fittings, and blue pex tubing compatible with the tubing shown in the picture? My thought is to remove what is there and install a new three valve bypass system. Of course I am open to suggestions. Thanks.
 

Attachments

  • camper 18 in bypass.jpg
    camper 18 in bypass.jpg
    146.5 KB · Views: 25
All I can say is WOW!.

No idea what tubing is in that. RecPro has a line of plastic fittings called Flair-it that push into Pex and poly butyl and have a collar that screws on to capture the tubing. I have used one of them for a toilet shutoff and had to add a little heat with a heat gun and it went right together. The also have a tool that is much easier to use for turning the collars than pliers, I bought it and was glad to have it.

Example of Flair-it fittings.

Charles
 
My first thought was same as Rene's. Should be 3 valves 1 bypass, 1 keep water out of heater (cold) 1 block water from heater (hot).
 
I see 2 valves, the top valve is an off/on valve for hot water exiting the tank. The bottom valve appears to be a 3-way valve (handle should move both directions) to shut off cold water entering the tank while re-directing it to the hot water plumbing downstream of the tank..
That direct frontal picture should be much easier to understand.
If your plan is to covert to a 3-valve bypass this is how it's configured. WH tank will be on the right is this picture.
1706581500708.jpeg
 
Without a doubt, the plumbing was modified by a previous owner as the RV industry does not use the flexible water connection hoses you have. It also seems to have some metal fittings that have not been used in the RV industry. Being built before 2000, it may have PVC plumbing as PEX was not used in the RV industry as soon as in home construction. The previous guy also removed much of the insulation from the water heater tank for some reason. Once you get the plumbing corrected I suggest you also add some type of insulation to that bare tank.
1706637038301.jpeg
 
More pictures. I added one of a unknown switch box. I have no idea what it might be for. It is dead. Any ideas? I also added pictures of the tubing. I did find out the existing tubing is SDR9 which is the same as PEX so the fittings and tubing will work. I can eliminate the mess and do it correctly with PEX fittings and valves. I think I'll go with a three valve system. I don't know what the previous owner was doing in there. I still don't see the check valve which would make the single bypass valve work. Which would explain why it won't keep the anti freeze out of the water heater. Any suggestions on insulation? Thanks guys.
 

Attachments

  • 00 wh bypass vailve.jpg
    00 wh bypass vailve.jpg
    156.6 KB · Views: 13
  • 01 bot city supply mid wh supply top hw supply .jpg
    01 bot city supply mid wh supply top hw supply .jpg
    81.5 KB · Views: 14
  • 02 not in bypass.jpg
    02 not in bypass.jpg
    151.1 KB · Views: 14
  • 03 in bypass.jpg
    03 in bypass.jpg
    137 KB · Views: 14
  • 04 left city supply middle wh suppy right hot water supply.jpg
    04 left city supply middle wh suppy right hot water supply.jpg
    115.2 KB · Views: 11
  • 05 tubing type.jpg
    05 tubing type.jpg
    96.8 KB · Views: 9
  • 06 tubing type.jpg
    06 tubing type.jpg
    88.9 KB · Views: 10
  • 10 unknown switch box.jpg
    10 unknown switch box.jpg
    166.1 KB · Views: 13
Last edited:
Agree there should be a check valve in the upper line (the hot water outlet) to prevent a backflow into the heater tank when it is bypassed. The tank fitting looks bigger than needful, though, so maybe it has a check valve inside, but it's stuck open. A sticky check valve is a very common fault in a water heater bypass. If it doesn't have one, it would be fairly simple to insert that or a simple on/off manual valve at either end of that piece of flex tubing that comes out of the tank.

As for pex, I'm pretty sure Fleetwood was using Pex tubing by 1998. Prior to that is was a gray plastic of some sort, probably polybutylene. One of the white tubes in your photos appears to be labeed PEX.
 
Last edited:
I would re-do it with the easy to understand 3 valve system. The position of the handle presently is in the "by-pass" orientation. There should be a check valve on the line going to the top (Hot), but I see none there. Is that brass in-line piece on the cold line at the bottom a check valve?
The electrics would be for the electric heater element, which seems to have one melted connection on the lower temp. switch.
 
Old Web - good catch on the melted connection. I missed that. I see that fitting in the cold line and have no idea what it is doing there. Maybe keep the heater from draining if pressure is lost?
Gary - it looks like about $100 to tear it all out and install a 3 valve system - adding a check valve or manual valve on the hot water line would be cheaper. And easier. Thanks everyone.
 
Last edited:
If looking to fix the electric element, first measure the ohms of the one in there to ensure it is sound first. depending on the size I think 10 or 12 ohms is close. The overheated connection should be replaced and that means both items... the wire/connector AND the switch, I just do not know if it is the overtemp or the thermostat in your case, it will have numbers on it.
Just replacing the connector may work, but typically it will overheat again... but you could clean the switch up and try.
EDIT: The switch box would have been for the heater element, you sayin' it is not connected and the element is possibly wired straight to the panel breaker? Nothing wrong with that....
Good luck
 
Last edited:
I would re-do it with the easy to understand 3 valve system. The position of the handle presently is in the "by-pass" orientation. There should be a check valve on the line going to the top (Hot), but I see none there. Is that brass in-line piece on the cold line at the bottom a check valve?
The electrics would be for the electric heater element, which seems to have one melted connection on the lower temp. switch.
Yep, that blue handled valve is a 3-way valve. Then the top valve shuts off for winterizing and bypassing the WH. That's the way I interpret the pics anyway.
 
Old Web - good catch on the melted connection. I missed that. I see that fitting in the cold line and have no idea what it is doing there. Maybe keep the heater from draining if pressure is lost?
Gary - it looks like about $100 to tear it all out and install a 3 valve system - adding a check valve or manual valve on the hot water line would be cheaper. And easier. Thanks everyone.
If you are going to install a 3 valve bypass system, you do not need a check valve on the hot (top) line
 
If looking to fix the electric element, first measure the ohms of the one in there to ensure it is sound first. depending on the size I think 10 or 12 ohms is close. The overheated connection should be replaced and that means both items... the wire/connector AND the switch, I just do not know if it is the overtemp or the thermostat in your case, it will have numbers on it.
Just replacing the connector may work, but typically it will overheat again... but you could clean the switch up and try.
EDIT: The switch box would have been for the heater element, you sayin' it is not connected and the element is possibly wired straight to the panel breaker? Nothing wrong with that....
Good luck
Thanks for that info on the electrics. I will get into that today. I am thinking the switch by the kitchen sink controls the W heater but will check it. I wonder if that box with the white romex was for a replaced WH?

I'm leaning toward installing either a check valve or a manual valve in the hot out line and calling it good. At least for this year.
 
It can be done with two valves as long as the hot water supply in the tank has a check valve to stop water from flowing back into the tank. That' the way mine is. The ball valve shown may be a three way valve.
R.651d3c6d3b0bee2eee9dd605289e8b3f
 
I am thinking the switch by the kitchen sink controls the W heater but will check it.
It probably is. If you will look at the front of the water heater there should be a plate with the make, and model number and if you post that we can supply a link to the service manual for the water heater. It will then tell us what to expect for water heater switches. There probably is one of propane use and another for 120V heating.
I wonder if that box with the white romex was for a replaced WH?
There is a good chance it is something of the sort and I'd bet it was not there when the trailer was sold new. I suggest that you open the box to see what is inside. If in doubt, post a picture of what you find.
 
More on the water heater saga, things get curiouser and curiouser. Today I decided to check out the electrics. First thing I discovered was the power to the heater was on. With the Circuit breaker off. I found that the last guy had ran a new wire (the yellow romex) to the heater from the circuit breaker box. But to make it more interesting, he swapped the wires for the microwave and the water heater. So turning off the water heater actually turned off the microwave. And that small box with the switch and white romex actually was part of the water heater. It bolts right over the element and wiring. That white wire was removed from the electric panel for some reason. It is controlled by the switch near the sink. I have no idea why it was removed and replaced with the new yellow wire.

Any way, I measured the ohms across the element and found 10.5. I tried across the entire assembly, through the two sensors and got no continuity. Maybe I have a burned up sensor? Attached is the name tag for the heater.
 

Attachments

  • water heater info.jpg
    water heater info.jpg
    75.3 KB · Views: 4
It can be done with two valves as long as the hot water supply in the tank has a check valve to stop water from flowing back into the tank. That' the way mine is. The ball valve shown may be a three way valve.
R.651d3c6d3b0bee2eee9dd605289e8b3f
A check valve is NOT required in the two-valve bypass system. The valve at the hot water outlet prevents backflow into the tank and is in lieu of a check valve there. The valves in your photo would both be "3-way" diverter valves
 
Gary - it looks like about $100 to tear it all out and install a 3 valve system - adding a check valve or manual valve on the hot water line would be cheaper. And easier.
I can't see any reason to tear it all out and a 3-way bypass has no advantage except maybe that manual valves don't get gummed up with mineral salts as quickly as check valves. Converting to a 2-valve bypass by adding a manual valve at the hot outlet eliminate the outlet check valve and is a cheap & easy fix to your problem.
 

Latest posts

Forum statistics

Threads
132,190
Posts
1,391,765
Members
137,899
Latest member
boklm
Back
Top Bottom