Morning after lap sealant, membrane bubbles

The friendliest place on the web for anyone with an RV or an interest in RVing!
If you have answers, please help by responding to the unanswered posts.

larryr

Well-known member
Joined
Jun 20, 2016
Posts
70
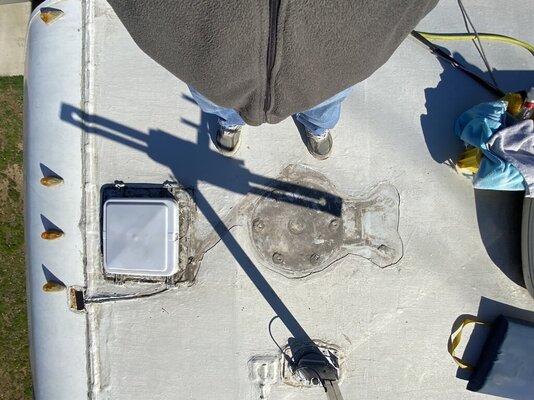
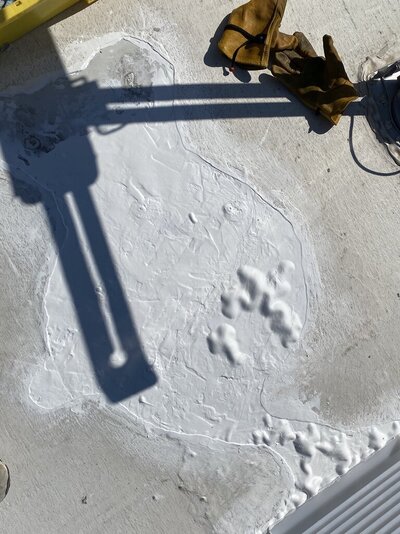
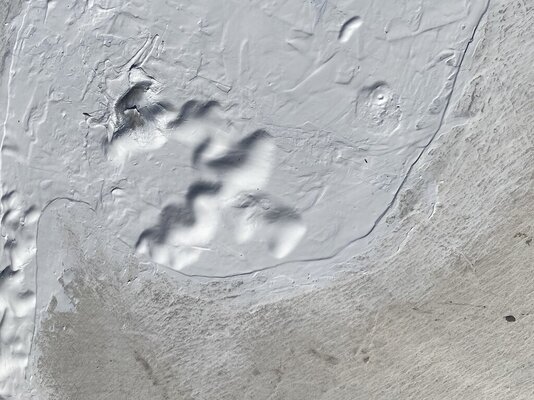
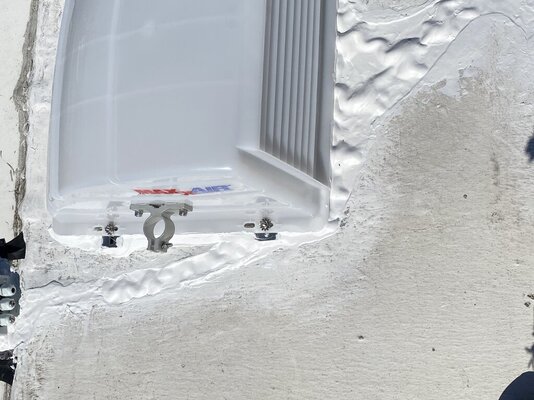
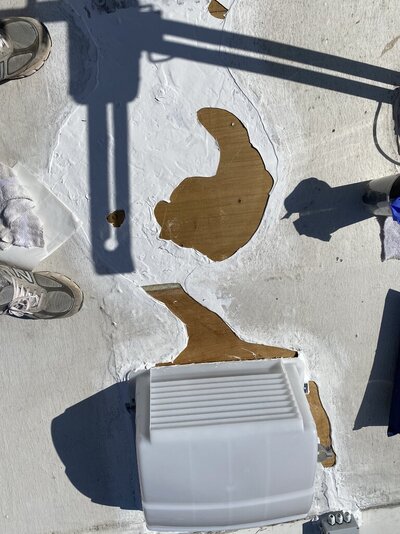
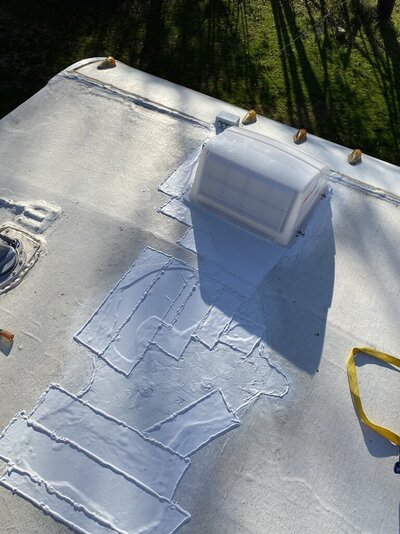
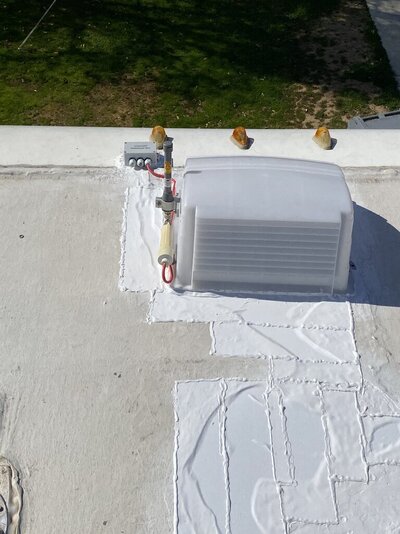
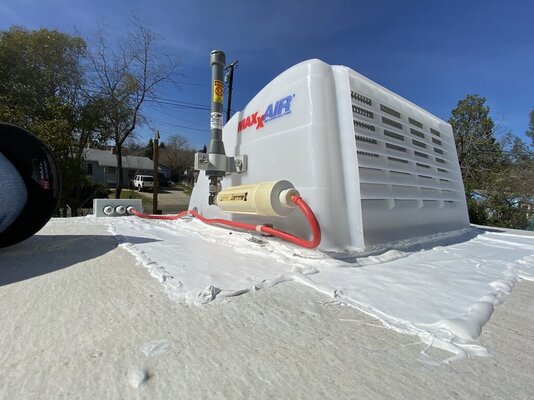
Had a leak coming from the wiring of an old RD9900 sat dish base. Decided to remove the base. Cut back loose sealant, membrane seemed tightly laid down. Prepped with lacquer thinner the day before resealing, an alcohol wipe a few minutes before applying dicor self leveling lap sealant. Ran out of sealant with a bit left to do, went up this morning and found bubbling up. I thought it was sealant, not the membrane and (idiot that I am) popped the bubble, found the membrane has lifted. I'm at a loss and need to find a solution. Pics attached from start to this morning. All of the problem areas are in the footprint of the old dish base and space between dish and vent cover.

Any help in figuring out what the cause is, and what solutions might be available short of re-roofing as the rest appears to be recent and good (don't know the history). TIA, Larry
 

Attachments

  • before sealingjpg.jpg
    before sealingjpg.jpg
    181.6 KB · Views: 18
  • old sat base.jpg
    old sat base.jpg
    179.7 KB · Views: 17
  • membrane puncture.jpg
    membrane puncture.jpg
    175.4 KB · Views: 18
  • around vent.jpg
    around vent.jpg
    145.9 KB · Views: 19
Solvents, especially lacquer thinner, are no-no on rubber roofs.

I guess I would pop the bubbles, put some Dicor inside the bubble and some Dicor on top and smooth it all down as best you can.
 
I was thinking of giving the sealant over the bubbles a couple of days to cure, then cutting out the bubbles and applying eternalbond tape. Opinions?
 
Eternabond would be a permanent fix. I would not cut out the bubbles, just puncture to let the gas out.
 
Probably caused by using lacquer thinner instead of mineral spirits to clean the old caulk. The lacquer thinner probably re wet the adhesive used to glue the roof membrane down.
 
I did try pressing a bubble down and it was tacky. I'll try again this morning after the roof warms up. It's just above freezing now. Hoping the lap sealant will have cured enuf to be non-tacky by mid day today (48 hours old). I will get some eternabond tape and do something to correct my screw-up with solvents.

I'm always amazed at how easy it is to have a project become bigger as you get into it and cause ancillary damage.... If I paid myself for time on project, the labor would be outrageous.
 
You are going to make mistakes doing things you've never done before, but more importantly, you're doing something.

When I DIY I pay myself what it would cost for someone else to do it. That way not only do I get the personal satisfaction of having accomplished something but I can buy another toy without guilt.
 
I would cut the damaged portions out with a exacto knife or razor blade then scuff over area with brand new clean "Green Pad" scrubber (320 grit equivalent) to "Dull up" the surface area that failed.

Avoid touching the area as oils off your hands can spoil the prep area. If the surface can take it I love acetone as it evaporates quickly, wax and grease remover also another favorite before bonding or painting.

Then I would carefully slop another layer over your original goop.

My Guess, Prolly a dirty surface, or chemical conflicts, or even weather, as mentioned earlier, as most looks like it stuck well.

Let us know how it plays out.

Good Luck!

JD
 
BTW, if it isn't tacky when you stick it back down work some contact cement under the rubber before putting eternabond over it.
 
I would cut the damaged portions out with a exacto knife or razor blade then scuff over area with brand new clean "Green Pad" scrubber (320 grit equivalent) to "Dull up" the surface area that failed.

Avoid touching the area as oils off your hands can spoil the prep area. If the surface can take it I love acetone as it evaporates quickly, wax and grease remover also another favorite before bonding or painting.

Then I would carefully slop another layer over your original goop.

My Guess, Prolly a dirty surface, or chemical conflicts, or even weather, as mentioned earlier, as most looks like it stuck well.

Let us know how it plays out.

Good Luck!

JD
I'm hesitant to try any more fast solvents as consensus is that lacquer thinner caused the original bubbling. I chose lacquer thinner over mineral spirits because it would evaporate quickly.

I have a small amount of denatured alcohol left - have been unable to buy more in California where it is banned! Also been unable to find online sellers willing to ship to CA, unfortunately. I can go to the liquer store and look for pure grain or try high percentage isopropyl.
 
Last edited:
I bet it will seal this next round by cutting out the damaged area and just scuffing it, dull it up real good and reapply.

My $0.02 from the Peanut Gallery.

JD
 
Lacquer thinner (and its sisters, acetone and MEK) is a strong solvent that dissolves a lot of adhesives and synthetic materials. It will also penetrate an EPDM membrane as if it wasn't there, meaning it reaches the underlying adhesive and likely destroys it. The tougher question is whether the lacquer dissolved the EPDM at all. If so (or unsure), the bubbles probably ought to be cut away and recovered.

If the EPDM is still intact and merely lifted, then the bubbles are mostly a cosmetic problem. However, it's best/safest if they are pricked or slit and glued back down. Then use Dicor or roof tape (e.g.Eternabond) to seal the punctures or slits.
 
I picked up some tape and will experiment some today. If the 48 hour old lap sealant is not a gooey mess, I might cut or flatten the bubbles today and apply roof tape. Will uncured lap sealant be a problem for roof tape to adhere to? I got cofair extreme roof tape. Liked the instructions better than dicor's which looked messy.
 
bubbles came out easily with nothing but wood underneath wo worry about. The wood is quite tacky so no prep. Gonna dry scuff the margins with scotchbrite and apply tape w lap sealant around the edges.
 

Attachments

  • bubbles cut out.jpg
    bubbles cut out.jpg
    170.4 KB · Views: 11
Done. Love roof tape!
 

Attachments

  • roof seal #2.jpg
    roof seal #2.jpg
    183.4 KB · Views: 12
Totally done and off the roof with an Ubiquiti M2 Bullet and lo profile antenna working.

Thanks all for the help on this project.
 

Attachments

  • m2 hi.jpg
    m2 hi.jpg
    140.1 KB · Views: 10
  • m2 low.jpg
    m2 low.jpg
    142.2 KB · Views: 11
I mounted the antenna bracket on the vent cover with the cover on a bench and made it perpendicular to the bottom of the vent cover. After installation, I realized that the roof panel slopes down to meet the nose piece and so the antenna is cocked forward. It bothers me enough to try to remove the screen from the vent so I can reach the bolts, remove one, make it plumb and re drill the vent cover. I won't remove the cover unless it appears that the forward cant catches branches. (always time to do it twice)
 
Back
Top Bottom