Floor damage repair under wall of 1999 Holiday Rambler

The friendliest place on the web for anyone with an RV or an interest in RVing!
If you have answers, please help by responding to the unanswered posts.

RamblingJohn

Well-known member
Joined
Sep 3, 2018
Posts
45
Location
Whidbey Island, WA
I just got back from deployment and was inspecting the motorhome and unfortunately found wet carpet behind the driver seat against the wall. The carpet had started to mold. I think water is coming in from rusted out screws that is holding the storage compartment on as it has come away from the coach some. I cut back the soggy carpet and the damage doesn't seem to go too far back. The wall is wet too but from what I can tell, it is just luan and styrofoam so I'm not super worried about it. I want to cut out the soggy wood and put in good wood but I think the wall might be supported by the soggy wood. Any ideas how to proceed?

IMG_013759.JPGIMG_013768.JPG
 
First identify where it's leaking. You could use a couple of leaf blowers or pay sealers company to do it. Fix all the leaks. Then once you have done that start repairs. Get rid of the wet stuff ASAP. If you don't you could end up with a lot of mold. Which could render your MH to the junk pile. I'm guessing windows as your first leaks. Do you have someplace inside and dry you can work on it?
You will likely eventually tear the wall out, get rid of the wet insulation, fix any structural damage and repanel with new stuff.
BTW THANK YOU FOR YOUR SERVICE.
Vietnam, 1965/69
 
Thanks, donn! What's this about a leaf blower? I'm pretty sure I know where the leak is coming from but I think the leak won't stop until the floor is fixed also. I do not have anywhere inside to work on it right now but I'm looking. My main concern is cutting out floor that may be holding up the wall.

I'm not sure how the coach is constructed, you know?
 
I have a new to me 2000 HR Endeavor and I had the same wet carpet and soft floor problem once I got the rig home and it set out in the weather a few weeks. The previous owner kept it in a building. I started at the top and repaired every seam in the roof and worked my way to windows and body seams sealing with Di-cor self leveling and a good brand of exterior door and window sealant that somewhat matched my coach. I removed the trim cover that exposes the screws at the floor line of the coach and almost every screw was rusted and several were so bad the threads were non-existent. Replace the screws, sealing them as I installed them, added new trim cover and seems to have stopped the leak. I found this problem on both sides in the front of the coach. I think the main leak was where the cap was installed and the seam tape was cracked and in one place was pierced by a low hanging limb. I used wood hardner available at the local lumber depot two good soakings and then used water putty to fill the depression from the rot. This age coach is prone to problems like this. I also redid the top of the slide and replaced the double bulb seal around the slide. Make sure your slide topper over hangs your slide box a couple inches on each side so the rain doesn‘t dump on the top of the box. Get a small handheld battery powered blower and blow off the slide box before closing the slide to prevent leaves and limbs from damaging the slide seal.
 
Leaf blower idea is a home made seal test. Basically you pressurize the inside as much as possible while spraying every seam you can find with soapy water. Bubbles means a leak. Mark the with a piece of tape. Then you can go back and uncover or reseal. Takes time, but a pair of leaf blowers on max should do the trick.
 
First identify where it's leaking.
I'm pretty sure I know where the leak is coming from but I think the leak won't stop until the floor is fixed also.
Donn is absolutely right and I would really examine the wall above the damage shown in that picture for any signs of stains or loose wall covering as leaks from windows or roof edges are by far the most common cause of problems such as yours. There is no doubt that you need to repair the trip issue as well, but I think that you could cover that with something like duct tape to prevent any more leaking there and see if you can dry out everything inside and have it stay dry.

It is quite possible that the outside wall is sitting on the floor as some manufacturers put the floor down on the framework before putting the walls into place, especially if the RV is not a basement model. If I am looking at the photo right, there is also an entry door just in front of the damage that could also be leaking as part of the problem.
 
Spend an hour on you tube watching videos of how they are made. You'll get some ideas on how to repair it if you see the process of how they put them together. They tend to build panels that are then assembled together and knowing which 2x2 belongs to which panel helps a lot.
 
removed the trim cover that exposes the screws at the floor line of the coach and almost every screw was rusted and several were so bad the threads were non-existent. Replace the screws, sealing them as I installed them, added new trim cover and seems to have stopped the leak.
The screws all around the trim line are rusted as you say and a couple were shot.
This may be where the water is getting in, just behind the driver door where the storage compartments start. Did some temporary waterproof tape repairs to see if the leaks go away before trying to fix the floor. If they remain I'll try some of your suggestions to zero in on the leaks.

I think it's too far gone to do any kind of penetrating epoxy, especially since I disturbed it and flaked away a lot of the wood.

@alh1956 What kind of screws did you use to replace the rusty ones? I took one out and it looks like a sheet metal screw.
 
What kind of screws did you use to replace the rusty ones? I took one out and it looks like a sheet metal screw.
There is a good chance that they were sheet-metal screws. That is very common to find them anywhere in an RV. The fist thing to do is to make sure that there is something solid behind them to have new screws grab when you replace them. I have always used stainless steel screws in places that are exposed to water. I would also go a little bit over size and possibly longer.
 
There is a good chance that they were sheet-metal screws. That is very common to find them anywhere in an RV. The fist thing to do is to make sure that there is something solid behind them to have new screws grab when you replace them. I have always used stainless steel screws in places that are exposed to water. I would also go a little bit over size and possibly longer.
Yes stainless self tapping screws and I used longer and one size larger. Just for peace of mind.
 
Is this something my insurance might cover? I called them and filed a claim but the adjuster will have to come look. I have comprehensive insurance, FWIW. I just don't think I'm going to be able to fix it myself any time soon with how much it rains here and how cold it's getting.

Edit: Called the insurance company. Not covered since it wasn't an accident or anything. :(
 
Last edited:
Your best bet is to rent someplace indoors with power so you can start tearing it apart. The other option is to scrap it.
 
You sure don't sugarcoat anything, do you donn? :D
Well, if it has to sit outside in the rain and snow until you can get to it, it'll only continue to get worse. At some point the options will narrow to one.
I was once gifted a '57 Sportsman teardrop trailer in need of tear down and rebuilding. I let it sit outside "until I could get to it". By that time, I ended up stripping it down and making it into a utility trailer. I was bummed. At the time I was driving a '54 Chevy pickup and that would have made an awesome looking rig.
 
Leaf blower idea is a home made seal test. Basically you pressurize the inside as much as possible while spraying every seam you can find with soapy water. Bubbles means a leak. Mark the with a piece of tape. Then you can go back and uncover or reseal. Takes time, but a pair of leaf blowers on max should do the trick.
I got the motorhome out of the rain and it's been drying out for 2 weeks. I think I'm going to give this a shot this weekend. I have read that silicone isn't the best for the outside because nothing sticks to it. I think I'm going to use Divor HAPS Self-Leveling Lap Sealant that alh1956 mentioned.
 
Update on fixing my motorhome leak in the hopes it will save someone some heartache in the future:

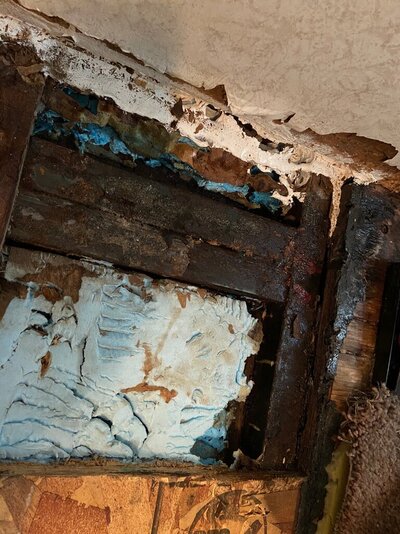
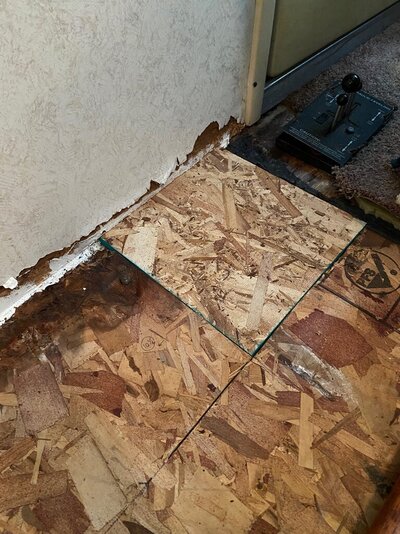
Things went... not great. I cut out the wood that was not salvageable and installed new. I used wood hardener to attempt to solidify the wood along the wall. I put lap sealant in along the wall and let it cure a couple weeks before deciding to use epoxy.

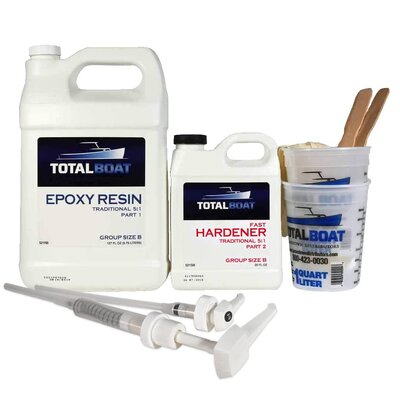
Here's where things didn't go so well. I decided to coat the now less damaged wood with epoxy, allowing it to level out. Things seemed to be going fine. After a bit, the epoxy starting reacting with something, creating heat and hardening super quick, leaving a cloudy look to the epoxy. I poured epoxy down into where I knew there was brittle wood, hoping that it would fill the crevices and help the structural integrity.

I poured a little bit and then went down below to look at the storage compartment to make sure epoxy wasn't just flowing out somewhere. It was a little warm but otherwise unremarkable. I figured that was the hardener doing it's magic. It wasn't.

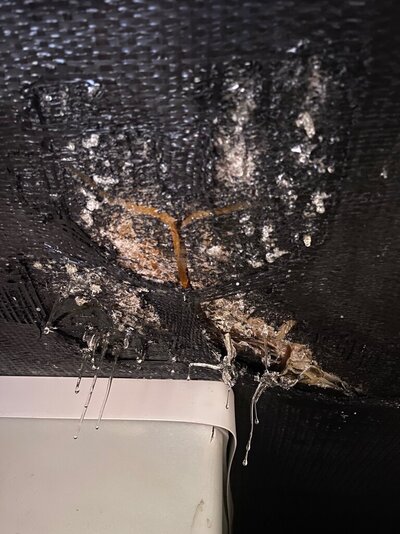
Other than the small spot that reacted strangely, it seemed to be working fine so I used the whole container of epoxy (127 oz.). I went down below again and the storage compartment was full of fumes and smoke. I cleared the area and got an ventilation fan on it to try to stop the chemical reaction and cool things down. The epoxy reacted with something, likely the blue foam stuff, and melted through the plastic in the storage compartment. This is how it looks now. It is hard and I think it's structurally fine, though it looks terrible.

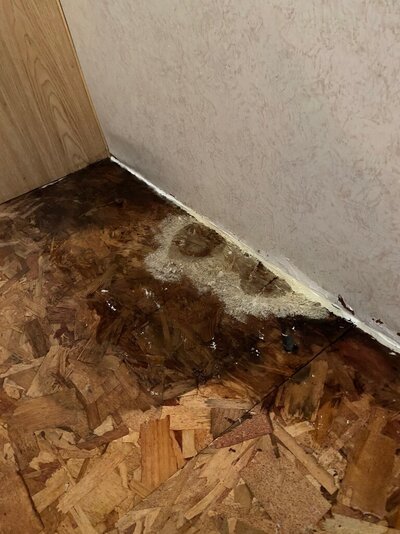
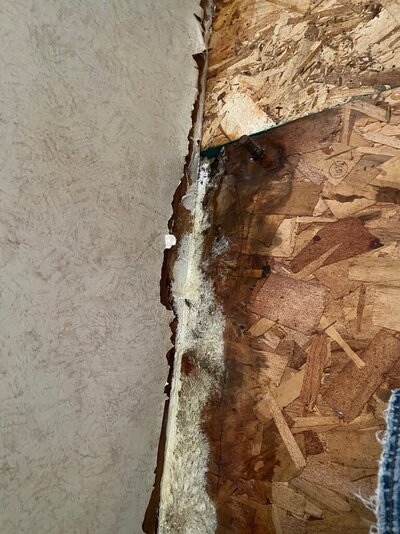
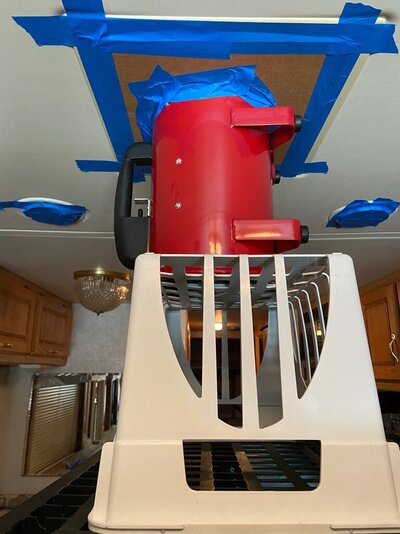
I then tried to do a leak check, sealing all of the vents. It seemed to be working as there was some resistance to closing the door but I didn't find any leaks. I think the driver door must be what is allowing water in as there was water in the jam. It may just be a poor design where the water sits in the door jam and slowly gets seeps into the wood.

I'm just not sure how to proceed to make sure it doesn't get water damaged in the future. The screws behind the driver door at the trim line are popped and I'm not sure new ones will take. Worried I may just damage it more by trying. I may call and see if I can get a professional leak test done and advice on how to finish fixing this but I'm sure everyone is slammed with the weather warming up. I don't think there really is a way to fix the storage compartment area, just need to clean it up and maybe put some type of covering on it.

I mostly wanted to share because I did not expect the epoxy to go off the rails like it did. I hope someone sees this that may be considering using it and is more careful than I was.

Also, be very wary of using rubber tape. I applied some along the door to try to stop water leaking and that stuff is not meant to be temporary. It's been damn near impossible to remove, even with solvents, a heat gun, etc. Wish I never saw that stuff. The aluminum tape came off fine, should have just used that. The rubber tape is now off but I don't think I'll ever get 100% of the adhesive removed.
 

Attachments

  • 1.jpg
    1.jpg
    216.1 KB · Views: 13
  • 2.jpg
    2.jpg
    221.1 KB · Views: 14
  • 3.jpg
    3.jpg
    157.3 KB · Views: 14
  • 4.jpg
    4.jpg
    211.4 KB · Views: 14
  • 5.jpg
    5.jpg
    54.3 KB · Views: 13
  • 6.jpg
    6.jpg
    162.8 KB · Views: 13
  • 7.jpg
    7.jpg
    113.7 KB · Views: 13
I don't understand what pictures #6 & 7 are of??
#6 is where the epoxy ate through the top of the storage compartment. #7 is a ventilation fan I have set up to try to pressurize the coach to spray soapy water around outside and find leaks. I didn't find any.. so either it's not working or I fixed the leak. I still think the door is letting water in though as there was water on the door jamb.
 

Latest posts

Forum statistics

Threads
131,929
Posts
1,387,650
Members
137,677
Latest member
automedicmobile
Back
Top Bottom