Building a shelf and not sure about floor mounting

The friendliest place on the web for anyone with an RV or an interest in RVing!
If you have answers, please help by responding to the unanswered posts.

airborne_spoon

Well-known member
Joined
May 11, 2022
Posts
149
Location
USA, California
I've built a lot of things over the years but this one I feel like I'm over engineering this and could use some help.

I am remodeling the kitchen in my teardrop trailer and I need to build a drawer that I can place a oven/stove on that will slide out so I can use it and then slide back in for storage. The oven is 32lbs and the locking slides are rated to 250lbs so I think I'll be ok on that.

But there is a caveat, I can't bolt straight to the floor I have to build up 2" (1.983" to be exact) in order to clear the lip that holds the rear hatch closed.
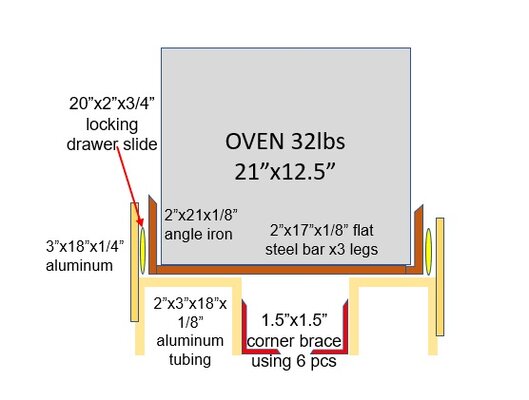
I made a pic of what I'm talking about making because I think it'll make more sense with a visual aid.

I plan on using a bunch of 6/6 rivets to secure the aluminum, the slides, and the corner brackets too. the angle iron will be welded into a box with 3 straps across the bottom for structural support.

For mounting the corner brackets to the floor they have 6 holes (3 on each side) I was thinking of using 2 wood screws in each corner brace and then one nut/bolt in the 3rd hole or should I just bolt all 3 holes down? The more holes I poke through the floor is the more I have to figure out how to seal it, (BTW what is recommended for that type of sealing?)
zTDy6.jpg
 
I think it is a bit complex. From what I see you want to suspend the slide out 2" above the floor.

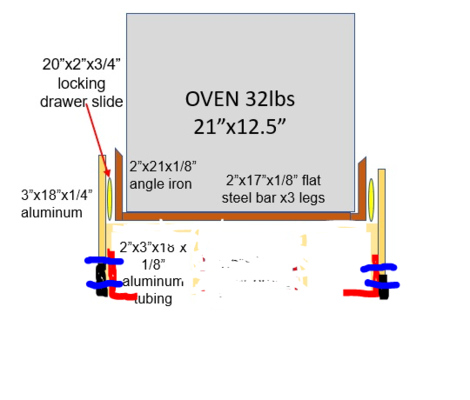
If the side plates were longer you could put the angle braces directly to the sides. I jimmied up your drawing to demonstrate.

If it were me I would through bolt the brackets to the floor. Out of habit I use a boating sealant 3M 4500 but any weatherproof sealant should work.

1660740775432.png
 
I think it is a bit complex. From what I see you want to suspend the slide out 2" above the floor.

If the side plates were longer you could put the angle braces directly to the sides. I jimmied up your drawing to demonstrate.
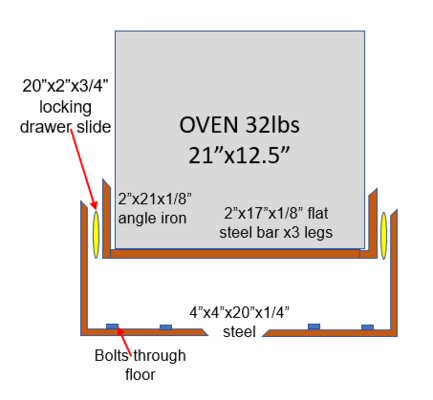
If I were to use angle iron for the base that would require a 4" bar which doesn't change the price but it would make me drive another 30 miles to pick it up from a different warehouse, because not many places sell 4" leg angle iron.
But it does seem a lot simpler to build, just bolt the angle iron to the floor and then bolt the rails to the sides of that at 3" up.

Naw - Keep your plate sides but if you can get 4" tall plate (or whatever gives the lift and overlaps the slide) - the plate would rest on the floor and be attached to your current 1.5 X 1.5 channel. That's what I was trying to show with the black extension of your side plates.

The blue lines are two fasteners through the angle and the plate with enough fasteners along the drawer depth to secure it to the angle brackets.
Those weren't 1.5" channels that was corner braces, which is why there was 6 of them mounted along the alum tube.
I think it makes more sense this way with just a 4"x4" piece of angle iron.

Capture.PNG
 
Those weren't 1.5" channels that was corner braces, which is why there was 6 of them mounted along the alum tube.
I think it makes more sense this way with just a 4"x4" piece of angle iron.

View attachment 156733
Yeah but you said you'd have to make a road trip for that.

IMO 1/4 inch steel is overkill. 1/4 aluminum should be fine and easier to drill. If steel you might not need anything over 1/8 inch.
 
Yeah but you said you'd have to make a road trip for that.

IMO 1/4 inch steel is overkill. 1/4 aluminum should be fine and easier to drill. If steel you might not need anything over 1/8 inch.
I gotta drive 2 hr no matter what metal I get it's just an extra 30 min to get the angle iron, and the 4" angle only comes in 1/4" or at least from the suppliers I can find anyway. But steel is easy to work with and I don't have to worry about it being strong enough.
 
Back
Top Bottom