SargeW
Site Team
Well, the mods have begun on our new 2023 Passport 2400RBWE. This is our 8th new RV in 25 years, and have modded them all. Sometimes out of necessity, other times it's just fun. So far this is what has been done.
First the drawer and cabinet pulls were terrible. The DW has some arthritis in her hands, and getting them open was near impossible. So heavy brushed stainless pulls were installed.
Then several hooks, towel bars, and various necessary "holders" were added.
An Andersen No Sway Load Distributing Hitch was put on.
A back up cam was put on the back of the TT to assist with getting into camp spots.
A electronic Bluetooth leveling device was installed to simplify the leveling and set up process as much as possible.
Also a remote display for the Xantrex Inverter was installed in the bedroom area.
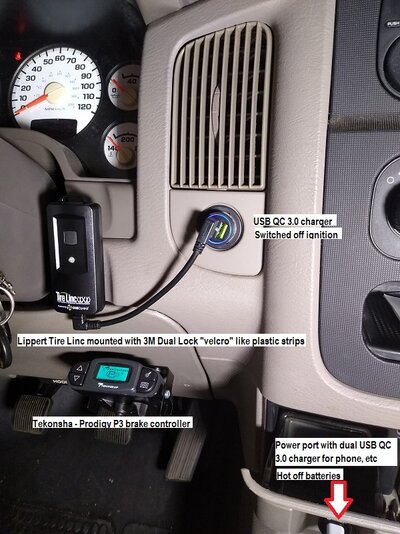
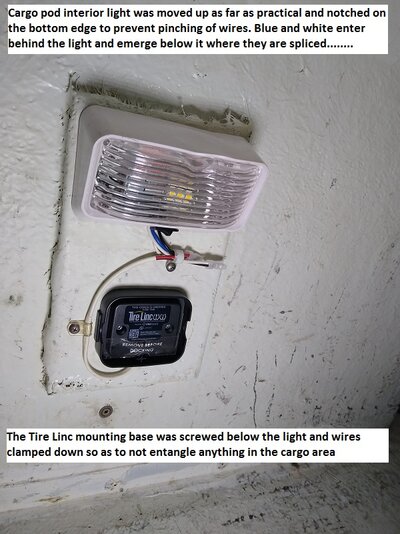
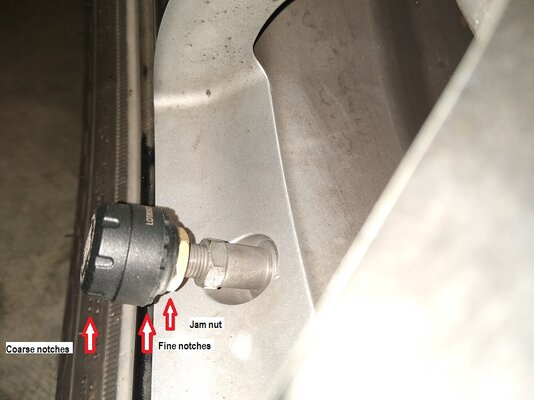
The Lippert Tire Sense TPMS was installed. The mounting dock was pre-installed by Keystone.
I added water connections in the water bay to ease the city water hook up and a splitter to the black tank flush is a one hose option. A "plunger" was added to the water bay opening to seal it up against critters that may want to check into a nice warm storage area.
Also ran a Starlink cable through the water bay to the bedroom area for the Starlink router. It has a sealed entry point as well.
I bought and installed 1/2" rubber foam flooring in the storage bay to keep stuff from flying around as much going down the road.
A Girard tankless water heater is on the bench prepping to install in place of the Suburban 6 gallon tank WH that came with the unit.
After that I will be starting to shop for a Combo washer/Dryer for the rig. That was one of the DW's big necessities.
And after that, a new remote control Fantastic Fan for the bathroom.
So there has been no time to get bored. And that's just the stuff I have though of so far:lol:
First the drawer and cabinet pulls were terrible. The DW has some arthritis in her hands, and getting them open was near impossible. So heavy brushed stainless pulls were installed.
Then several hooks, towel bars, and various necessary "holders" were added.
An Andersen No Sway Load Distributing Hitch was put on.
A back up cam was put on the back of the TT to assist with getting into camp spots.
A electronic Bluetooth leveling device was installed to simplify the leveling and set up process as much as possible.
Also a remote display for the Xantrex Inverter was installed in the bedroom area.
The Lippert Tire Sense TPMS was installed. The mounting dock was pre-installed by Keystone.
I added water connections in the water bay to ease the city water hook up and a splitter to the black tank flush is a one hose option. A "plunger" was added to the water bay opening to seal it up against critters that may want to check into a nice warm storage area.
Also ran a Starlink cable through the water bay to the bedroom area for the Starlink router. It has a sealed entry point as well.
I bought and installed 1/2" rubber foam flooring in the storage bay to keep stuff from flying around as much going down the road.
A Girard tankless water heater is on the bench prepping to install in place of the Suburban 6 gallon tank WH that came with the unit.
After that I will be starting to shop for a Combo washer/Dryer for the rig. That was one of the DW's big necessities.
And after that, a new remote control Fantastic Fan for the bathroom.
So there has been no time to get bored. And that's just the stuff I have though of so far:lol:
Last edited:


") . I googled it, nice trailer.
. I googled it, nice trailer.