'74 Midas Mini revamp

The friendliest place on the web for anyone with an RV or an interest in RVing!
If you have answers, please help by responding to the unanswered posts.
Joined
May 25, 2023
Posts
13
Location
Rexford, MT
Good morning! I just posted a quick introduction in the newbie thread, but this is where I believe I will be residing for quite a few months.
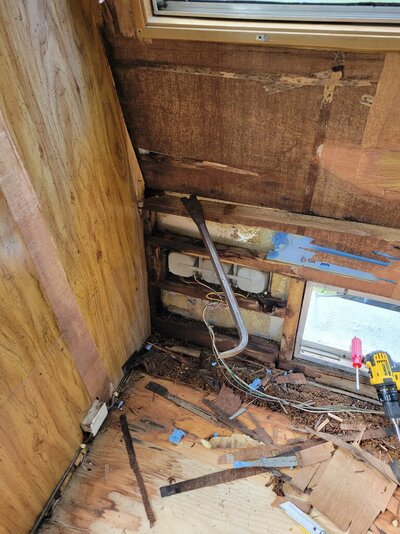
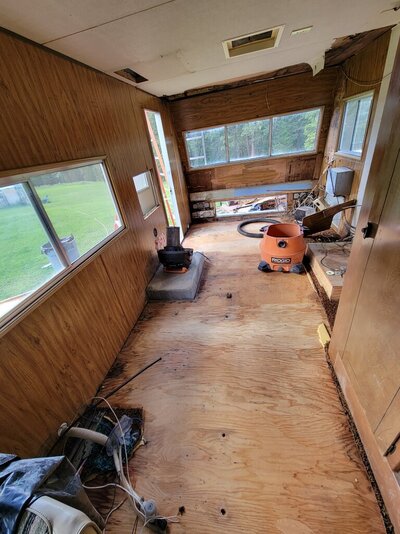
We just acquired a '74 Midas Mini on a Dodge chassis and are in the process of taking her down to 'studs' and rebuilding her. The previous owner had purchased her new, made some modifications (different heater, second gas tank and probably some other stuff we just haven't figured out yet) and then drove from Montana to Alaska somewhere and back. After that it was barely used. 34k miles on it... but a lot of water damage. We tore into the back corner and found quite a few pinholes in the roof, as well as areas not sealed correctly after the mods.

So we need to remove, clean and replace. Paneling, floors and ceiling will be replaced. We are also needing to replace the back wall framing structure and possibly some on the side and roof.

What I am worried about is the integrity of the shell as we are doing the work. Midas sealed everything together with glue, so getting the rotted frame pieces off the shell is proving to be difficult.

Can anyone share their experience? I'd hate to have to scrap the project because I inadvertently caused something to collapse.

Thanks!

Johna and Jess
 

Attachments

  • 20230523_174021.jpg
    20230523_174021.jpg
    177.3 KB · Views: 13
  • 20230523_174012.jpg
    20230523_174012.jpg
    171.9 KB · Views: 13
  • 20230523_161203.jpg
    20230523_161203.jpg
    199.7 KB · Views: 12
  • 20230523_162949.jpg
    20230523_162949.jpg
    228 KB · Views: 12
  • 20230523_173959.jpg
    20230523_173959.jpg
    175.6 KB · Views: 13
I admit I had to google it...

You are right to be cautious about removing structural support for replacement.

You might consider 1X1 internal framing wood screwed into the walls and ceiling so that as you remove internal panels and rotted frame nothing moves or sags. Once new framing is done, remove temporary "scaffolding" and install insulation/interior wall panels.
 
That's a good idea. We already figured we would be working one side at a time, due to not having indoor space. I'm hoping the rear two corners, the roof and the front driver corner on the overhead bunk will be the only real damage that we have to contend with on the uppers, but we are literally going to have to go in one step at a time.
 
You've apparently got a few tools. Just rip a few 2x4's down the middle and use those as temporary studs. Be careful not to beat them in too tight or it could push the roof up. An oscillating tool with a flat blade for debris removal could make the process of removing the glued on material less of a pain. We used them to remove glued on sheetrock from studs during repair jobs, they made our lives much better.
 
Had a 1977 Midas Mini Class C. The back end was rotted out due to the stupid worthless rooftop rack and ladder. Also a section of the roof was gone because a screw was used to hold the cabinet above the dinette up into the ceiling and THRU the roof. That was a factory error. Front window in the cabover was pulled and the front framing was replaced as it was rotted. We paid $1500 for it in 2006. Used it for 4 years and gave it to my daughter, who used it for 5 more years. She gave it to a friend.

First we sealed the roof. Then we repaired in sections from inside. Use a couple 2X4 braces to support the ceiling at the section we were working on. Remove a 4 to 5 ft wall section, rebuild it and reskin, move on. All the staples in the 2X2 (actually 1.5 x 1.5 inch) framing is on the outside of the RV. All the framing we replaced was glued and screwed together. We also added new electric since there was only two circuits. Almost everything was on one over loaded circuit.

Our aluminum skin had tiny pin holes (you could see light thru them. We ended up cleaning the aluminum, painting with a latex etching primer and then painted (roller & brush) with latex house paint. The thicker paints helped to seal the pin holes. It was a 10 ft paint job. If you were closer to the RV than 10 ft, you were too close.

We added firestone air bags to the rear because the leaf springs were almost flattened. Our Midas was on a GMC 3500 Vandura (P-30) chassis. Went from teeth jarring "bangs" when ever going over a concrete seam or bump in the highway to a smooth ride. Ran about 55LBs or so in the bags.

The waste tanks "nested: into each other and you cannot get a replacement. So if you have to replace one, then figure on removing and replacing both.

It was a nice little RV. If I had it to do over, I would have taken more time and worked on it under a roof. I think we got our money's worth out of it. Good luck.
It sounds like you described our camper to a T! Thank you for sharing. It makes this project seem less daunting knowing that someone else went through that same scenario. Do you remember what you used to seal the roof? We are looking at a couple of options but we do not know which is best.
 
As I look at the first picture, to the left side is what looks like sheetrock? That material is very heavy and if you use much of it you are likely to exceed the maximum weight limits for your chassis. You have received some good suggestions, but be cautious about adding additional weight as you rebuild.

My parents had a 1968 Midas travel trailer back in the 70's that served them quite well.
images
 
Do you remember what you used to seal the roof? We are looking at a couple of options but we do not know which is best.
The Class C had a metal roof. I rolled on a residential elastomeric roof coating made by a company called "Snow Roof". I had to special order it. I rolled the roof on two overcast days, barefoot and in long jeans. I still sunburned up to my knees even in long pants. Along with sunburning all skin that faced the roof (sunburning under the chin is very uncomfortable).

For the bus (also a metal roof), I rolled on Henry Solar-Flex Elastomeric Roof Coating. Two coats over two days. Just like the first time, I wore long pants but rolled it on at dusk. STILL sunburned up to my knees.

Rolled my daughter's truck camper roof with Henry's after we did some extensive repairs on it.

Henry Elastomeric requires a two layer base coating of any of the elastomerics in the Henry brand line (NOT the silicone Tropi-cool). So I chose to use the cheapest Solar-Flex for my base coats. Since Solar-Flex is good for 7 years, I rolled a single layer of Henry Dura-Brite Elastomeric on the roof to refresh at 6 years. Dura-Brite is good for 10 years before needing to be recoated. I prefer to recoat while the coating is still in good shape. I'm due to recoat in 2026. Henry also makes seam fabric/mesh and elastomeric caulks. I use the Crystal Clear (great for windows and glass) and 289 Solar-Flex in the cartridge tube to seal seams and vents on the roof. I used the Crystal Clear to seal the lag bolts we used when we mounted the brackets for the superstruts (used for mounting the cargo baskets that we installed the truck camper's battery bank in and the solar panels on).

The difference in heat reduction in the summer is amazing. Plus the rain on the metal roof is much quieter with the elastomeric coating. Hail is still pretty loud.

I bought my Henry's from Home Depot. It's pretty much the only place in town.

I'm sure others will tell you some nifty "RV" roof coating to use instead. I will tell you that none of the elastomerics like "ponding". On the Midas, be careful with the rear section of the roof. It likes to sag because there is little support. If I had been able to work under a roof instead of out in the open (in an area where it rained almost every day) and had more time, I would have added a slightly curved roof over the existing roof so the water would shed. In my opinion, one of the stupidest designs on an RV is the flat roof. Eventually the roof sags, water ponds and the roof fails.

The Midas wasn't my first RV/camper remodel. And it certainly wasn't the last. I have figured out that RVs of any kind are not meant to last long unless an owner makes the needed changes and upgrades. And one does not need to stick with parts that have "RV" in their name. To me, "RV" = "junk".

Don't forget that the Midas is an orphan from way back. There are no "OEM" parts. Opt for updated light fixtures (LEDs), updated appliances and updated plumbing. We were luck in that the 2 breaker box was a GE and we could buy breakers that still fit the box back then. Today, I'm not so sure we could do that. We also replaced the two single breakers with two dual/tandem breakers. This allowed us to spread out the electrical load on the breakers. One interior outlet was on one breaker, the rest of the electrical load was on the other breaker. My opinion of RV "professional" electrical work is pretty low.
 
Last edited:
If you do get a sunburn, brew up a strong cup of Earl Grey tea (not any other kind, it must be Earl Grey, any brand). Let cool and put into a spray bottle. You can pat it on but a spray bottle is "touchless". Take your shower to wash the dirt and sweat off. Dry off and then spray the tea on the sunburn. It will need to be applied as long as the sunburn is painful. Do not wash the tea off. Let it dry. It should stop the pain and it will also prevent blistering.

We keep a little 2 OZ fingertip sprayer of Earl Grey tea made up all summer long. It's great for those times when we realize we got just a bit too much sun, particularly on the face, shoulders or neck. It doesn't last long with two of us using it almost every day with the desert sun beating down. Don't use it if the trigger sprayer has gotten moldy.
 
You are undertaking a great task. Please don't get disheartend. I have some experience in repairing a class C I once owned. There may be some difficulty in tying all the front framing turns together. The framing results needs to be very strong. Add bracing anyway you can to the joints. It will not add too much weight and will be worth it.
I hope your dream comes true.
John likes to "overdo" things. He built roll cages back in his heyday, so I am pretty sure once we are done with the framing he will either have added too much weight or we will be able to take it 4-wheeling with the Jeeps. He was already talking about changing the frame to 2x4s and adding additional insulation - until he realized his 6'3" frame wouldn't be able to sleep in the camper comfortably if he did loose those couple inches.
 
If you do get a sunburn, brew up a strong cup of Earl Grey tea (not any other kind, it must be Earl Grey, any brand). Let cool and put into a spray bottle. You can pat it on but a spray bottle is "touchless". Take your shower to wash the dirt and sweat off. Dry off and then spray the tea on the sunburn. It will need to be applied as long as the sunburn is painful. Do not wash the tea off. Let it dry. It should stop the pain and it will also prevent blistering.

We keep a little 2 OZ fingertip sprayer of Earl Grey tea made up all summer long. It's great for those times when we realize we got just a bit too much sun, particularly on the face, shoulders or neck. It doesn't last long with two of us using it almost every day with the desert sun beating down. Don't use it if the trigger sprayer has gotten moldy.
This is the best advice I have gotten so far. I am ALWAYS sunburnt here in the mountains. I moved here from Indiana and I swear the sun is about 100 feet away where I live now in Montana.
 
The Class C had a metal roof. I rolled on a residential elastomeric roof coating made by a company called "Snow Roof". I had to special order it. I rolled the roof on two overcast days, barefoot and in long jeans. I still sunburned up to my knees even in long pants. Along with sunburning all skin that faced the roof (sunburning under the chin is very uncomfortable).

For the bus (also a metal roof), I rolled on Henry Solar-Flex Elastomeric Roof Coating. Two coats over two days. Just like the first time, I wore long pants but rolled it on at dusk. STILL sunburned up to my knees.

Rolled my daughter's truck camper roof with Henry's after we did some extensive repairs on it.

Henry Elastomeric requires a two layer base coating of any of the elastomerics in the Henry brand line (NOT the silicone Tropi-cool). So I chose to use the cheapest Solar-Flex for my base coats. Since Solar-Flex is good for 7 years, I rolled a single layer of Henry Dura-Brite Elastomeric on the roof to refresh at 6 years. Dura-Brite is good for 10 years before needing to be recoated. I prefer to recoat while the coating is still in good shape. I'm due to recoat in 2026. Henry also makes seam fabric/mesh and elastomeric caulks. I use the Crystal Clear (great for windows and glass) and 289 Solar-Flex in the cartridge tube to seal seams and vents on the roof. I used the Crystal Clear to seal the lag bolts we used when we mounted the brackets for the superstruts (used for mounting the cargo baskets that we installed the truck camper's battery bank in and the solar panels on).

The difference in heat reduction in the summer is amazing. Plus the rain on the metal roof is much quieter with the elastomeric coating. Hail is still pretty loud.

I bought my Henry's from Home Depot. It's pretty much the only place in town.

I'm sure others will tell you some nifty "RV" roof coating to use instead. I will tell you that none of the elastomerics like "ponding". On the Midas, be careful with the rear section of the roof. It likes to sag because there is little support. If I had been able to work under a roof instead of out in the open (in an area where it rained almost every day) and had more time, I would have added a slightly curved roof over the existing roof so the water would shed. In my opinion, one of the stupidest designs on an RV is the flat roof. Eventually the roof sags, water ponds and the roof fails.

The Midas wasn't my first RV/camper remodel. And it certainly wasn't the last. I have figured out that RVs of any kind are not meant to last long unless an owner makes the needed changes and upgrades. And one does not need to stick with parts that have "RV" in their name. To me, "RV" = "junk".

Don't forget that the Midas is an orphan from way back. There are no "OEM" parts. Opt for updated light fixtures (LEDs), updated appliances and updated plumbing. We were luck in that the 2 breaker box was a GE and we could buy breakers that still fit the box back then. Today, I'm not so sure we could do that. We also replaced the two single breakers with two dual/tandem breakers. This allowed us to spread out the electrical load on the breakers. One interior outlet was on one breaker, the rest of the electrical load was on the other breaker. My opinion of RV "professional" electrical work is pretty low.
This is awesome. Thank you so much for all your input. I am hoping to tackle the roof soon and will look all that stuff up when we make our town run.
 
Back
Top Bottom