Frederic
Member
I updated my "Engine & Trans R&R" thread the other day: http://www.rvforum.net/SMF_forum/index.php/topic,106411.0.html. Today, since it's a different area of the rig, I'm starting a new thread. Today's topic, the powder room.
When we had the interior redone, we decided that we did not want carpet in the kitchen area, we wanted vinyl. The problem was that, when Monaco built their coaches, they used these big carriage bolts to attach the structure to the chassis cab, which left the bolt heads sticking out above the floor. The carpet pad and carpet eliminated the issue but, with vinyl, it necessitated the installation of a subfloor, so that there would be no bumps underneath. Since the bathroom came with vinyl, we did not want a step down, so the subfloor was extended into it.
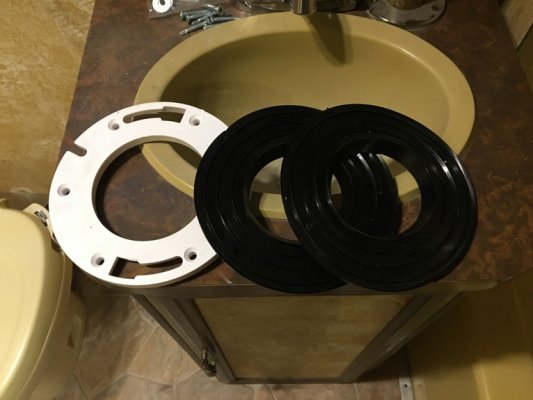
A big problem arose, when the installers decided to not remove the closet flange and just cut a jagged hole around it instead. The result was that the flange was now 1/2" below the floor...no bueno, so I called the installer and he sent Heckle and Jeckle to repair the situation. I am OCD and freely admit it. My take on effecting repairs is the Mike Holmes mantra, "Do it right the first time". Unfortunately, what they brought to fix the problem was a spacer with two rubber gaskets. While that may indeed work, I like to have peace of mind and no leaks, so I thanked them for coming out.
Yesterday I went to Home Depot and found my way to the remnant section. There was a piece of 4x4 ultra-dense particle board, so I found a guy with an orange apron and asked how much the remnant was. He asked me how much I needed and I replied 8"x8". He cut the piece and handed it to me. When I asked him how much I owed, he told me to just take it and have a good day. Can't beat free!
When I got home, I made a scribe out of 2"x2" wood, installing a screw on one end and a hole for a Sharpie on the other. I placed the 8"x8" piece on the floor and traced the jagged hole. I then took the 8"x8" to my bench grinder and got the shape I needed. I then used Liquid Nails and put the piece in, tapping it down with a rubber mallet. Then I used sawdust and mixed it with liquid nails and filled in the crack around the new piece and the existing subfloor. Once it set, I used my 4.5" hole saw and made my hole. The floor is now completely flush and I can mount a new closet flange.
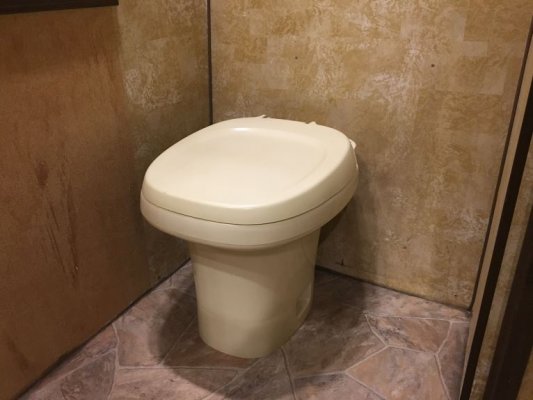
Since I'm deconstructing my S&S 10.5' camper, due to massive structural damage, I am repurposing the Thetford Aqua Magic IV toilet, to replace the original Baby Poop Yellow, aka Harvest Gold, toilet. I also added the medicine cabinet from the S&S in the Monaco shower, so we now have a place to put shampoo and soap.
Here are some pics. And, yes, I am taking the '70s wallpaper down, little by little.
When we had the interior redone, we decided that we did not want carpet in the kitchen area, we wanted vinyl. The problem was that, when Monaco built their coaches, they used these big carriage bolts to attach the structure to the chassis cab, which left the bolt heads sticking out above the floor. The carpet pad and carpet eliminated the issue but, with vinyl, it necessitated the installation of a subfloor, so that there would be no bumps underneath. Since the bathroom came with vinyl, we did not want a step down, so the subfloor was extended into it.
A big problem arose, when the installers decided to not remove the closet flange and just cut a jagged hole around it instead. The result was that the flange was now 1/2" below the floor...no bueno, so I called the installer and he sent Heckle and Jeckle to repair the situation. I am OCD and freely admit it. My take on effecting repairs is the Mike Holmes mantra, "Do it right the first time". Unfortunately, what they brought to fix the problem was a spacer with two rubber gaskets. While that may indeed work, I like to have peace of mind and no leaks, so I thanked them for coming out.
Yesterday I went to Home Depot and found my way to the remnant section. There was a piece of 4x4 ultra-dense particle board, so I found a guy with an orange apron and asked how much the remnant was. He asked me how much I needed and I replied 8"x8". He cut the piece and handed it to me. When I asked him how much I owed, he told me to just take it and have a good day. Can't beat free!
When I got home, I made a scribe out of 2"x2" wood, installing a screw on one end and a hole for a Sharpie on the other. I placed the 8"x8" piece on the floor and traced the jagged hole. I then took the 8"x8" to my bench grinder and got the shape I needed. I then used Liquid Nails and put the piece in, tapping it down with a rubber mallet. Then I used sawdust and mixed it with liquid nails and filled in the crack around the new piece and the existing subfloor. Once it set, I used my 4.5" hole saw and made my hole. The floor is now completely flush and I can mount a new closet flange.
Since I'm deconstructing my S&S 10.5' camper, due to massive structural damage, I am repurposing the Thetford Aqua Magic IV toilet, to replace the original Baby Poop Yellow, aka Harvest Gold, toilet. I also added the medicine cabinet from the S&S in the Monaco shower, so we now have a place to put shampoo and soap.
Here are some pics. And, yes, I am taking the '70s wallpaper down, little by little.