House battery access

The friendliest place on the web for anyone with an RV or an interest in RVing!
If you have answers, please help by responding to the unanswered posts.

Mpistone

Member
Joined
Apr 1, 2021
Posts
14
Location
Simi Valley, CA
Hello all, I have a 2005 Fleetwood Fiesta 26Q and I can see, through a one inch diameter hole, that my house batteries are under the second entry step; but for the life of me I don't know how to access them from above. The step, I would expect to be removed to gain access is carpeted and I just don't see any kind of latch. Does anyone know how to gain access to the house batteries. Is there a trick to removing one of more panels like a puzzle piece to lift or remove the step?
IMG_20210416_120743_hdr.jpg
 
When I had a Bounder with the batteries under the step, I didn't have to contend with carpet on the stairs, and there were a couple of screws under a rubber mat. Can you lift a portion of the carpet on the step (front OR back OR side), perhaps to find a piece of (ply)wood underneath with screws? I see something on the step with rubber that looks like screws -- could that be a key to your access?

The only other possibility that I can see is if a basement bay next to the step (ahead or behind) has access into the side of the step.
 
Hi, thanks for the reply. The rubber mat in the picture screws into a piece of plywood. I had hoped that it somehow locked the next step up in place but alas, it does not. The batter box below the carpeted step is a welded enclosure with holes large enough to run the battery cables through. I did try to peal back the carpet at just about every corner hoping to find a place to pry a "locking panel" out. Unfortunately the carpet is glued pretty much everywhere. Every other MH I have seen has a latch or locking device to hold a step or panel in place over the battery bay. I fear the previous owner has sealed the box closed and I really don't want to rip open the carpet to gain access. I only purchased the MH a month or two ago and wanted to look in on the batteries to check their age for preventative maintenance. I guess I'll have to wait until I have some down time and I can test the battery using the old fashion way to determine how much life they still have.

I'll still leave the question of how to open it in the event someone has the same Fiesta 26Q and knows a trick or can confirm that I'm just out of luck until I rip out some carpeting.
 
I'm guessing someone tried to make your steps look pretty, but I think you'll need to get to them. So you will have to cut that carpet.
 
I'd make a single cut under the lip on the front of the step so the carpet can come out with the step. It looks like it's already separate from the vertical walls at the side and back of the step, if not cut it there, too.
 
I'd make a single cut under the lip on the front of the step so the carpet can come out with the step. It looks like it's already separate from the vertical walls at the side and back of the step, if not cut it there, too.
I think you're right - there's some cutting to be down. I ran a magnet where you'd expect the screws to be (as shown in the YouTube vid) and sure enough I got a hit on both locations.
Thanks,
Michael
 
So I lucked out and did not have to actually cut the carpet to gain access. The former owner, who recently re-molded the entire interior, had folded, tucked and stapled the carpet over the access panel.
To my surprise it had two 6V golf cart batteries - Interstate GC2-HD-UTL 216Ah. They needed some fluid. but not much. As I have over a dozen 12V deep cycle 75Ah batteries I made a battery bank which provides ample AC to the house, through a new ATS. Taking the advice of others on this forum I have isolated my house batteries changing circuit and now have the option to disable the 3 stage battery charger and still use it's power supply, in essence I can run both AC and DC without the generator or house batteries via my battery bank and inverted power. I changed out the house batteries to Renogy 12V 100Ah deep cycle AGM batteries. Couple of reasons why, the biggest being no maintenance, long service life, works in colder environments, deeper discharging and my favorite, super fast charge times.

I am able, if I choose, to charge the house AGM batteries from my inverted power (albeit a bit inefficient) or from shore power and/or the generator, I also connected a Solar Charge Controller dedicated to just those AGM batteries as another means of charging.DSCN2015.JPGDSCN2023.JPGDSCN2038.JPGDSCN2041.JPG
 
Last edited:
Nice work.

I have been planning to install additional batteries and a Solar setup on the Class C that I recently got.

I had not considered using the large storage area in the back of the RV.

It would solve a couple of installation issues that I have been trying to work around.

I have struggled with finding a good path from the roof panels to the battery bank. Also the A/C distribution panel is located in the rear bedroom and running the Inverter to A/C branches was going to be a long run if I followed my initial design of locating the sealed batteries and inverter under the couch up front.

Can you elaborate on what components you used and what are the dimensions of the battery bank housing that you installed in the back storage area,

Here are a couple of pictures of my back storage.

I think that it would be a great idea for you to do a detailed write up on your solution.
 

Attachments

  • 20210321_103121.jpg
    20210321_103121.jpg
    122.7 KB · Views: 4
  • 20210321_103106.jpg
    20210321_103106.jpg
    110.7 KB · Views: 4
  • 20210321_103113.jpg
    20210321_103113.jpg
    96.1 KB · Views: 4
Last edited:
If I understand your setup, You have created your own small electric company that is separate and distinct from your normal 12 volt system.

It looks like you have designed a direct additional source of A/C similar to a generator without the noise and need for carrying fuel for it.

It seems that the limiting factor will probably be the amount of Solar that you can carry on the roof or portable panels.

Good Boondocking solution.
 
Last edited:
Can you elaborate on what components you used and what are the dimensions of the battery bank housing that you installed in the back storage area,

Here are a couple of pictures of my back storage.

I think that it would be a great idea for you to do a detailed write up on your solution.
Hey HueyPilotVA, I was 1st Air Cav - nice to meet you.
So the actual wood box measures just about 36" long, 9.25" wide and 13" tall - with a 3" wood strip in front of the battery bays. I built the frame using 1" X 10" boards and the back is plywood. The batteries I have come from Uninterruptible Power Supplies ( I am a retired I.T. Guy) and they measure 10.5" Long X 6.75" Deep and 9" Tall. You'll note that I left some room above and in front of the batteries so I can slide them into place. I used a piece of wood that drops in front of each battery so they cannot slide around and at fifty pounds each I'm not worried about them jumping upwards. The box dimensions will of course need to change to accommodate what ever batteries you select. I decided on these UPS batteries, not just because I already have a bunch, but because I did want to keep the cost down, I don't need expensive Lithium, Gel, or batteries with any cranking power for this power solution - just simple 12 volt deep cycle batteries. Being maintenance free is a real plus for me.

All of the battery and Inverter cabling is 2GA and the Solar wiring is 14Awg. I use a couple of really nice folding solar panels to keep everything charged.

I don't know if the Master on/off switch is really required but I just feel more comfortable having it. (The ANL fuse or a breaker is a must have though).

Of Note: I used a standard 14/3 25' extension cord from the Inverter to the shore power electric cord. The shore power cord and generator cord are both connected to a Automatic Transfer Switch. The RV believes it is simply plugged in shore power when being feed Inverted power. I also drilled a small hole in one of the plastic "tubs", we all have, in our storage area and ran a short cable from the Solar Controller to an XT60 female connector hidden below the RV. I have a 50' spool of 14 /2 wire with XT60 connectors I use to connect the solar panels. I do not run them to the RV roof - just not worth the effort. I put the panel(s) on a piece of cardboard on the ground, with maybe a rock if it's windy, and that's it.

Here's a list of most of the parts.
Inverter
100w folding solar panel
Charge Controller
Amp / Watt meter
3:1 heat shrink
ATS
Lug/Crimp tool
On / Off rotary switch
14AWG red-black wire
XT60 flush mount connector XT60 Male - Female connectors
2GA Battery cable (by the foot) Terminals / Lugs

Inverted power.jpg
 
I really appreciate the details. I am saving it for a more detailed analysis and see how it fits with my plans. Thanks especially for the schematic. I was one of the first
users of AutoCad version 1.1A about 40 years ago.

I did two tours, (69-71), with the 7th Armored Squadron of the 1st Air Cav. We were a squadron assigned the the 164th Aviation Group, (call sign was Blackhawks), and was south of you 1st Cav guys. We were based in the middle of the Delta.

I have some old stories on here that you might relate to.

I also will share a lead on a source of 100AH LFP0 Lithium 12 volts batteries that I found for $395 each. The source gets them from Tesla. I would put it out for all to see but I first need to order three before everyone buys them.
 
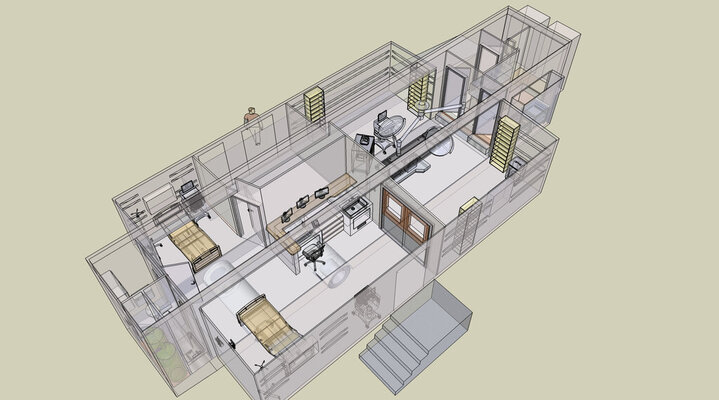
I could not sleep so I thought I would share with you the initial elements of the modified design after seeing your solution using the rear storage area.

I am a project type guy and often over design some of my modifications. They are not always completely practical or cost effective but I do enjoy doing them.

I had already selected most of the equipment for my planned installation.

The major difference and change to my plan after seeing your setup involves having a solution for where to route the cables down from the roof and where to locate the battery bank and inverter.

I am also going to feed the A/C output into selected branches in the circuit breaker panel which is located in the rear bedroom area right near the Inverter. I will skip the high amp branches like the Air conditioner circuit. This is how the Inverter in my previous Country Coach was connected to most all of the circuits using a Xantrax 458 charger/Invertor.

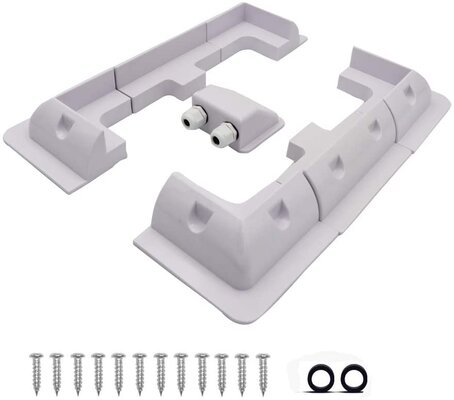
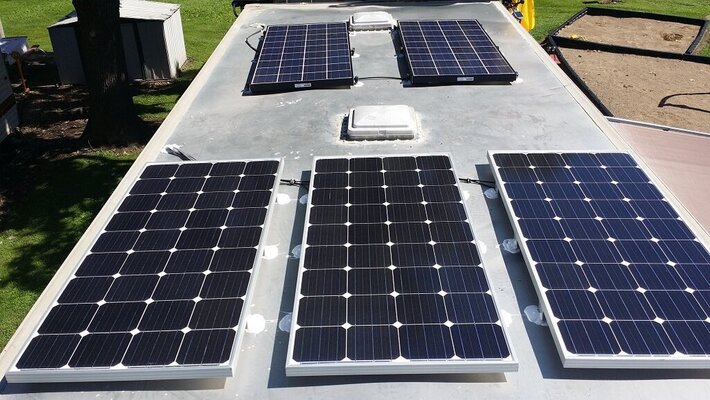
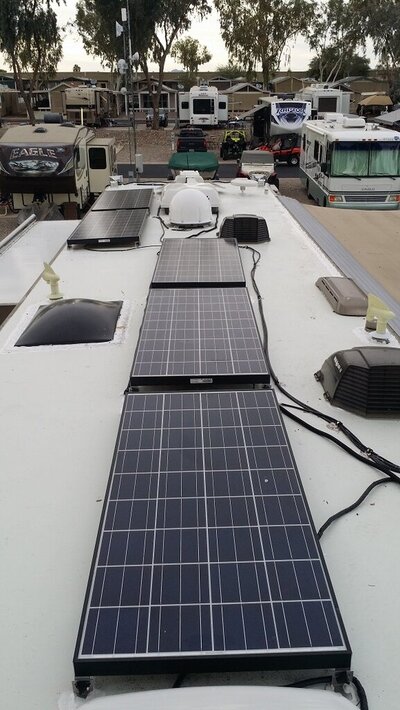
I will install four 190 watt panels on the roof using a mounting system that I found on Amazon. It is called CMYYANGLIN mounting brackets. They are expandable to fit the size of most panels and raise the panel off the roof and have an aerodynamic effect. The 10 gauge cable will pass down thru a corner closet to the storage area.

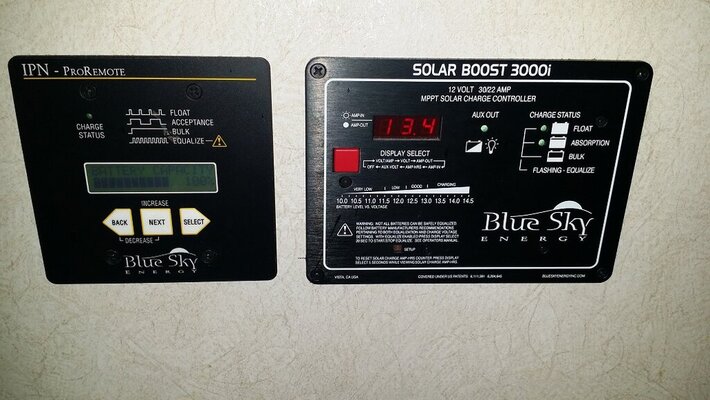
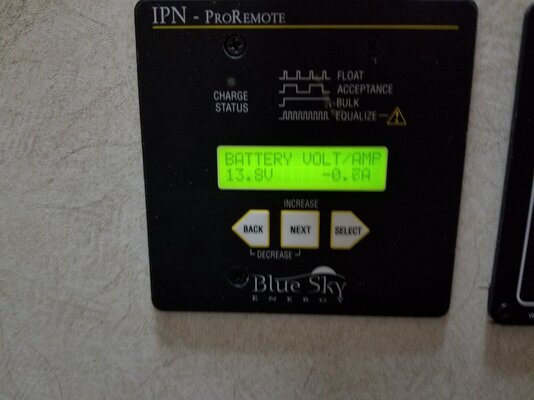
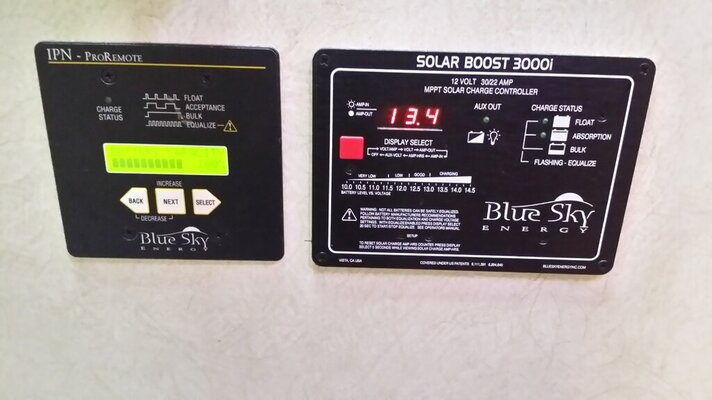
In the side wall of the closet I will flush mount the charge controllers, Remote IPN network monitor, and the remote inverter panel. This is the same setup that I installed in my last coach.

The Blue Sky system uses a master charge controller, (3000I) to network more than one charge controller, (SB3024L), (up to seven), so it works like multiple water hoses feeding into a water tank. One of the benefits is that dual controllers help eliminate shadows effecting a large single array. The blue Sky IPN monitor acts like a Trimetric monitor to show many details about the batteries.

I install inline fuses before and after the charge controllers so that I can easily disconnect the power.

This will feed into your really practical battery bank and Invertor solution.

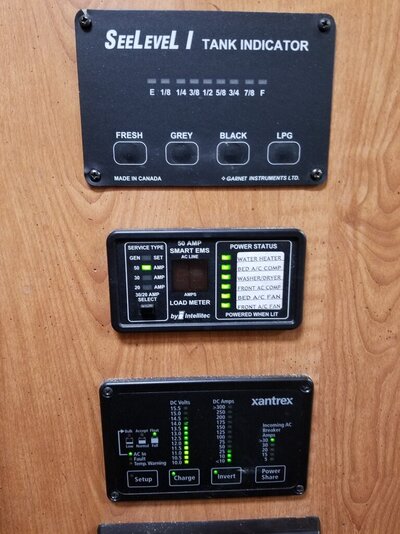
As I mentioned I will feed the A/C output directly to the circuit breaker panel and feed the AC if available from a generator or shore power to the Xantrex Invertor/Charger that will also charge the battery bank. The Zantrex XC series has a lithium charging profile. The remote control panel for the Inverter also flush mounts in the wall of the closet in the bedroom. The DC current goes into and out of the Invertor thru a catastrophic fuse,

Here are picture of the networked charge controllers and panel mount.
 

Attachments

  • r20171030_200126 (1).jpg
    r20171030_200126 (1).jpg
    127.6 KB · Views: 3
  • r20181217_214121 (1).jpg
    r20181217_214121 (1).jpg
    370.2 KB · Views: 3
  • r20181217_214116_001.jpg
    r20181217_214116_001.jpg
    214.1 KB · Views: 2
  • 51UdVAkyAxL._AC_SL1000_.jpg
    51UdVAkyAxL._AC_SL1000_.jpg
    27.2 KB · Views: 2
  • 20171030_200433.jpg
    20171030_200433.jpg
    78.3 KB · Views: 3
  • 20181217_213216_001.jpg
    20181217_213216_001.jpg
    156 KB · Views: 3
Wow, your design is much more sophisticated than what I installed. I had most all of the components (pictured above) mounted in a E150 van which I had dedicated to my camping / shooting trips. I bought my Fleetwood Class A when I retired last November and knew as soon as I saw that huge rear storage area that I found a home for some additional power.

I pretty much go out (boondocking) in the Mojave desert every 4 to 6 weeks for 4 days at a time. I may need to move to a solar system like yours, should I spend more time boondocking. With my limited RV experience I am still a bit leery about mounting stuff on my roof.
 
Thanks, It is only a little more complex because I have installed four systems on my own RVs. We learn from our mistakes.

If you are a boondocker than you might want to consider joining a bunch of us at our annual rally at Quartzsite in the winter.

Just do a search on here and you will find lots of details.

I did tend to go bigger with my projects in the past. My old solar setup consisted of 10 panels between the diesel pusher and the stacker trailer for 1600 watts and 16 batteries.
See the pictures below.

My opinion about putting a hole in my roof is that there are several openings there already, the AC (big hole), roof vents, antenna cables, crank up vents, and screws holding down the ladder and such.

I think that as long as you seal them with Dycor they do not concern me.

However if you are hesitant to mount solar panels due to screws then you might consider those panel mounts that I referenced above that can be glued down with adhesive. being a belt and suspenders kind of guy I would still use a few screws.

You will still need a hole to bring the cables down thru the roof but it can be under the panel and sealed up completely.

I got an email from Amazon today and they have several different brands of those mounts now from different vendors.
 

Attachments

  • Surgery 1.jpg
    Surgery 1.jpg
    99.5 KB · Views: 4
  • 007.JPG
    007.JPG
    156.9 KB · Views: 4
  • 014.JPG
    014.JPG
    180 KB · Views: 5
  • 200BedNPRGplusAMoHSAngle (2).jpg
    200BedNPRGplusAMoHSAngle (2).jpg
    137.1 KB · Views: 4
  • r20160821_115254.jpg
    r20160821_115254.jpg
    168.4 KB · Views: 5
  • r20161116_153925.jpg
    r20161116_153925.jpg
    138.8 KB · Views: 4
  • r20190108_133905.jpg
    r20190108_133905.jpg
    148.8 KB · Views: 4
  • rtilt2.jpg
    rtilt2.jpg
    284.2 KB · Views: 5
Last edited:
Back
Top Bottom