House Battery Cable Length / Factory Cables

The friendliest place on the web for anyone with an RV or an interest in RVing!
If you have answers, please help by responding to the unanswered posts.

X-Roughneck Strike 3

Well-known member
Joined
Feb 15, 2021
Posts
324
Location
Globe
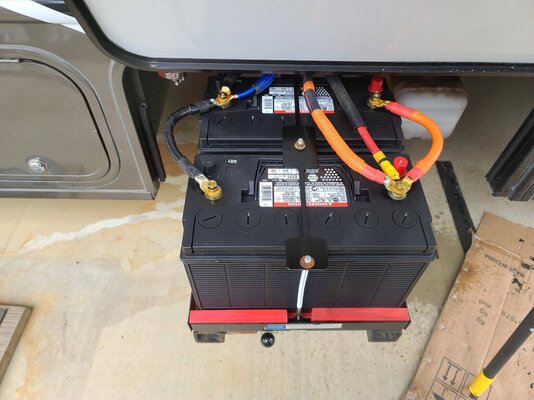
Hello board. I am looking for Online documentation that shows the Factory Length of battery cables that connect at the House Batteries. Is there WGO documentation out there that show this?

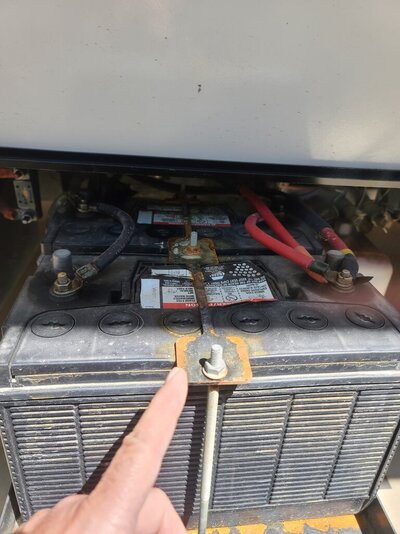
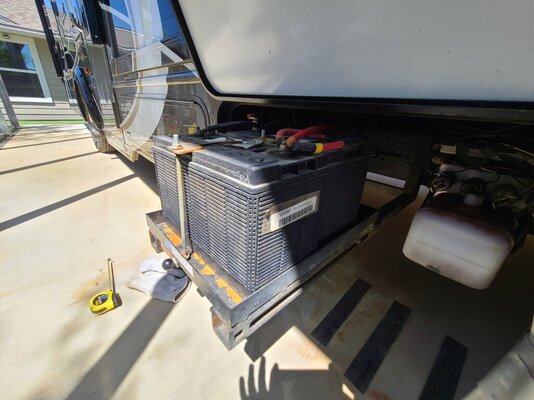
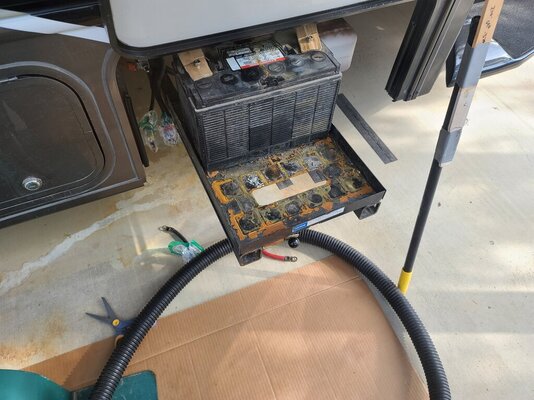
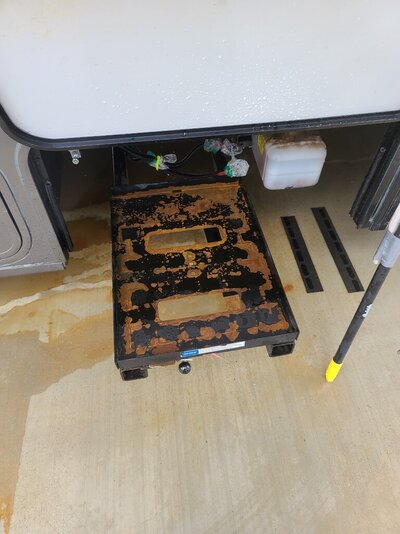
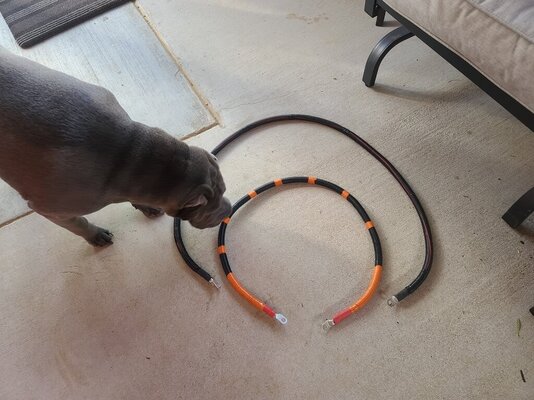
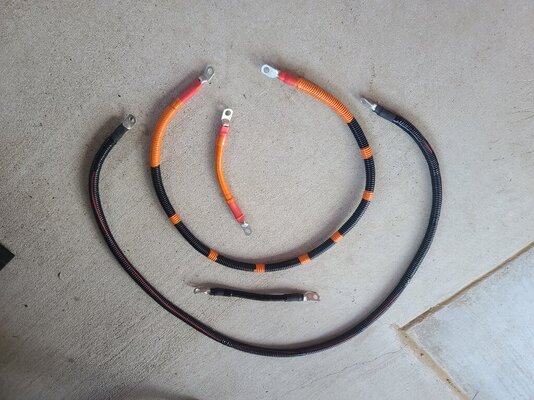
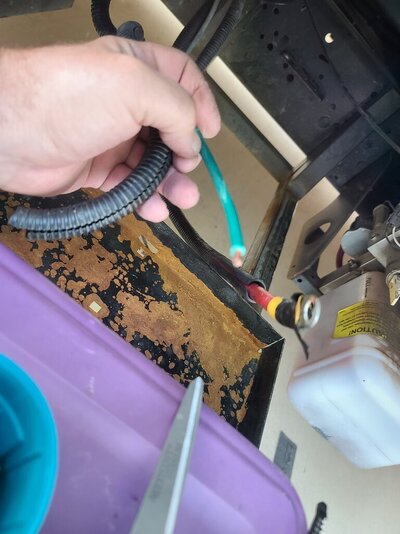
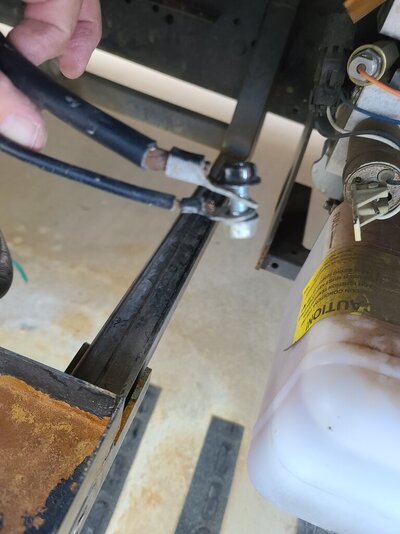
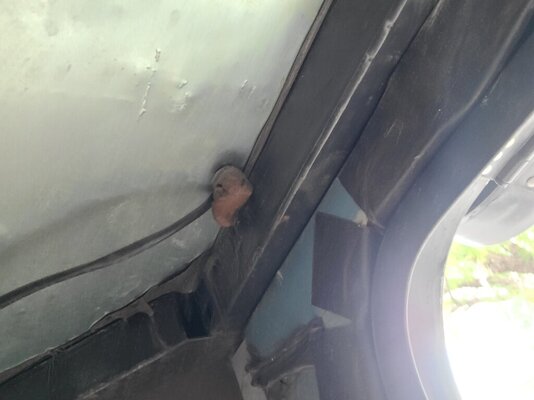
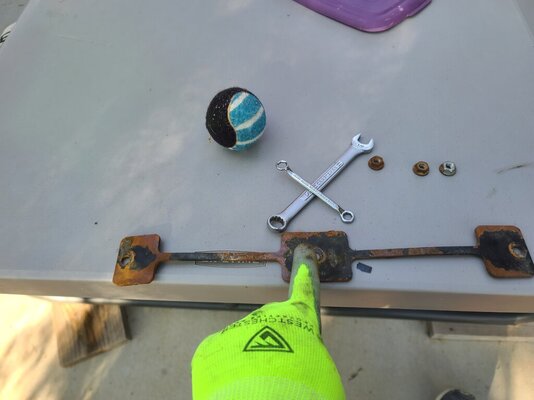
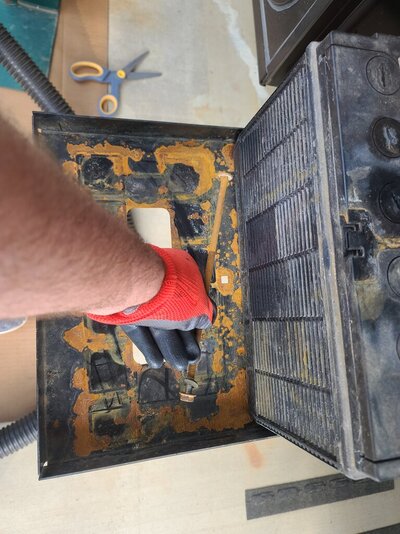
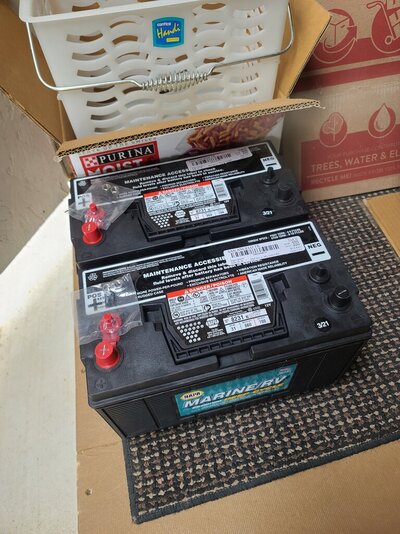
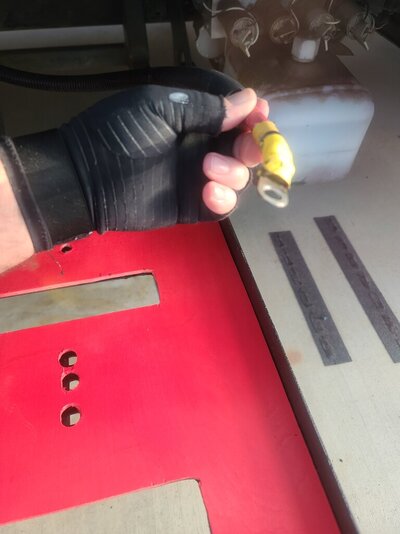
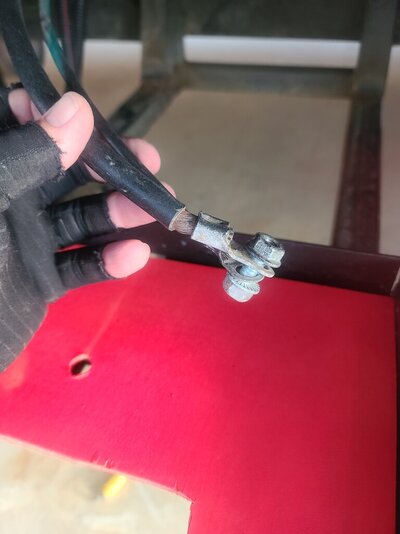
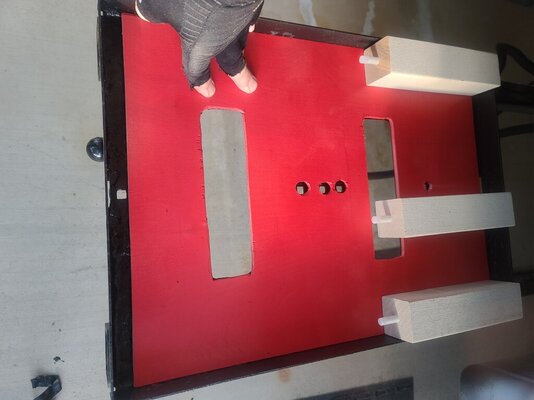
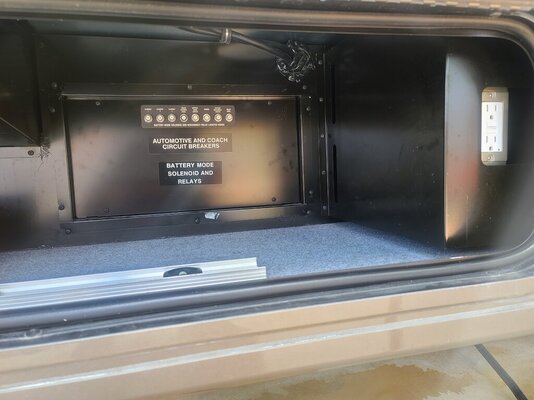
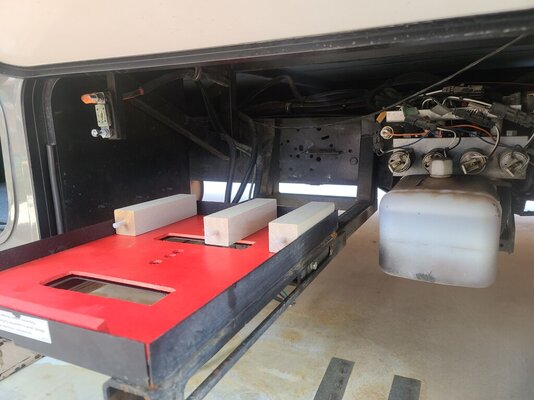
I have ordered some parts from WGO parts online for the House Battery Hold down bracket. Trying to go back Fresh when the parts arrive as I am replacing the two House batteries painting the tray etc. Freshening things up before battery acid does any real damage.

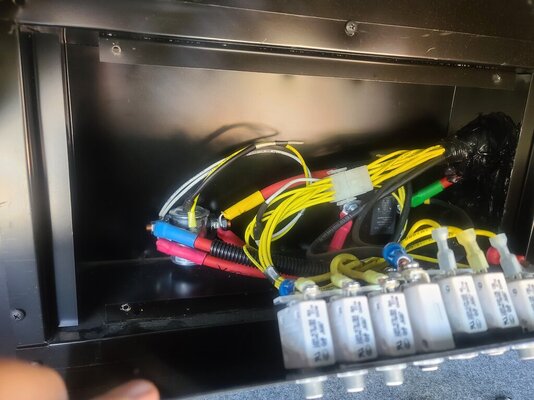
I am avoiding pulling the batts and taking this off until I have parts in hand. I am wanting to order new cables with better pressed on ends / connectors at the battery if I can find exact lengths using online documentation.

I emailed WGO customer support and asked.

JD
 
Last edited:
Don't think I've ever seen a cut list for cabling. If you want to roll your own, check online solar power shops, they have the proper gauge cabling, terminals and you can use an inexpensive crimp tool for those large terminals. It's a two part thingy that you whack with a hammer to crimp the lug.
 
John

I figure I am going to have to get them pulled out lay on the Ground and Measure them. Prolly the best approach to do it. Somebody told me Marine Shops. I have a Golf Cart Place near by and maybe they have the Crimper tool. I just don't' like the factory cables. I may have a problem of they just did not bundle the slack correctly as there is a wiring Blob zip tied up above, but when I slide my tray out I can see the full range of motion available is snubbed off with tight neg cable. I just have no desire to buy the special crimp tool and will fork out the cash for some Beautiful Looking replacement cables. I love shiny beautiful looking terminals.
 
Last edited:
If you're not happy with the current setup then why would you want to replicate it? My take on it would be to mock up the installation you really want, which may use battery cables that aren't factory length. The factory layout solves the design goals of function and production efficiency (quick and easy) but that doesn't always line up with reliability and serviceability, least of all aesthetics. If that means an extra foot or two for a cable to end up neatly dressed to their terminations, or out of the way for cell watering, then that's how I do it. I have the stuff to make my own 2/0 cables and it's not expensive or difficult but barring that, there are any number of online vendors that will make cables to your spec. When it's done you have a setup that is neat, easy to maintain and will be more reliable than the typical zip tie rat nest/corrosion mess you typically find in battery bays.

Mark B.
Albuquerque, NM
 
Now that I have the Hold Down bracket showing the UPS tracking data for the new Bolt (3), and the Original OEM Fresh battery hold down Bar enroute, I am going to Wrastle out those 2 house Batts today and trace the wires down in the Rat's nest of wiring blob.

At least they put the plastic Insulators on all the wiring to protect the outer plastic of the wires carrying the juice to the batts keeping them clean and shielded from engine heat, grime, teeth, etc. All wiring is wrapped in the removeable black plastic insulators.

Good in that respect to keep the road juice off wiring, but Crappy looking work by the ones who did it. Reminds me of their Factory Front Cap Work at the seam I re-did earlier. I did not buy top of the line either, so I am a realist. My wiring bundle may have been installed at Beer Thirty on Friday afternoon. Who Knows?

I know I am not going to wish the batteries out of the carry bracket so I got to get piddling.

I want to add the Cut off to the Negative terminal I purchased on Amazon. I will make sure I have enough loop to do a few repairs if required over time. I do not want a bunch of extra wire either.

JD
 

Attachments

  • 20210505_114950.jpg
    20210505_114950.jpg
    146.8 KB · Views: 15
  • 20210505_115248.jpg
    20210505_115248.jpg
    127.6 KB · Views: 14
If you're not happy with the current setup then why would you want to replicate it? My take on it would be to mock up the installation you really want, which may use battery cables that aren't factory length. The factory layout solves the design goals of function and production efficiency (quick and easy) but that doesn't always line up with reliability and serviceability, least of all aesthetics. If that means an extra foot or two for a cable to end up neatly dressed to their terminations, or out of the way for cell watering, then that's how I do it. I have the stuff to make my own 2/0 cables and it's not expensive or difficult but barring that, there are any number of online vendors that will make cables to your spec. When it's done you have a setup that is neat, easy to maintain and will be more reliable than the typical zip tie rat nest/corrosion mess you typically find in battery bays.

Mark B.
Albuquerque, NM
I totally agree Mark. Factory lengths may be Redone once I dig into it. My initial thought is..they are too long. I want to add a cut off to the negative side with that piece 4" near the terminal, or on the other side mounted as to not create a problem with the bulk of the Piece. Do you have any other suggestions for the Negative Terminal Cut off (Actual Pieces?). Not sure if I like this or not. I have this which will give me that end piece I am not happy with (Exposed Wires), I want more of a capped off look.

 
Last edited:
Case in point - note how your parallel jumpers arc in over the cell caps. I would reroute those to arc to the outside of the batteries so the caps are clear and watering is easier, plus it makes cleaning the battery tops easier. The other thing that stands out is your batteries are hangin' out there in the breeze. Nothing wrecks batteries, hardware and wiring more than road spray and dirt. Not sure if that kind of project is high on your priority list but life is so much easier with clean, dry batteries along with other 12V stuff like termination blocks, breakers, switches and such. I blocked off my battery box with sheet PVC and the most I have to do is dust them off once a year. Consider it an investment in maintenance saving and increased reliability. I buy red and black heat shrink with sealant and put those over the terminals which serves as both a moisture barrier and relieves some of the stress on crimp. I don't use a negative switch as I don't disconnect my batteries often enough to bother with one, I just lift a terminal. Given your operating environment I'm not sure I'd use a switch unless it was rated for water spray.

Mark B.
Albuquerque, NM
 
Pulled the batteries and exchanged them with same type (Napa 8231) that came out of the RV. Had some cables fabricated at the Golf Cart Place here in Town. Tomorrow I will paint the battery tray, with Rhino Liner Rattle Can paint, and go to Lowes and buy me a 1/4" piece of wood to line the battery tray.

Battery hold down bar, bolts will be here in the mail early next week.

There are 2 battery cables (Pos & Neg) coming out of a junction box on the slide that have Factory tips on the cables. (Can't Remove easily), so I am going to take the RV back to the Golf cart Place on Monday and he can reclamp the ends with the covered tip connectors that he used when fabricating the new cables today. I do not like the Battery cable clamps with exposed wire tip showing. Going for the Capped, bullet shaped tips. If I redo those 2 cable coming out of Junction Box, I will have all new cable tips and cables that can be easily swapped out.

The House batteries share cranking duty for the 4K Onan Gen set, and they still held a charge and were functional. I am not a boon docker, but I wanted to deal with the Acid mess now and get those batteries exchanged out. Cables were $150, batteries with exchange $340. DIY $500- ish.

A necessary expense. Deal with the problem now.

JD
 

Attachments

  • 20210514_091812.jpg
    20210514_091812.jpg
    158 KB · Views: 8
  • 20210514_144938.jpg
    20210514_144938.jpg
    130.5 KB · Views: 8
Last edited:
If you're not happy with the current setup then why would you want to replicate it? My take on it would be to mock up the installation you really want, which may use battery cables that aren't factory length. The factory layout solves the design goals of function and production efficiency (quick and easy) but that doesn't always line up with reliability and serviceability, least of all aesthetics. If that means an extra foot or two for a cable to end up neatly dressed to their terminations, or out of the way for cell watering, then that's how I do it. I have the stuff to make my own 2/0 cables and it's not expensive or difficult but barring that, there are any number of online vendors that will make cables to your spec. When it's done you have a setup that is neat, easy to maintain and will be more reliable than the typical zip tie rat nest/corrosion mess you typically find in battery bays.

Mark B.
Albuquerque, NM
This...
 
The Golf Cart Guy only had Red Cable. I was OK with it. He fabricated the Dog Bone and Pos and Neg cables. I think it is Standard 2 Guage, what ever standard Battery Gage is but I opted for the more flexible variety. Don't know Jack about batteries but I liked the Flexible I think more strands same standard Thickness.

The 10 guage connectors I paid for (gave guy a cut off cable end to Match Up) was 10 G and too small. I actually needed 8 guage, called back and he did not have the larger 8G Connectors. Local Lowes is a no go, so I Amazon-d and got a Crimper Tool 1 to 8 Guage and some Connectors for a DIY finish off the remaining ends I want to Refresh.

To DO: 2 Large Battery Connection ends coming out of the Junction Box (+ & -), and 3 each 10 Guage ends to snip and replace ends on with Fresh connectors.

The earth Ground looks like it needs a good shine up before reapplying bolts.I think one of these 10G Grounds might be the Generator and the other 30 Amp Solar wiring stuff.

The battery triple bolt hold down, I might omit middle bolt and just block shim it with dowel or block of wood. The furthest bolt has 3 " of tray behind it. Even though the bracket was over tight the batteries shifted out of square in the tray. I am going to wood block snug on corners blocking it from sliding in tray

JD
 

Attachments

  • 20210514_175218.jpg
    20210514_175218.jpg
    198.3 KB · Views: 9
  • 20210514_175533.jpg
    20210514_175533.jpg
    240.8 KB · Views: 9
  • 20210514_180429.jpg
    20210514_180429.jpg
    118.8 KB · Views: 10
  • 20210514_180445.jpg
    20210514_180445.jpg
    105.7 KB · Views: 9
  • 20210514_180523.jpg
    20210514_180523.jpg
    73.2 KB · Views: 9
  • 20210514_085855.jpg
    20210514_085855.jpg
    76.3 KB · Views: 7
  • 20210514_091854.jpg
    20210514_091854.jpg
    169.2 KB · Views: 8
Last edited:
When I purchased the 8231 replacement batteries he said they were Maint Free. When questioning him on it he said well you just remove the label and add water. I know why they want maint free, to sell more batteries.

The Golf cart guy told me those celled Batts where operator performs maint were no longer sold.

Not all people are not experts in their fields of work.

I will remove labels after I see they are not Lemons / Bricks.

Too hot here for me to feel comfortable with sealed batts./ AGM.
 

Attachments

  • 20210514_135408.jpg
    20210514_135408.jpg
    201.8 KB · Views: 9
Last edited:
Wire brush those rusty places and then coat with Ospho. I used gel batteries on the sailboat (a 4D and an 8D) and they were great, but expensive. Then AGM was the better battery chemistry, I'm on about year 11 or 12 with Lifeline AGMs. Gel and AGMs are completely maintenance free.
 
John / All

Back to waiting on Tools to arrive from Amazon. The Crimper tools I did not want to buy in the first place to be exact. Yep, I bought them out of necessity of doing the job right.

Adding pics of the two larger cable ends I need to REDO still that are coming out of the junction box all silicon-ed up. I was going to take the RV back over to th eBattery place, now I will DIY the last 2 when tools and parts arrive. I am going to replace these last 2 open tip clamps on the Battery wires with bullet type, closed off wire tips. These remaining cables can't be removed without some serious digging into the bowels of the RV. Not willing to do that to my 2017.

I ended up having buying the Crimping tool with Heat Shrink and set of terminal ends for future stuff to finish this project up. I had stated before the Golf cart place gave me 10 guage connectors, and I need 8 which I can't find here in Po-Dunk Central. I am not trimming down ground wires to make it fit the 10 g connectors either.

The Positive cable shown I see it also has the exposed end wires as does the negative clearly shown in this pic, I am assuming the 8G in the other pic paired to the Ground with bolt and nut goes to the Gen set or Possibly Solar Controller? That corrosion just wicks into the copper more and more over time. With all this acid I had splashing around only compounds the problem. I have alot of slack on the negative so a couple inches off the cable is no problem for negative. Positive cable well.....

My observation / decision is to might have surgically remove the battery Terminal end with dremel out of necessity and re-apply new Pressed on bullet tip terminal after I douse the wires tips with cleaner over original end. My fear is if I lop it off it will be getting very close to not being long enough once I re-apply a new bullet shaped press on cable terminal not allowing full range of motion for the slide out tray for servicing the cells.

My Primary Objective is to lop it off so I can get into fresh copper under the new tip. I am going to have to dry fit the batts to make sure I got the length. I am going to obtain another 1/2" forward to tray which will assist in filling the cells on the 2nd battery, but this dang positive cable has not alot to spare and that 1/2 I am going to gain moving the batts more outward in the tray will shorten my over all cable to terminal. I might be able to pull some length on the cable by yanking slightly on positive cable exits the hole in the slide box piled up with silicone.

Look in the rear of the tray. Behind the 2nd batt there is 3" of tray. I am going to cut a broom handle and glue it on the side of the from battery, slide Batt#2 against then shim in rear, Glued in and lightly place the new retain bar on top, ensuring I do not deform the battery as they did in the factory.

I put Bed liner in the tray first. Did not like it real well. Added this thin piece of wood. Angle iron is tall enough to keep things onboard when hitting bumps.

I am going to cut those wooden blocks to length to brace in back the rear of battery #2 deepest in the tray. Not going to be over tight, and will probably glue with RV Silicone on each side of the blocks or wood. Wood shim in Front, and between along with snug 3 Bolts to retain the batts on top.
 

Attachments

  • 20210516_073905.jpg
    20210516_073905.jpg
    81.5 KB · Views: 3
  • 20210516_073936.jpg
    20210516_073936.jpg
    76.2 KB · Views: 3
  • 20210516_074432.jpg
    20210516_074432.jpg
    92.2 KB · Views: 3
Last edited:
I have ford Battery Disconnected. I have the 2 House Batteries Removed. I have no 110V input voltage. I think I am somehow getting voltage off the 100W RV panel which is supply stray/ direct voltage to the 30 amp controller. I have a slight hum coming off the controller box and am wondering if I should cover the panel or remove a wire off this controller? Buzz sound is that arcing or doing possible contact damage to controller circuit board?
 

Attachments

  • 20210516_072543.jpg
    20210516_072543.jpg
    93.8 KB · Views: 1
I doubt your solar controller is arcing. More likely you're hearing buzzing from one of the number of internal components that are actively trying to control the panel into an open circuit. The simplest means to solve that is cover the panels with something.

I get the reluctance to tear into OEM wiring but maybe there's compromise there. Would it buy you anything to reorient the batteries so maybe an existing length gains slack, at the expense of a different cable that may be more convenient to replace? The first thing I did when I got my RV was to clean out the battery bay and start fresh with a new layout and hold down hardware. Was able to re-use all the cables in different locations. But if I were to come up with my "ideal" layout and it involved having to modify some hardware or maybe adding a junction block somewhere to re-route or extend a cable, then that's what's going to happen. Then there's my OCD with keeping batteries and connections clean. Batteries are nasty enough but to compound the corrosion problems with dirt and road spray is a formula for failure. It's so much easier to monitor and maintain clean batteries so sealing the battery compartment is always part of any installation I have.

Mark B.
Albuquerque, NM
Mark,

I think the wiring from the alternator is coming thru the cavity under the flooring to that Junction Box on the slide? I am not going to RE-design the routing of those 2 remaining Guessing 2 gage Battery terminals. Come to think of it, I have a electric paneling cover for the slide controllers in that basement storage area somewhat close to that box where these wires are coming from. Maybe I need to look a bit further to see if I can find and push out a bit more cable for that positive lead that is borderline the lenght I need? I am going to tape apiece of carboard on that RV 100 panel just so I can make the constant hum I am hearing at the 30 amp controller go away.

Not sure but the partial battery box enclosure to minimize road juice sounds interesting. Having something semi around those batteries shield to a great majority of the grime I am sure could not hurt. I need to I need to look up under there to see if I can Macguver something. Tell me about your sheet PVC Solution box you fabricated. Did you affix it to the undercarriage with Rivets, Tape, angle iron, or what?

JD
 
Last edited:
For the sake of piddlin, I found the other end of the wire all safe and sound in the wiring jungle. No spare slack to coax out of the run, so it was a OK and I put it back together after taking a peek. I am not willing to attempt a swap or redesign, as it is buried. Way too much effort, plus I am more liable to open a can of worms in the process of Pulling a Tool Time Tim Allen, Roh Roh Modification. I want to do as much stuff as I can to freshen it up as I am pulling the batts but within reason.

I am not sure but I am assuming this is where the convergence of the Ac to DC Converter, Gen Set Charging and Ford Alternator some how come together electrically to go back to the positive side of the house charging batts.

I have been busy doing some other tasks and am still waiting on those Amazon Parts, so that fact is dampening my enthusiasm to get knee deep into the mock up today. There Still maybe enough slack to cut that tip off and get down into some Fresh Copper under the insulation.

The battery tray and the piano Hinge will only allow for clearance to slightly above Posts on the battery. I could possibly do a 3 side enclosure with a piece on the bottom of the slide out battery frame to keep some of the juice off the batteries, but I think It would have very little value in the Grand Scheme. No way am I going to re-invent this set up, as it would only be worse.
 

Attachments

  • 20210516_143534.jpg
    20210516_143534.jpg
    106.4 KB · Views: 1
  • 20210516_142414.jpg
    20210516_142414.jpg
    124.1 KB · Views: 2
  • 20210516_143738.jpg
    20210516_143738.jpg
    112.9 KB · Views: 1
I now need to redo the shims because this top retain bar has to be in a certain place to access the cell tops. Had to shift the placement slightly when I removed the plastic cover film, and noticed my cell top was covered. I dislike this design of bar down the middle.

I also realize I have 1 Gage for the battery leads. I took the Golf cart guy at his word when he told me it was 2 Gage. So I was not able to change the two larger lead tips. I soaked them down and they are OK as things look pretty shiny.

Got the slack I need to service the terminals. Put it all in and the Gen Set Fired Right up. Ran it awhile to add a charge to the cells.

When I charge the batteries Should I clip the charge lead to Negative Battery #2 and Positive Battery #1? Diagonal? Or can I just use the front battery pos and neg terminals?

I think I am going to buy a longer cable and start plugging in to the solar input in the trunk. I use my 100 watt panel on my fence as my roof RV panel is shaded from RV Port.
 

Attachments

  • Need better shims.jpg
    Need better shims.jpg
    126.6 KB · Views: 4
Last edited:
Are these your house batteries or the chassis batteries? House batteries will be charged from the inverter/charger, chassis batteries won't be charged unless you add a Xantrex Echo~Charge or a Trik-L-Start.

If you are manually charging with a portable charger, it doesn't make any difference which positive terminal you use.
 

Latest posts

Forum statistics

Threads
131,973
Posts
1,388,466
Members
137,722
Latest member
RoyL57
Back
Top Bottom