How can I reduce truck squat?

The friendliest place on the web for anyone with an RV or an interest in RVing!
If you have answers, please help by responding to the unanswered posts.
Its really quite simple the truck is meant to squat under normal loads if it squats too much and your lights are high you have to much weight on it. Its really not rocket science. The manufacturers design the trucks to be level when loaded not level too much load.
B.S! My F-250 is basically level when empty, maybe an inch higher in rear at max. I don’t care what the rating is, you put 1000-1500 lbs in bed it WILL squat… period! I’m willing to bet in states with no inspections 3/4 of truck owners never even think about their lights! And if they do half of them don’t realize they can be adjusted! When I say, IF the manufacturer or you thinks my truck will set level with max load then I do say B.S. and I for one will not go buy an F/450, know why? It won’t sit level either with max load. Think about it, it’s not rocket science!!
 
B.S! My F-250 is basically level when empty, maybe an inch higher in rear at max. I don’t care what the rating is, you put 1000-1500 lbs in bed it WILL squat… period! I’m willing to bet in states with no inspections 3/4 of truck owners never even think about their lights! And if they do half of them don’t realize they can be adjusted! When I say, IF the manufacturer or you thinks my truck will set level with max load then I do say B.S. and I for one will not go buy an F/450, know why? It won’t sit level either with max load. Think about it, it’s not rocket science!!
If your f250 is sitting level when empty my guess is it has a leveling kit in it? Now i could be wrong but did you buy it new? Every truck i have every outfitted and that is in the 1000s has had a rake including all of my own, so with the exception of this truck i have always put a leveling kit in them.
This current f350 drops more than 4inches to just above level when loaded with my trailer.
They are designed that way. So that when loaded they are level if the rear is sagging that means the front is too light which i turn means lighter steering with less control and less breaking , in turn means overloaded. Having said all of that different trucks will squat at different levels depending on how stiff the spring package is in that particular truck
Ie your 250 may haveca payload cap of 3000lbs as an example
Another 250 may only haveca payload cap of 2000lbs
 
Last edited:

Your vehicle’s headlights are one of the most important parts of road safety because they allow you to see the trail better in low light and nighttime. Therefore, the headlights must be appropriately adjusted to ensure that they are providing optimal performance. Headlights that are improperly aligned can jeopardize your safety and can blind oncoming drivers, as well as compromise visibility.

It might be necessary to need to adjust your headlight alignment if:

  • You have replaced your old headlights recently
  • After the vehicle was in a collision
  • You will carry additional weight
You must check the alignment of your light before driving your car at night time to ensure that they are aimed correctly. If things don’t seem right, you can readjust your headlights through a simple process that requires a few tools that you may already own.

Required Tools and Materials Required to Adjust Headlights

So, how to adjust headlights? For aligning your vehicle’s headlights, you will need a screwdriver or ratchet that will work with the headlight adjusters of your vehicle. Generally, different vehicles have headlight adjusters located in different locations. To find out where they are placed in your car, you can check in the owner’s manual of your car or somewhere adjacent to or behind the headlights.

To know the exact type of screwdriver you would need, you can look at the kind of screws your vehicle has.

Adjusting car headlights you’ll also need:

  • Over 25 feet of space
  • Measuring tape
  • Painter’s tape
  • A flat surface
  • A piece of cardboard for blocking light
  • A dry-erase marker
adjusting headlights


Steps for Adjusting Headlights

To ensure that your headlights are correctly aligned, the vehicle needs to be on flat level ground. Aiming headlights can be done either inside or outside with the help of our systematic guide on how to adjust headlights:

Get Your Vehicle Ready​

To prepare your vehicle for headlight alignment, fill your tires to the appropriate air pressure and make sure there is a half tank of gas because the weight of the fuel affects the vehicle’s stance. Additionally, if you use your car to carry heavy equipment regularly, then it will be best if you have them in the vehicle at the time of the headlight adjustment.

Figure Out The Headlight Axis​

Using the dry erase marker, draw a dot in the center of each headlight. The dot will signify the headlight axis. Remember to mark the regular headlights and not the high beams.

Parking Your Vehicle​

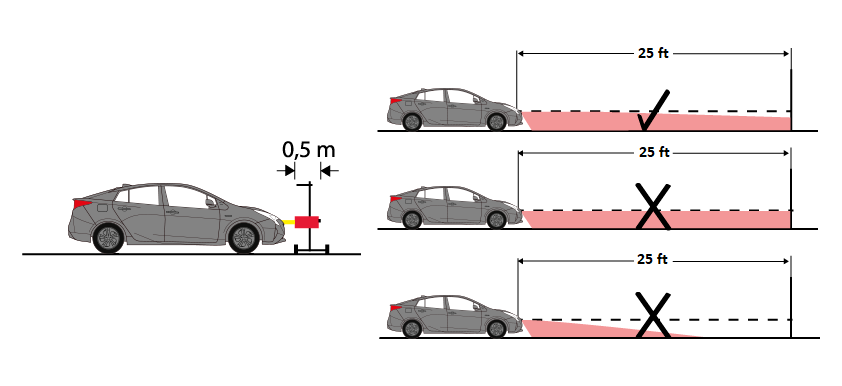
After identifying the headlight axis, park your car right in front of a flat surface such as a level wall. Also, ensure that you should have at least 25 feet of backing space in a straight line from the parking spot.

Settle The Suspension​

You can jounce and settle the suspension by bouncing the vehicle a few times on all four corners.

Determine A Center Guide​

With a piece of painter’s tape, mark the wall in line with the center of your vehicle, you can use the license plate or hood ornament as a guide. The measurement doesn’t have to be exact.

Marking The Headlight Axis On The Flat Surface​

adjusting headlight axis


Using the painter’s tape again mark the wall in front of each headlight axis with a vertical strip. Make sure that the axis dots on the headlights line up with the center of each tape.

Find Out The Headlight Axis’s Height​

Using the axis dot as your guide, measure the height of the axis from the ground with the measuring tape.

Mark The Height Of The Axis On The Flat Surface​

Use the measuring tape to measure up the flat surface to mark the height of the headlight axis on the tape placed.

Find The Headlight Cutoff Lines​

Find The Headlight Cutoff Lines


You will find the headlight cutoff lines on the driver’s side about 4 inches below the headlight axis. For the passenger’s side, it is recommended to drone a line 2 inches below the headlight axis. The passenger’s side is usually lower to reduce the glare seen by oncoming drivers.

Mark The Headlight Cutoff lines​

After you have found the headlight cutoff lines place a horizontal strip of painter’s tape above each cutoff line on the same level. If the bottom of the painter’s tape will not line up with the drawn cutoff line, you may find it challenging to see the cutoff from a distance.

Back-Up Your Vehicle And Turn On The Headlights​

Since you have not completed all the necessary steps for checking and marking the alignment of your vehicle’s headlights, you are not ready to adjust them.

Back up your car (about 25 feet away from the wall in a straight line) and turn on the headlights. It is also essential to turn off your garage lights and all the other light sources. We recommend you to perform this task at night if you are doing it outside.

Time To Adjust Your Headlights​

It is essential first to find the adjustment screws. In most headlights, it is vital to remove the trim ring from the headlight. The adjustment screws are usually located n the top and side of the light housing. However, if you cannot find the adjustment screws, you should refer to the user manual of your vehicle.

It is a smarter idea to individually adjust your vehicle’s headlights; this will allow you to conveniently adjust the vertical and horizontal field of both the headlights of your car to the correct level. We recommend you to check the manufacturer’s guidelines to ensure that you are explicitly following the mentioned instruction, and you are not causing more harm than good.

Test The Adjustments​

test headlight adjustments


The last, but the most crucial step is to ensure that your vehicle’s headlights are providing proper visibility after adjustment. Go for a test drive to ensure that your headlights are correctly adjusted.

Conclusion​

Adjusting your vehicle’s headlights should be your top priority because unadjusted headlights can not only compromise your road safety, but you can put other drivers at high risk as well. So, if you were wondering how to adjust headlights, then don’t worry! Follow our simple steps and align your vehicle’s headlights at home.

However, make sure that you check your vehicle’s user manual before starting the adjustment procedure as different cars have different measurements that are important to take into consideration before you adjust the headlights of your vehicle with the help of this tutorial/post.

Any further queries about how to adjust headlights? Please share them with us in the comments section below.
 
Air bags will do you a world of good. Get a wireless remote air compressor to control the amount of air "on the fly", and you will be golden.
 
"I-95 in So. Carolina) the ride is terrible. I wonder if I over did it??"
It's not you, it's the road. Gotta be in the top 10 worst roads in the US. I avoid it like the plague. It's built on swamplands and made of concrete.
 
Good idea! I have had air shocks but couldn’t justify the cost of on board compressor. Recently installed Tombrebs on my F-250, does the job, has zero effect when not towing but on a tough road (I-95 in So. Carolina) the ride is terrible. I wonder if I over did it??
"I-95 in So. Carolina) the ride is terrible. I wonder if I over did it??"
It's not you, it's the road. Gotta be in the top 10 worst roads in the US. I avoid it like the plague. It's built on swamplands and made of concrete.
I stopped taking that section of road a few years ago for the same reason. It is so rough. I use to take 81 south to 64 then pick up 95 just south of Richmond. Now we go further south on 81 and pick up 77 to 26 down to 95. Miss nearly that entire section in SC.
 
Speaking of "squat". Apparently that look is very popular with the young pickup truck kids in NC. They are modifying them by dropping the box or raising the hood and front fenders to give them that squat look. The state has recently banned such modifications.
 
peaking of "squat". Apparently that look is very popular with the young pickup truck kids in NC. They are modifying them by dropping the box or raising the hood and front fenders to give them that squat look. The state has recently banned such modifications.
sounds like the early 70's again, and the late 50's
 
There are basically two ways}
Air shocks or air bags may help but you have to adjust pressure to keep every time you hook/unhook.

Option 2 is a load equalizing hitch. this type of hitch has a pair of torsion bars and devices to it basically "Lifts" the hitch forcing some of the weight onto the front axle of the truck.. >Larger trailers often have this type of device.
 
Option 2 is a load equalizing hitch. this type of hitch has a pair of torsion bars and devices to it basically "Lifts" the hitch forcing some of the weight onto the front axle of the truck.. >Larger trailers often have this type of device.
John, the OP has a fifth wheel.
 
It’s not my business or concern if you are over weigh. You asked for help leveling your truck. Just get the Firestone Ride Rite Air bags with an onboard compressor and your problem is solved. Newer trucks are built for ride quality, but have to be able to carry the weight, which in turn they use softer springs. Never mind the weight police. It makes them feel important I guess. One snipped at me one time. Lol.
 
I stopped taking that section of road a few years ago for the same reason. It is so rough. I use to take 81 south to 64 then pick up 95 just south of Richmond. Now we go further south on 81 and pick up 77 to 26 down to 95. Miss nearly that entire section in SC.
Gasoline in the state is considerably cheaper than neighboring states....lower tax. Consequently less $ for infrastructure, plain and simple. However they have redone the southern half of 95 recently, it was very good two weeks ago, the northern third is still quite bad. I probably should of got lighter weight Timbrens for a little more give. Maybe someday I'll get the air bags with the compressor I just hate the thought of more mechanical crap (compressor, wiring to run it) to give me problems down the road. Maybe the weight police are right, I'll go get me an F-450 dually so I can get all swollen up and ride like a buckboard ALL the time, loaded AND empty!! Naw, I don't think so!!! LOL
 
I will try one last time.

With no load, my headlights are fine. I did adjust them after replacing a defective one. Driving well back from another car, the sharp top cutoff is just at the bottom of their rear window.

With trailer, headlights are a little high.

Steve, if your headlights are right with 4 inches of squat with trailer, then they MUST be low with no trailer - by your logic. It is just geometry and isn’t about weights. The weight causes the geometry but I didn’t ask for weight help.

All, I like the idea of air bags though I am not sure I want to rip out the rear suspension to do it and, I don’t have a shop anymore Being full time till next summer. Perhaps there are just booster bags? I am trying to learn about timbren suspension kits but I am in a poor location to get much internet bandwidth Until maybe next week.
Timber's are quite affordable, simple to install and have zero affect on ride when you're unloaded. However say if you're only squatting say 3" loaded like I was DO NOT over do it! I can't remember what load weight I bought but as far as I'm concerned...they're too much. The ride is quite unforgiving when loaded, the 5th wheel MUST be pounding all over the place on a rough road. Truck was squatting about 3" without them, maybe 1"-1 1/2" with the ones I have but when they come into play like I said in my opinion they are way to stiff. I still like the fact I do not need an onboard compressor.
 
I will try one last time.

With no load, my headlights are fine. I did adjust them after replacing a defective one. Driving well back from another car, the sharp top cutoff is just at the bottom of their rear window.

With trailer, headlights are a little high.

Steve, if your headlights are right with 4 inches of squat with trailer, then they MUST be low with no trailer - by your logic. It is just geometry and isn’t about weights. The weight causes the geometry but I didn’t ask for weight help.

All, I like the idea of air bags though I am not sure I want to rip out the rear suspension to do it and, I don’t have a shop anymore Being full time till next summer. Perhaps there are just booster bags? I am trying to learn about timbren suspension kits but I am in a poor location to get much internet bandwidth Until maybe next week.
The Firestone air bags are an add-on kit, not a suspension replacement. I feel you on missing the shop, but I'm pretty sure they could be installed without a lift if you're still limber enough to crawl under the truck.
 
I will try one last time.

With no load, my headlights are fine. I did adjust them after replacing a defective one. Driving well back from another car, the sharp top cutoff is just at the bottom of their rear window.

With trailer, headlights are a little high.

Steve, if your headlights are right with 4 inches of squat with trailer, then they MUST be low with no trailer - by your logic. It is just geometry and isn’t about weights. The weight causes the geometry but I didn’t ask for weight help.

All, I like the idea of air bags though I am not sure I want to rip out the rear suspension to do it and, I don’t have a shop anymore Being full time till next summer. Perhaps there are just booster bags? I am trying to learn about timbren suspension kits but I am in a poor location to get much internet bandwidth Until maybe next week.

Air bags are not a replacement, but an add-on (as mentioned above). I installed them on my last two trucks. It was not very difficult. It would be now as my knees aren't what they used to be, and I have a bit of trouble getting up off the ground anymore. But really, a half a day job if you have the right tools. You don't need a shop. I did both of mine in my driveway. The hardest part for me was on my last truck, when I also installed the wireless remote compressor. It involved finding a place to mount the compressor, wiring it, and running all the air lines to it. Still not difficult, but just more work. There are plenty of YouTube videos on installing these things. This would be my choice.
 

Latest posts

Forum statistics

Threads
131,929
Posts
1,387,696
Members
137,678
Latest member
David W.
Back
Top Bottom