I'm from the Netherlands - own a 1994 Winnebago brave RC23 with a P-30 1993 chassis

The friendliest place on the web for anyone with an RV or an interest in RVing!
If you have answers, please help by responding to the unanswered posts.

lrook

New member
Joined
Dec 18, 2023
Posts
2
Location
Netherlands
HI all
since two years i am the owner of a 1994 Winnebago Brave rc23 (prepped for 230 by Winnebago Europe)
I remodeled the interior, changed the tyres worked on the engine etc and removed the generator/airco and Micro-wave and installed a inverter and solarpanels.
I now face an electrical problem MY taillight and tail contour lights are no longer working.
We checked the fuseblock underneath the dash but cant find any defects, any body knows which fuse is for the tail-lights and where is it located
the brakelight and turnsignals are all working.


regards Lars
 
Welcome to the forums, Lars! Lots of friendly and knowledgeable folks here.

If you add your Brave’s details to your signature, it’ll help with future posts. Also, suggest keeping your questions in separate posts to avoid confusion. (Not that you did anything wrong in your first post, it’s very clearly stated.)

Sounds like you’ve made a lot of ptogress! We love pictures! I have zero knowledge to anything Winnebago-specific. Just wanted to welcome you. There’s a whole bunch of Winnie folks who will be along shortly. @John Canfield
 
Last edited:
For that year, this is a General Motors product, and brake/running lights will be powered from the chassis circuits. So to start, it will be a chassis fuse block you're looking for. I have the successor to that chassis, much newer but will offer to you there can be more than one fuse block and relay box. In mine there's one on the firewall to the left of the steering column, one inside the dash near the instrument cluster, and a fuse/relay box on the engine side of the firewall. The problem may not be a fuse but at least you can determine if power is being supplied to those circuits. Looks like you can get house wiring diagrams from winnebago so that can go a long way towards tracing any body wiring faults. I recommend saving this information as part of your documentation package.

Wiring Diagrams

Mark B.
Albuquerque, NM
Thx Mark i will look for the other fuse block as you mentioned ! i downloaded the scheme's but it did not show me location of fuse blocks (maybe bcs i am an amateur on wiring diagrams)
 
but it did not show me location of fuse blocks

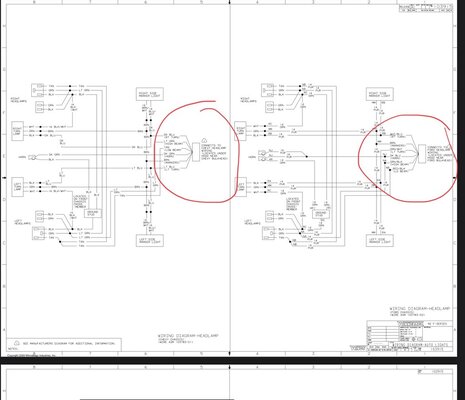
These are fuse blocks. It’s different in each drawing but these are the first 2 I looked at. The words next to the block tells you what the wiring connects to.


6785478A-2A07-40D3-954D-9A5FB6748342.jpeg
 
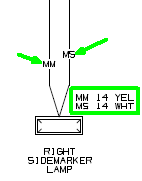
No, the parts manual doesn't show detail for the block locations. The chassis manual (GM) will detail the specifics of the fuse and relay panels. Per Ohiosnowbird the wiring diagrams detail where the connections are made so once you find the block(s) you can trace things through if necessary. Not sure when Winnebago started this but on mine at least, all the individual wires that they install are individually marked as identified on the schematic:

1703002595148.png

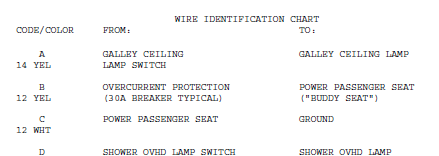
When you first dive into this stuff it just looks like a mess of yellow and white wires but once you figure out the labeling scheme and how junctions are identified on the drawings, it just comes down to tracing the path they take in your particular RV. Towards the back of the wiring diagram document is an identification chart arranged in order of code and number so you can readily determine what a wire does by it's marking, without having to search through dozens of pages of drawings.

1703002841509.png

As far as I know this level of detail provided to owners by the manufacturer is unique to Winnebago and is an invaluable resource for maintenance and repair.

Mark B.
Albuquerque, NM
 
HI all
since two years i am the owner of a 1994 Winnebago Brave rc23 (prepped for 230 by Winnebago Europe)
I remodeled the interior, changed the tyres worked on the engine etc and removed the generator/airco and Micro-wave and installed a inverter and solarpanels.
I now face an electrical problem MY taillight and tail contour lights are no longer working.
We checked the fuseblock underneath the dash but cant find any defects, any body knows which fuse is for the tail-lights and where is it located
the brakelight and turnsignals are all working.


regards Lars
Hi Lars- I have owned a 1994 Winnebago Brave R 23RC since 2016 and it has been a very reliable rig. Unfortunately I can't help you with this electrical problem, but was hoping you may help me with a brake question. I have replaced the front and rear breaks discs and shoes, and the master cylinder, but it still takes what I would consider excessive pressure on the brake pedal to stop. I was told by an experienced older RV owner that this should not be the case, it should stop like a similar year van. I know "excessive" pressure is subjective but was wondering if you have any thoughts on that? Thanks! Mark, Olympia, WA.
 
Mark, you may want to check out this youtube video regarding upgrading the Hydrobooster, there is another model out there the 178-1040 which does not require pulling the input shaft, but does require adjusting the stop switches as the pedals sit a fraction of an inch lower with it. Also the eyelet hole is slightly larger, but can be shimmed with a short piece of thin wall hobby brass tubing.
p.s. I am not sure about your model year, but I know this does apply to the 1996+ P30/P32 chassis coaches.

 
Back
Top Bottom