Mavarick
Well-known member
- Joined
- Jan 30, 2011
- Posts
- 2,027
I looked at GPS devices for the MH for the longest time and decided I did not like the small screens. (I don?t have a need for one in my other vehicles.) The ones I looked at I found myself having to stare at them too long to focus. After reading about problems regarding hoods to fight sun glare and the extended windshield mount arm used in a MH I decided the best option for me was my laptops 15? screen.
I loaded Microsoft?s Streets & Trips 2011 for about $35 (without their GPS). I then ordered a Holux GR-213-USB GPS receiver for $39. The Holux has a 6? cord making it easy to sit right in the windshield and reach the laptops USB port.
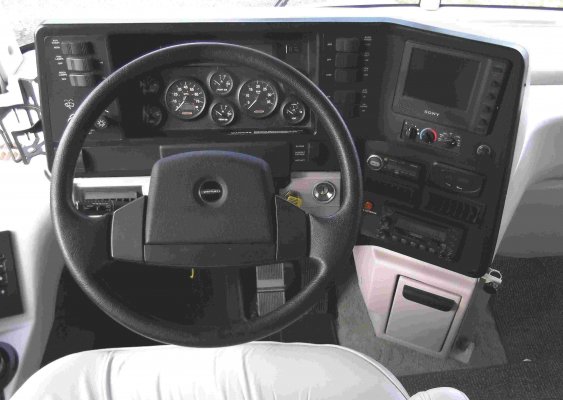
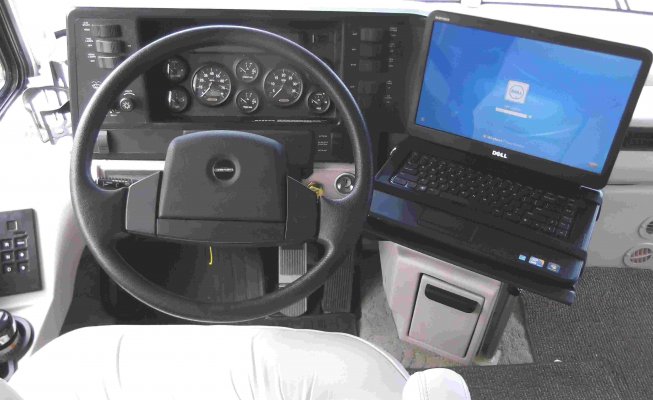
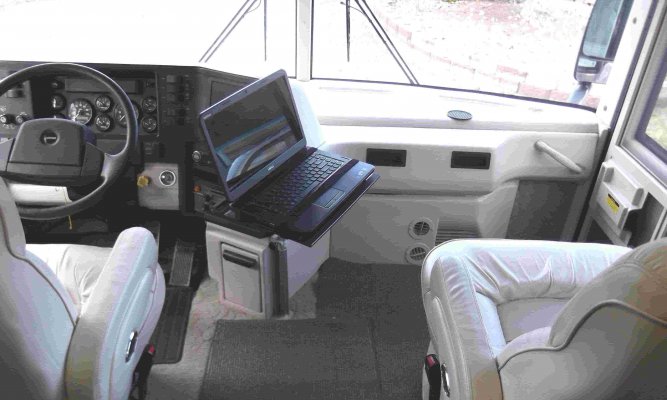
I then decided on the best spot for the laptop. Not too high to block vision but also high enough to scan easily when checking across from mirror to mirror. With the lid down everything is accessible such as backup camera, heater controls, etc. It sits just high enough for my knees to clear under it when getting into/out of the seat. I can also tilt the wheel to different positions without interference.
I also wanted the laptop to pivot over towards the passenger seat completely out of the way, if needed. The entire stand is removable from the base or can be locked in place with the small black knob.
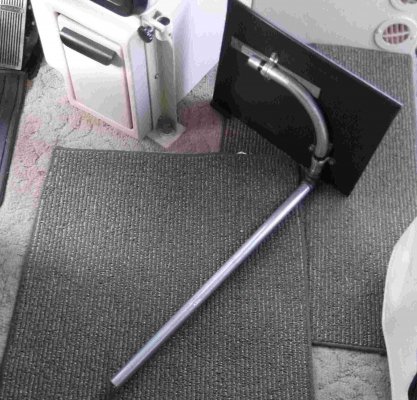
The stand was constructed out of an old B-B-Q side shelf and some ?? EMT electrical conduit. I used the long 90 at the top to get the correct angle for the pivot and used EMT clamps to retain it to the shelf. I used some flat steel pieces as a shim to tighten up the EMT clamps. To connect the straight to the 90 I used a ?? black iron 90 with 2 ea close nipples threaded into the pipe 90. I machined down one end of the OD of the close nipples to fit tight inside the EMT then drilled and used a screw to lock the fitting to the EMT.
The base was just a piece of angle iron welded to a flat plate, with a fitting on the bottom center to fit the ID of the EMT, similar to how the close nipples are used above. I welded another piece of tubing at the top of the angle iron for the straight EMT to fit down through. I also welded a piece of square stock at the top of the angle and then drilled and tapped it for the black locking knob.
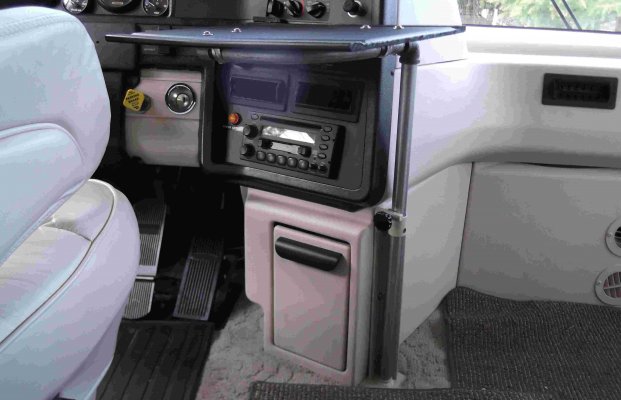
I installed the base using the existing 3 screws that are used to hold the lower trim in place going down the side of the dash. These 3 screws go into metal framework behind the plastic trim.
The laptop is held in place on the stand using two pieces of ?? strip Velcro wrapped around the stand and laptop. I installed a small DC/AC converter in the small map box below the laptop and that is where the laptop plugs into. This keeps all the cords out of the way. The converter ($25) was easier than running another 120v circuit from the onboard inverter in the MH.
Just about everything here was made out of what I had lying around so a very minimal investment and a good Sat project. Hope it helps someone else looking for a good spot for a laptop.
I loaded Microsoft?s Streets & Trips 2011 for about $35 (without their GPS). I then ordered a Holux GR-213-USB GPS receiver for $39. The Holux has a 6? cord making it easy to sit right in the windshield and reach the laptops USB port.
I then decided on the best spot for the laptop. Not too high to block vision but also high enough to scan easily when checking across from mirror to mirror. With the lid down everything is accessible such as backup camera, heater controls, etc. It sits just high enough for my knees to clear under it when getting into/out of the seat. I can also tilt the wheel to different positions without interference.
I also wanted the laptop to pivot over towards the passenger seat completely out of the way, if needed. The entire stand is removable from the base or can be locked in place with the small black knob.
The stand was constructed out of an old B-B-Q side shelf and some ?? EMT electrical conduit. I used the long 90 at the top to get the correct angle for the pivot and used EMT clamps to retain it to the shelf. I used some flat steel pieces as a shim to tighten up the EMT clamps. To connect the straight to the 90 I used a ?? black iron 90 with 2 ea close nipples threaded into the pipe 90. I machined down one end of the OD of the close nipples to fit tight inside the EMT then drilled and used a screw to lock the fitting to the EMT.
The base was just a piece of angle iron welded to a flat plate, with a fitting on the bottom center to fit the ID of the EMT, similar to how the close nipples are used above. I welded another piece of tubing at the top of the angle iron for the straight EMT to fit down through. I also welded a piece of square stock at the top of the angle and then drilled and tapped it for the black locking knob.
I installed the base using the existing 3 screws that are used to hold the lower trim in place going down the side of the dash. These 3 screws go into metal framework behind the plastic trim.
The laptop is held in place on the stand using two pieces of ?? strip Velcro wrapped around the stand and laptop. I installed a small DC/AC converter in the small map box below the laptop and that is where the laptop plugs into. This keeps all the cords out of the way. The converter ($25) was easier than running another 120v circuit from the onboard inverter in the MH.
Just about everything here was made out of what I had lying around so a very minimal investment and a good Sat project. Hope it helps someone else looking for a good spot for a laptop.