My Renovation Log

The friendliest place on the web for anyone with an RV or an interest in RVing!
If you have answers, please help by responding to the unanswered posts.

Tiercel

Well-known member
Joined
Jul 20, 2021
Posts
442
Location
Pennsylvania
I am thinking of keeping a log of repairs, etc. This seems like a no nonsense forum. I love that. I don’t offend so if it is your opinion I should drive this rig off a cliff feel free to express yourself. I won’t get offended at you comments if you don’t get offended if I don’t follow all your advice.

2000 Dutchmen Express 29.5’ on a Chevy frame 23,000 miles. Aluminum frame
Known Problems:
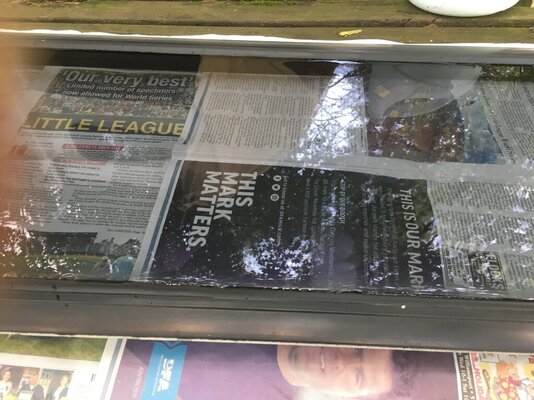
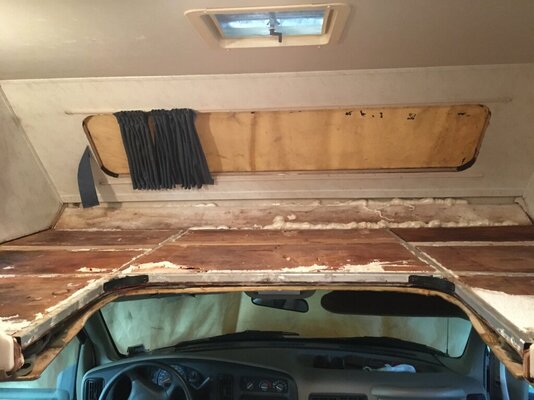
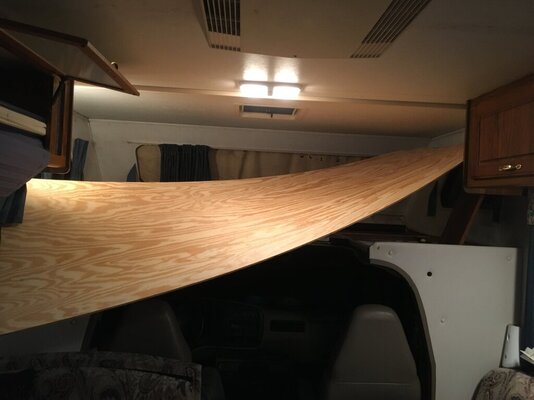
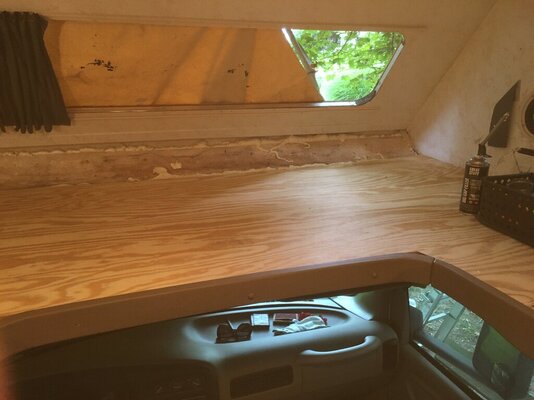
Leaking overhang front window

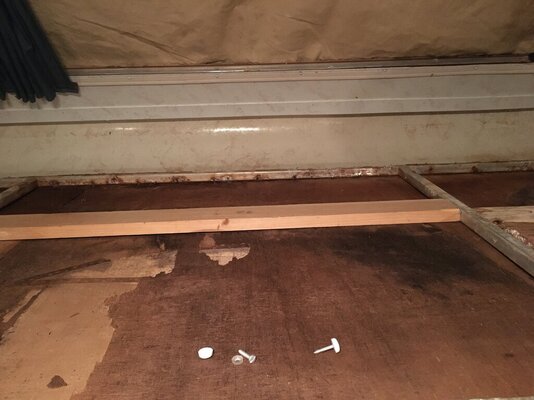
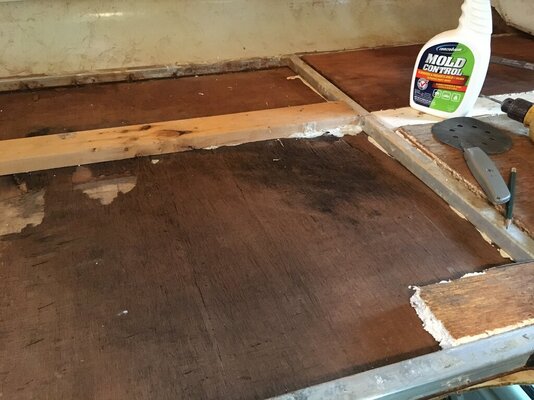
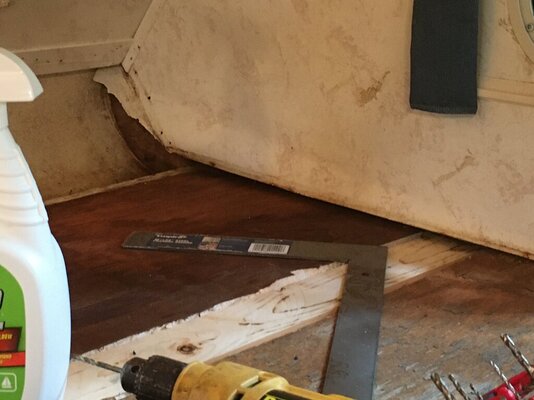
Water damage to overhang floor (significant), lower 6” of overhang walls

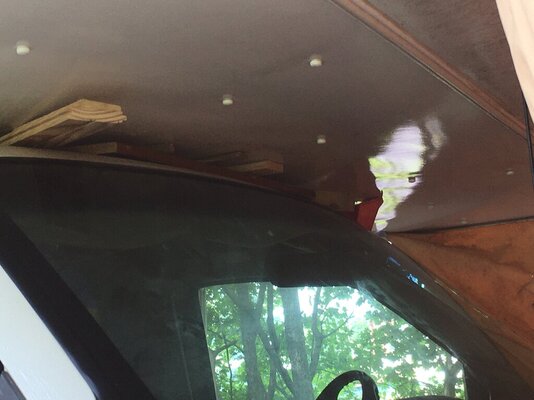
Water damage under Master bedroom emergency window - lo we half of wall needs replaced as well as some delamination in that area

I suspect all windows and every seam needs attention, calk, tape, etc. Roof needs re-coated although ceiling, upper walls all look and feel solid.

20 year old water heater leaks and needs replaced

Holding tanks need thoroughly cleaned and treated (Borax, Dawn, maybe ice)

clean water system as a precaution

need to explore TV options

Need to learn how storage batteries are supposed to work and check condition of these.

Good points:
All appliances and A/C work - nice size refrig with upper and lower doors
no obvious exterior seam damage
carpet and floor surprisingly good
low mileage
lots of gear and supplies included
 
I have removed the overhang floor down to the outside skin. It still has one ply of luan attached that I left.

I will put down 1/4" plywood to replace the 1/8" panel that was on the floor. I am also mounting a few wood cross-members between the aluminum framing. I will attach the outside skin to the wood cross-members with screws from the outside/underside of the overhang and put white caps on the screws. The hope is this will give some support to prevent the weight of the skin from tugging at the seams from constant vibration and bumps of road miles.

I removed the window frame from the MH and removed the window glass from the frame to make sure I get a good reseal.

I ordered a new hot water tank and some Eternal Bond tape to put on all seams.

I tried to post some photos but I need to resize them so they are not so large.
 
Last edited:
I had a good day working on the Cab-overhang. I placed full 1" think wood cross bracing between the aluminum frame. Next, I put Liquid Nails Extreme Construction between the wood cross members and the outside skin (not sure what it is called). The outside skin still had one ply of the luan attached. It was not obvious from the outside, but the exterior had totally delaminated. I drilled down through my cross wood pieces, clear through the outside skin. Then I went outside and slid a plastic collar and a washer over a 1 1/4" screw and fastened the screws to the wood cross members. I then placed white caps over the screws. I put two aluminum screws into the frame using the same washers and screw caps.

This drew the exterior skin (and 1 ply of Luan) up tight to the cross pieces squeezing out the liquid nails.

In all, I used 9 screws. To a non-RV'er, the screws and caps look factory installed—no sense of delamination. However, the skin is tight, and the floor of the overhang is more solid than when it left the factory.

I still have to install the front window, but I have to wait almost a week on the window urethane that I ordered.
 
Tiercel,
You should be keeping a maintenance log already. When you have had the coach very long, everything (essential or not, good times and bad) will be a massive blur.

Apart from the maintenance log (has it really been two years since I changed the oil in the generator?) Start a document in your computer. This should have at least 5 headings.
Needed now - The things you have to do before the coach is usable again / road worthy.
Winter jobs - The things that can wait until you can afford the down time.
Waiting - Those things that you have to locate materials for but don't keep you off line.
Abandon - Things you thought you wanted but now are not sure.
DONE - The BEST heading. Move things here from the above lists and include a date.
Mine is two columns wide and three pages long. We have had the coach for 16 years. It is getting old enough that some things I did do need to be re-done. But we still lover her.

Matt
 
I am going to post some photos. I am not sure about the size or the number allowed.
1. placed wood cross braces
2. Screwd the delaminated outside to the wood braces and aluminum frame (used screws and glue
3. Outside view of the screws, washers, and caps
4. All foam is pack in place ready for phywood floor
 

Attachments

  • Overhang ready to glue and screw.JPG
    Overhang ready to glue and screw.JPG
    116.1 KB · Views: 20
  • Overhang ready to put foam back.JPG
    Overhang ready to put foam back.JPG
    144 KB · Views: 19
  • screw caps 2.JPG
    screw caps 2.JPG
    104.3 KB · Views: 19
  • OverHang ready for plywood.JPG
    OverHang ready for plywood.JPG
    114 KB · Views: 20
I feel like I have been wrestling Sumo wrestlers. I tried to maneuver an 8' x 36" sheet of plywood into an 8'x58" opening. O am not sure it is geometrically possible. I really do not want to cut it. Maybe my son can help me get in.

PS: I got my Atwood water tank today. It will be interesting to see how long it takes to put in a new hot-water tank in the water heater.
 

Attachments

  • Plywood Jam.JPG
    Plywood Jam.JPG
    81.1 KB · Views: 10
The overhang side walls are delaminated on the inside about 4" or 5 " up from the floor but not delaminated on the outside. Since the mattress will cover it, I might leave them for now until I get a few more pressing jobs done, like the water heater and water damage under the Master Bedroom emergency window. That is delaminated inside and out. I might need some advice when I start that.
 

Attachments

  • Overhang sidewall.JPG
    Overhang sidewall.JPG
    106.9 KB · Views: 14
I got the 1/4" exterior-plywood floor down. I swear the hardest part of the entire project was getting that sheet into the overhang. I was about as graceful as a one-legged duck trying to hop south for the winter. I still have one small piece for the nose, and then the mattress goes back in. The mattresses are in great shape because they were removed from the RV years ago at the first sign of a leak.

MY window urethane and calk gun should be here by Monday, so the widow should be back in soon.

I am a total novice to RV's so feel free to advise or critique. There are times I think I might have bitten off more than I can chew but even if it all goes down the tubes it is a small money venture and it is kind of fun. I am reasonably handy but I am slow because I work, and puzzle over the best approach as I go.
 

Attachments

  • Plywood in overhang.JPG
    Plywood in overhang.JPG
    103.5 KB · Views: 20
You certainly have a good project. Thanks for the pictures. Glad you are addressing the mold. Ya, water is always the killer of rv's, how's the roof? Best to use Roof sealant like Dicor on roofs, keep away from silicone in general.
 
Sometimes being newer at stuff and a little slow and hesitant is a good thing. You repair looks pretty darn good.

I can tend to be a bull at a gate in my approach.
 
I apologize but I have always been a man of many questions. On top of that, I am a greenhorn when it comes to RV's
If you have any input on my plans please speak up.

This is my intent with the front overhang window. The frame was caulked to the hard fiberglass shell with some sort of black goop much like the seal between the glass and frame. I expected there to be butyl tape between the frame and RV.
1. I removed the glass from the frame and cleaned the black caulk from the glass and frame track with Goof Off Professional Strength
2. I will put Sikaflex Primerless Urethane Glue P2G Auto Glass Sealant on the frame and ceter the glass on the sealant and apply some pressure to seat it.
3 I will clean the hard fiberglass window opening with mineral spirits then maybe wipe it off with 91% isopropyl alcohol.
4. I will insert new rubber glazing in the window frame.
5 I will apply butyl tape to either the fiberglass opening or the window frame and have my son hold it in place while I insert screws from the inside
6. I will cover it for 24 hours to allow it to set, then trim any butyl tape that squeezes out.
 
Last edited:
I have no critiques to this. Everything you are doing seems very reasonable, possibly even a bit overkill. I flipped houses for years, did much of the work myself. I found that often times with a 'repair with what you have' scenario, you just have to use your experiences. Personally I have never replaced a window in an RV. (I am contemplating adding one to my travel trailer so I am interested if others jump in with pros / cons with what you are doing.
 
As a novice to everything RV, I was a little confused when I went to put butyl tape on my front over-hang window frame to reinstall it. I have 1/8" x 3/4" tape. The flange of my window frame is cupped shaped like a shallow letter "C" shape. I expected it to be flat. The perimeter lip of the frame would just cut the edge of the tape, and the tape is not thick enough to fill the scooped-out profile.

1. Is this the typical shape of RV window frames? It is hard to see that detail on youtube.
2. Should I put two layers of butyl tape around the frame?
3. Should I buy thinker (not wider) butyl tape?
4. Should I use a tube sealant instead of butyl tape?
 
Thanks, Ex-Calif. I kept looking for a reply, and when I did not see any, I figured everyone was practicing tough-love. Thinking, "leave him alone. He will figure something out. It will do him good." :)

So I found your message when I was finished. I think it will be fine. The last two days, I sealed my front window to the window frame with SIKAFlex Auto Glass Sealant Urethane P2G. It requires a 1:26 caulk gun, but I ordered one, and it worked well. After it set-up I laid newspapers on the picnic table and laid the widow on the papers with the outside side up. I filled it with water and waited to see if I had any water make it through to the newspapers. It passed the test. Once you see what water does to an RV and the work to fix it (if you can), you tend to be more careful.

Then I put two layers of1/8" butyl tape around the window frame. It was enough to fill the scooped-out area of the frame. I called my son. He came over, and I put two suction cups (from Harbor Freight about $ 3.99 each). He climbed the ladder and placed the window frame in the opening while I laid in the overhang, putting the screws in. I zigzagged like you would with lug nuts until over half of them were in. After I had them all in, I went back around to put some more torque on them. Some got loose as the butyl tape squeezed down. I was happy to see butyl tape finally squeeze out the whole way around and the frame flange very close to the exterior MH wall (a dime's thickness). After about 6 hours, I went and tightened them more. Depending on the weather, I will trim the excess off tomorrow. I find it hard to believe this window will leak. I really wonder about having to caulk around the window.

photo - a widow full of water.
 

Attachments

  • 37CD3780-D67C-436A-B029-BE44D8B337EA.jpeg
    37CD3780-D67C-436A-B029-BE44D8B337EA.jpeg
    164.9 KB · Views: 15
Last edited:
Another thing I did today replaced some new rubber glazing around the fixed portion of a couple of sliding windows. The window rubber on the MH is bad. It is stiff, shrunk, and sections missing.

I feel like I am beginning to understand RV windows. It still looks like all the water damage to this RV was from window leaks. To make it worse, I suspect that clogged weep holes caused the majority. I certainly am not trying to teach anyone here anything, just thinking out loud. ------->

It seems the rubber glazing does nothing to seal a window but rather contributes somewhat to 3 functions. It helps hold a window in place, it reduces the litter that gets in the window tracks, clogging the weep holes, and it helps shed water so the weep holes can keep up with what does get past the rubber glazing.

if it is damaged or missing:
1. The weep holes clog
2. The frame track now gets flooded because water runs in faster, and the weep holes drain slower.
3. As the track fills, the least flaw in your window seal will let water through to the inside.
4. The interior glues on inside and outside walls immediately fail, and all your wood falls apart. (DELAMINATE)

Writing it out just helps me understand it better.
 
Last edited:

Latest posts

Forum statistics

Threads
131,973
Posts
1,388,466
Members
137,722
Latest member
RoyL57
Back
Top Bottom